Showing posts with label baking. Show all posts

Food, Family, & Traditions

Tuesday, May 3, 2016
For the past couple of weeks, I have been baking and canning jellies and jams to take to our local farmer's market. Believe it or not, it has been a dream of mine to be able to bake and make items to sell. While I would really love to own a little restaurant, similar to what my dad owned, at this time the farmer's market is about all we can handle.

Food, Family, & Traditions www.HensleeFarmAdventures.com
Baked goods for the farmer's market

As I stood last night at my kitchen sink, looking out the window and stemming strawberries to make strawberry jalapeno preserves, I got a strong sense of déjà vu. I realized that the food itself was bringing back memories. Memories of my childhood, of when my mom and dad would can jams and jellies. When we would get together with my grandparents and make pies to go into the freezer for winter. The food connected me to my childhood. In fact if I stood there long enough I could imagine standing at my parents' kitchen sink, looking out their window, helping to get whatever produce was ready to either can or go into the freezer.

Food, Family, & Traditions www.HensleeFarmAdventures.com
Strawberry Jalapeno Preserves and Pepper Jelly

Tradition in our family and in many families can be found in the food that we eat and make. There are certain things that we always make on holidays. For Easter it is ham, deviled eggs, and my grandmother would always make angel food cake with strawberries. For the Fourth of July, growing up we always had watermelon and homemade ice cream. Thanksgiving of course means turkey, our family's special dressing (stuffing), and pumpkin pie. And of course on Christmas we would have homemade candies that was only made during that season.

Food, Family, & Traditions www.HensleeFarmAdventures.com
Homemade deviled eggs, a tradition at many of our family gatherings.

I try to carry on some of these traditions for my children, but I also try to start new traditions for them. They will grow up eating strawberries and pie crust for Easter, and for the Fourth of July, since my daughter is allergic to dairy, there is no homemade ice cream. Instead we stick to fruit kabobs and of course grilled hamburgers and hot dogs.  Thanksgiving we still have our traditional family meal, and for Christmas, I make several of the candies that I grew up with.

Food, Family, & Traditions www.HensleeFarmAdventures.com
Homemade buns using my dad's recipe that he used when he owned the Pastry Shop


One of the best gifts I have received was from my cousin Jim. To most people it would have no value, in fact it really has little monetary value, but to me it is worth everything. It is our grandmother's rolling pin. It still has the dough on it from the last time that she used it. She passed away in February of 1988, I was only 14 years old. When I look at that rolling pin, I think about her and her raisin pie and her stacked applesauce cake. I also think about how much she loved all of her grandchildren and how kind she was to us. I know that when Jim looked at the rolling pin, he had different memories of her, but still loving memories. He is older than me and while we didn't grow up together, we share what matters most, a grandmother, a rolling pin, and sweet memories.

Food, Family, & Traditions www.HensleeFarmAdventures.com
My grandmother's rolling pin.

So as I make the jams and jellies, as I bake my dad's famous hamburger buns that he served at his restaurant, I am making new memories and traditions, while still carrying forward the old. These memories are ones that my children can look back on and remember, fondly I hope. Memories that I hope they will carry on as they raise their children. Memories that are all founded in food.

What food traditions does your family have? Let me know in the comments below.

Throw Back Thursday: Chocolate Chip Coffee Cookies

Thursday, October 22, 2015

The throw-back Thursday recipe post is back!  I know some of you have missed it and to tell you the truth, so have I.  I really enjoy making these recipes and I enjoy remembering the story behind them as well.

Today's recipe comes from my husband.  When we were dating 12 years ago, he decided to try and impress me with his baking ability.  At that time his cooking abilities were just ok at best and so I was a little leery of him cooking me anything.  He went through several recipes and instead of sticking with one (which I thought he should do), he combined several recipes together to make chocolate chip coffee cookies, because he knew I loved chocolate and coffee.

I can admit know that I was worried about tasting them when they were done.  But boy did he surprise me!  He made the most wonderful cookies.  One bite and I was hooked...on the cookie and the man!

I thought I would share that recipe with you today and hope you enjoy it as much as we do.  He still makes them for me, in fact he really wanted to make them for this post, but I asked if I could try my hand at it.  While these cookies turned out really good, I think I should have let him make them.  He definitely has that special touch.

Chocolate Chip Coffee Cookie Ingredients
Cookie Ingredients
So let me say a little something about the ingredients.  It calls for instant coffee.  I normally have instant coffee at home.  Not to drink of course, blech, but to use in various recipes.  Of course when I went to retrieve it, I found out that I was out.  So I decided to try it with regular coffee, but still follow the instructions.  THEN I found out that my husband just makes extra strong coffee and uses that!  Geez! I wish I would have known.  So in the coming pictures you are going to see coffee grounds in the cookies.  Guess what?  It ain't so bad!

First you want to dissolve 1/3 cup of instant coffee in 2 tablespoons of hot water.  Then while it is dissolving (and cooling at the same time), cream together 1 cup of butter and 1 1/4 cups of sugar.

Butter and sugar creamed together
Butter and sugar creamed together.
Once the coffee has cooled, add it to the butter and sugar mixture along with 2 eggs and 1 teaspoon of vanilla and mix well.

Batter with coffee added
See? Coffee grounds.
Then in a separate bowl, mix together 2 2/3 cups of flour, 3/4 teaspoon of baking soda, and 1/2 teaspoon of salt.  Add that to the coffee ground mixture. Once you have that mixed well.  Add in 2 cups or one 12 ounce bag of chocolate chips.

Chocolate Chip Coffee Cookie Batter
Cookie batter, yum, yum!
Drop by spoonfuls onto a greased cookie sheet, or in my case a parchment lined cookie sheet and bake at 350°F for 10-12 minutes or until golden brown.

Chocolate Chip Coffee Cookies Ready to Bake
Ready to go into the oven.

Once they are done, let them cool on the cookie sheet for a couple of minutes before transferring them to a cooling rack.

Chocolate Chip Coffee Cookies
Yummy cookies!
These are so good, even with the coffee grounds.  I love the flavor of coffee and chocolate together and these were perfect.  Well almost perfect. ;-)

If you want a printable version of the recipe, then click HERE.

Try this recipe out and let me know in the comments below what you think.

Throw Back Thursday: Cast Iron Skillet Cornbread

Thursday, September 10, 2015
A while back I promised you a recipe for my cast iron skillet corn bread.  Well now the time has come to deliver on that promise, but before I share that recipe with you, I thought I would tell you a story.

My dad was born in the middle of the great depression.  He was child number 9 out of 12 for my grandparents.  Can you imagine trying to feed that many mouths during good times, let alone during one of the longest economic downturns that our country has ever seen?

I know what helped was the way that they lived.  They had a vegetable garden, and raised their own meat.  They had a milk cow for milk and butter, chickens, and hogs and they had land they could farm. During the toughest of times, my grandfather and the eldest son went away to find work at a logging camp out west.

Growing up, I heard many stories about my dad's childhood.  Those stories would come from various family members and it gave me a real insight into how life must have been during that time.

During one visit with my grandmother's sister, I remember discussing cornbread.  That family was known for their good cooks, and great recipes, so talking about food was not uncommon.  My dad mentioned making cornbread with milk and eggs.  His aunt just looked at him and in the way she would always draw out her words she said "oh honey, you weren't brought up that way."  She went on to explain that they were too poor to make cornbread with anything other than water and cornmeal.  My dad just smiled and gave me a wink.  He didn't argue with her.  He knew that there was a time that cornmeal and water was probably the only way they could make cornbread, but he also knew that when the ingredients were to be had on their farm, milk and eggs were added as well.

I haven't tried my great aunt's version of cornbread, I'm thinking that it is probably a hot water cornbread.  This recipe is going to be more than just cornmeal and water and I can tell you that this version is very tasty!  Even my cornbread hating husband loves this one.

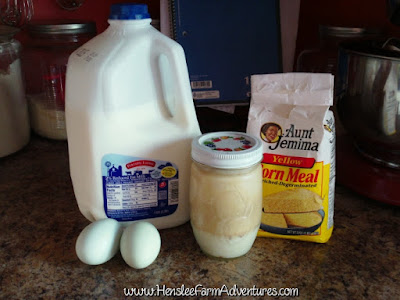
Simple ingredients make for a delicious and cheap recipe!

So here are the ingredients.  You might be asking yourself, "what is in that jar?"  Well that is my secret ingredient and what my grandmother always used, to make her cornbread.  Bacon grease.  I know what you are thinking...heart attack waiting to happen, but the bacon we use is from grass fed pigs.  When I save the grease, I strain it so it is "clean."  And honestly, it gives the cornbread so much flavor.  Trust me.

Not sure about the bacon grease?  Well, I guess you can use oil, whichever one you prefer.  It will still do the job (just not as tasty). :-)

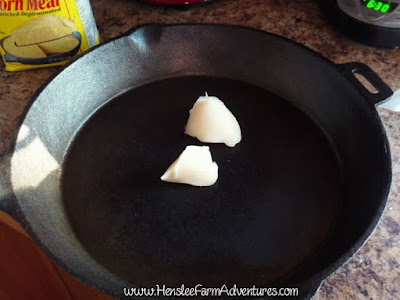
See, that bacon grease doesn't look so bad!

Turn the oven on to 350°F.  Put two spoonfuls of bacon grease, or about 1/4 cup of oil in your cast iron skillet and then put the skillet in the oven.

Next mix together 2 cups of cornmeal, 2 eggs, and 1 1/2 cups of milk.  You can use sweet milk or butter milk, whatever you have on hand.  Mix well.


Once the oven has preheated and the skillet is nice and piping hot, take it out of the oven and pour a little bit of the grease or oil into your batter and stir.
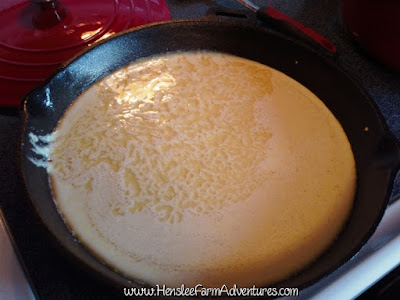
This is the batter ready to be baked.  Thanks to the hot pan, it has already started to brown around the edges.

Then pour the batter into the skillet.  It should sizzle as it hits that pan.  Turn the oven up to 400°F and put the pan back in the oven.  Bake for 15-20 minutes or until golden brown.

Yum, yum!
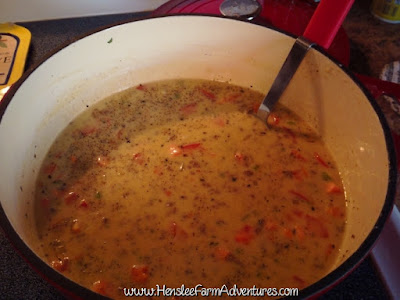
And here is the finished product! This was so good!  I love cornbread, especially with chili, or beans, or a hearty soup.  I even love it as a dessert with honey drizzled on top.  Want to know what we ate with this cornbread? 

Cheeseburger soup!  I'll share that recipe with you very soon!

This was unbelievably good!  One of our family's favorites!
I hope you enjoyed this easy iron skillet corn bread.  If you want the printed version of the recipe, then click HERE.

Let me know in the comments how you make your cornbread.


Smart Strategies to Get Organized for the School Year

Tuesday, August 18, 2015

Anyone who knows me, knows that I am an organized person. In fact my husband can tell you that the messier our house gets the crazier I get. I don't like chaos and clutter. However if you were to walk into my house right now you wouldn't believe a word you had just read. But there is a reason for the mess we have now, which I promise to explain later.

Normally people do fall or spring cleaning when it comes to their house.  And while I do like to tidy up, especially in the spring, my main time to do a deep cleaning is when it is time to go back to school.  I just want the to get the house in order before the whirlwind of school starts and we get busy with activities. 

I normally start this cleaning in July.  Some of the tasks that I tackle are: clean out last year's school papers, go through the kids' clothes to see what fits and what doesn't, take an inventory of all the school supplies we have on hand, and get our command center ready to house school calendars, monthly menus, and weekly newsletters.

This year however was a little different.  My mother-in-law moved from living across the road from us to a nice place in town. Time that I would have normally spent on getting ready for the beginning of the school year was spent getting the stuff we had stored at her house moved to ours, as well as making sure she got completely moved to her new home.  So just enough chaos was thrown at me to almost drive me crazy. :-)
I was able to do a few of my back-to -school organization rituals this year and I thought I would share with you what I was able to do.

The first thing I did was of course go through the kids' clothes.  Both grew about an inch and put on some pounds.  I really wanted to see what the kids needed instead of just buying blindly.  To be honest, both kids have a ton of clothes.  I was able to get two nice size sacks full of clothes that Drew had out grown.  Carly, only a few of her clothes were outgrown.  The good news is that they did not need new clothes OR new shoes.  Thanks to a few new things that my mom and sister had been saving that they had purchased on clearance.  

I was wondering what to do with Drew's outgrown clothes, and I was given a great suggestion.  One of my friends told me that her daughter who is a 1st grade teacher, has had students in the past that had very little to wear.  She asked if I would mind donating my clothes to her daughter to have on hand for the students that needed them.  I thought that was a wonderful idea!  So if you have extra kids clothes and want to donate them, check your local school to see if they need them. 

The next thing I did was get our command center ready.  It is a place that I put the school breakfast/lunch menus, as well as the newsletters that they bring home from school.  I also have a calendar with activities for the month.  It is the only way I can keep organized and remember what each kid has going on.

Cooked and ready to go in the freezer

The last thing that I got done was a little freezer cooking.  We have a deep freeze full of hamburger meat, so I decided to thaw out 5 pounds and I made meatballs and meatloaf.  I used the same recipe for both to make it easy, which you can get HERE. Since the meat had already been frozen, I baked both the meatballs and the meatloaf in the oven, and then froze it.  This will make it super easy to reheat when I need a quick meal during the week.  

All assembled
I also made some breakfast burritos using sausage, eggs, and cheese.  After assembling the burritos, I wrapped them in plastic wrap, then put them in a freezer bag and froze them for a quick breakfast.  

Wrapped up and ready for freezer
I had some sausage left-over so I decided to make those in patties and cook them then freeze for a quick breakfast.  It would be easy to just heat them up and put them in one of my homemade biscuits. (Recipe to follow) :-)

Cooked and ready to freeze

I made some bread for sandwiches when the kids want to take their lunch.  It is cheaper and healthier than store bought bread and it makes some great cinnamon toast for breakfast! ;-)

You can freeze these loaves, but they don't last long enough in our house!
How did you get ready for the beginning of the school year?  Let me know in the comments below!

Throw Back Thursday: Waffles!

Thursday, July 9, 2015


So I have a little secret to share.  I have this obsession... and no it isn't with waffles.  In fact isn't a food item at all, but people use it all the time to create food.  Only my close family and friends know about it, but I thought I would share it with you since it does pertain to this post.  Are you ready? 

My obsession is with...

1958 Crisco Cookbook
vintage cookbooks!

Today's #TBT recipe comes to you directly from a 1958 cookbook that I was able to purchase during a library book sale.  I love it when libraries put books for sale, I can get some pretty cool books for pretty cheap!  And the best part is that my library can use the funds for programs, books, and other resources.  So support your local library!

Ok, back to the recipe.  There are several of my vintage cookbooks that I originally purchased because of the graphics and the era that they were published, but when I got them home, they have become some of my favorite cookbooks to use!  This is one of them.  And while it is a Crisco cookbook, you can adapt the recipe to your liking.  (You don't really have to use Crisco in these recipes.)

That is what I did with this recipe.  I adapted it so that I use grass fed butter and also had to change the liquid amounts so that the batter wasn't too runny.  So without further ado, here is the homemade waffle recipe adapted from a 1958 Crisco cookbook!

Waffle ingredients

Here are the ingredients for the waffles.  They are your pretty basic players for waffles which include flour, salt, sugar, baking powder, milk, eggs, and butter.  

Start by mixing together 2 cups flour, 3 teaspoons of baking powder, 1/2 teaspoon of salt, and 2 tablespoons of sugar.

Dry ingredients, check!
In a separate bowl, mix together the 2 eggs and 1/3 cup of milk.

Wet ingredients, check! (Love that blue bowl!)
Next, melt 1/4 cup of butter (1/2 of a stick).  Add the dry ingredients to the wet, and add in the melted butter. Mix everything together.  You should have a nice sheen to your batter.  After mixing, I like to let the batter rest for about ten minutes.  This is a perfect time to get your waffle iron heated.

Ready and waiting on the waffle iron
Cook the batter on your waffle iron according to the manufacturer's directions.  I know that with mine, it needs to cook for 2 1/2 minutes.  I have a pretty simple waffle iron that I have had for almost 20 years, but it gets the job done!

Now you have a delicious golden waffle, just begging for butter and syrup.

Just add butter and syrup, yum!
What I love about this recipe is that it is so simple!  Just mix everything together and cook.  I'm not much of a morning person, so I really need simple...and coffee.  Lots of coffee. 

The other thing that I love about this recipe is that the leftover waffles can easily be frozen and then popped in the toaster or microwave when you need a quick breakfast.  

To get the recipe click HERE.

Please let me know what you think about the recipe.  Do any of you collect vintage cookbooks?

Throw Back Thursday: Strawberry Pie

Thursday, June 25, 2015


Today's #TBT recipe is not actually an old family recipe.  I actually got this recipe from Pinterest, but did adapt it a little for our tastes and what I had on hand.  So are you wondering why I am not doing a throwback recipe?  Well, I thought I would switch things up a bit.  What is throwback is the act of making the pie.  In my family we would make a day of it and get together making pies to freeze.

When I was little, my grandmother and mom would always spend a day together during the summer making pies to put in the freezer for the winter.  It was usually during a time that we had fruit harvested from our trees.  At the time, between my parents and grandparents we had access to apple trees, peach trees, pear trees, and cherry trees. 

We would spend one day picking, another day preparing the fruit, and then the third would be pie making day.  The pears were the only fruit that we did not make pies out of.  We either ate those right off the tree, or they would be canned to enjoy "as the snow flies" like my grandma would always say. 

I loved these days and have great memories from them.  As soon as I was old enough, I would help them with the pies.  I loved to help roll out the dough and I loved to hear stories that they would tell about when my mom was a little girl.

My sister and I got together and made strawberry preserves one day and we had some strawberries left over.  So I thought it would be great to make a couple of pies.  Since this is a one crust pie, I made one recipe of my Mom's Blue Ribbon Pie Crust recipe, put it in the pie dishes and baked for about 10 minutes.

Then we added strawberries, and made the gelatin syrup to go over the strawberries.  After that, all you have to do is chill the pie, and then enjoy!

You can watch the YouTube video.


Or you can print out the adapted recipe HERE.  The original recipe can be found at With a Grateful Prayer and a Thankful Heart.


Throw Back Thursday: Raisin Pie

Thursday, June 18, 2015
My dad's 80th birthday was not that long ago.  Instead of a cake, he requested that I make him a raisin pie.  He grew up with his mom making these quite a bit.  In fact I remember when I was little she would always make them whenever we got together for a big family gathering.  And let me tell you our family gatherings were big!  My dad had 10 brothers and 1 sister.

I used my grandmother's raisin pie recipe to make this, but I did use my mom's blue ribbon pie crust recipe for the crust.  So this post is just about the filling.  To me it is so good and not too sweet.  And of course it brings back great memories of my grandmother.

To start out you will need to boil the raisins in some water to plump them up.  Here I  have combined the water and the raisins and will bring them to a boil, then turn down the burner and let them simmer for about 25 minutes.

Getting ready to boil
While you are waiting on them to cook, you can go ahead and roll out the pie dough.  After that mix together the sugar, corn starch, and pinch of salt in a separate bowl to add to the raisins later.

After the raisins have simmered, add in the lemon juice, and the butter and stir.  Then add in the corn starch, sugar, and salt mixture to the raisins and mix well.

Pour it into an unbaked pie shell and top it with a top crust and bake it in a preheated 375°F oven for about 45 minutes.  Be sure and check after about 20 minutes to make sure that the edges of the crust aren't burning.  If they are, cover just the edges with foil and continue baking.

Fresh baked pie!
 Once done, take out of oven and let cool.  I made this one day ahead of time.  I normally like warm pie, but in this case I needed that extra day to have plenty of time to make the pie.

Sliced pie
And here is the pie at my dad's birthday party.  I had just sliced it and was getting ready to give him the first piece.

My dad taking the first bite.  Baby Jasper wants a bite, Papa!

Dad gave me the thumbs up on the pie.  So glad that he liked it and that I could make it for him for such a momentous birthday!

Check out my YouTube video of making this raisin pie HERE.

And to print a copy of the raisin pie filling recipe, click HERE.

I hope you all enjoyed this recipe.  Let me know...have you ever had raisin pie?

Throw-Back-Thursday Recipe: Mom's Blue Ribbon Pie Crust

Thursday, June 11, 2015
Welcome to #TBT recipe day!  I love these posts and I am happy that I can share them with you.  What is special about today's post is that I actually have a video for you.  This is the beginning of my video segment on my grandmother's raisin pie.  

My grandmother, or Granny as we called her, was born in 1901.  She experienced WWI as a new bride getting married in 1918 and made it through the depression years with several children.  She also experienced WWII having at least three of her sons serve during that time, but all came home safe.  With my grandfather they raised 11 boys and 1 girl.  They knew hard times and good times.  They had their struggles, but they always survived.  The raisin pie recipe is hers, but we will get to that next week. ;-)

For this week's recipe, I wanted to share my mom's blue ribbon pie crust recipe.  This is the go to crust recipe that my family uses for all our pies.  It is light and flaky, and just down right good!  It is also very easy to make.  

So sit back, sip a tall glass of sweet tea (it is summer after all), and enjoy my mom's recipe!


So let me know in the comments, do you make your own pie crust or buy it?

UPDATE: Get the printable version of the recipe here.

Throw-Back-Thursday Recipe: Banana Bread

Thursday, May 21, 2015
Happy TBT!  Today's recipe comes from my sister who has been making this recipe for the past 30 years.  It has to be the best banana bread that I have ever tasted.  She gave me the recipe about 20 years ago and it is the only banana bread recipe that I will use.  I have tried others, but I just keep coming back to this one.  It is that good!
Nom nom nom...
So I really wanted to post a picture of my sister and me when we were little, but because of our age difference, I didn't really find one.  She is 12 years older than I and was married and out of the house when I was 8.  When I was younger, we really didn't get along that well.  We were too much alike.  But now that we are older, she is one of my best friends!  I admire her so much.  She is such a strong lady and I hope that I can be as strong as she is one day.
My sister and son.
Here she is with my son when he was just 3.  That was 6 years ago!  My how time flies!  Now onto the recipe.

Here are my ingredients ready to go.  You can see that it is all the basics...flour, sugar, butter, egg, milk, baking soda, baking powder, vanilla, salt, and of course bananas.  (If you are wondering, the salt is mysteriously missing.)
Ingredients
If you notice, the bananas are ripe.  Verrry ripe.  To me that is the perfect time to use them to bake with.  With them that ripe, it really brings out the sugar in the banana and intensifies the flavor.  Most people would throw these out, but to me it means fresh banana bread!  Or in this case, muffins.
Very ripe bananas

Preheat oven to 350°F.  Then cream the butter and sugar together.  Make sure that the butter is room temperature so it makes for an easier process.  You can see below I still have some clumps of butter.  No worries, just cream it together a little more.
Butter and sugar

Next add to the butter and sugar the milk, egg, and bananas and mix well.  You may have noticed in my ingredients that I am using almond milk.  I am very happy with the way my baking is turning out with the use of almond milk.  You could also use coconut milk, or just ole plain milk. Then sift together the flour, baking soda, baking powder, and salt and add to the liquid mixture.  Mix it all together.  Last, don't forget to stir in the vanilla.
After all ingredients added
Now you have a choice to make.  You can bake this in a standard size loaf pan for about an hour.  Or make two smaller loaves, or do what I chose to do and make muffins.  For muffins they only need to bake for about 25 minutes or until golden brown and a toothpick inserted in the middle comes out clean.
Ready to eat
And here they are, ready to eat.  The hardest part is letting them cool.  Seriously I could eat all of these.  At one sitting.  No joke.  I can eat them as is, or with a little butter, or some honey.  But you want to know my favorite way of eating these scrumptious muffins?

With homemade strawberry preserves!
So to get the printable form of the recipe click HERE.  And let me know in the comments below what you think about this scrumptious banana bread.

Wondering about my strawberry preserves recipe?  Well, I am going to make you wait for that one.  My sister and I are going to get berries this weekend and work together on putting up some preserves. I foresee a YouTube video in the future. I can't wait!

Throw-Back-Thursday Recipe Post - Simple Yeast Bread

Thursday, May 14, 2015
I just love Throw-Back-Thursday or otherwise known as tbt.  I love seeing all the pictures on Facebook and at times I will get tagged in pictures from my younger days.  I thought it would be a great idea to make every Thursday here a tbt with a great recipe from my parents or grandparents.

So today I am sharing with you a very simple recipe for yeast bread.  This recipe comes from my mom who uses it for her homemade rolls.  When I made this yesterday for my family, I made it into two loaves of bread.

I thought I would share a picture of my mom.  In fact this is my mom and dad circa 1960.  They were not married yet, but I believe that they were engaged at this time.  They were on their way to my dad's brother's wedding.  I just love the clothes, the hat, the gloves.  Ah, why can't we dress like that anymore?
My mom and dad circa 1960
 Anyway, back to the bread.  Have you ever gotten recipes from your family and just by looking at it you know that not all the steps are included?  Well this is how this recipe was.  Luckily I love to bake and I knew the steps to making the bread.  I will of course include the steps here for you.

So the recipe that my mom gave me was this:

Yeast Bread
2 cups warm water
1/3 cup sugar (a little more)
1/4 cup melted shortening (not oil)
1 egg
2 pkgs yeast
1 1/2 t. salt
6 cups flour

Mix first 6 ingredients together.  Place in a greased bowl and cover.  This will also keep in refrigerator.

That's it.  That's all she wrote. Literally. Now if you follow these directions, you add in all the ingredients except for the flour.  Then place in a greased bowl and cover.  So like I said before I think there might be a few steps missing. ;-)

So here are my ingredients that I have ready for the bread.  I just have to say that I love my little baking corner that I have set up in my kitchen.  It makes it so handy to bake, and cook for that matter!
My ingredients
I do mix the first 6 ingredients together and that is what you see next.  Actually you see them before I mix them together.
First 6 ingredients
Next I add the flour.  I first add 3 cups and mix it up.  Then I add another 2 cups and mix that.  That is what you see below.  It is a sticky dough and it still needs more flour, but I like to add that last cup as I am kneading the dough.
After 5 cups of flour added
So here is my dough after I have kneaded the last cup into the dough.  You want a nice and soft smooth dough.
Kneaded dough
Now this is where you will put it in a greased bowl and cover.  From here you have two options.  You can let it rise which is what I did.  You want it to rise until doubled which for me was about an hour.  Or you can put it in the refrigerator overnight and take it out the next day to get it ready for the second rising.
After first rise
So here you see how my dough has doubled.  I need to take out the dough and divide it in two equal parts.
Ready for second rising
I form each of those parts into loafs and put them in a greased loaf pan.  Now they are ready to rise for the second time.  This time it will only take about 30 minutes to rise.  Be sure and keep an eye on your dough.  I know from experience that I have let it risen too long (because I forgot about it) and they fell.  :-(
Ready for oven

Now they are ready to bake in a 350°F preheated oven.  They will need to bake for 25-30 minutes. See my beautiful loaves below!  Now the hardest part of the whole recipe is waiting until they are cool to slice into them.
Beautiful baked bread!
What a beautiful soft bread!  Tastes so wonderful and I love this bread toasted with some homemade jelly on top!  To get the printable version of this recipe, go here.

Pass the jelly, please!
Tell me in the comments below what you think of this recipe and let me know if you have a favorite bread recipe.

©HensleeFarmAdventures.com. Powered by Blogger.

Search This Blog

Back to Top