Throw Back Thursday: Embracing the "Lasts"

Thursday, August 27, 2015


 I'm taking a one week break from my regular throw back Thursday recipe post. I'm sorry to those who look forward to seeing it each week, but I promise I'll have one next week. 

Mama's birthday and Drew at nine months

There has been something that has been weighing on my heart and I just had to write about it.  In fact just thinking about it, I can already feel the tears start to well in my eyes. I'm sure at one time or another all moms go through this but I just didn't expect it to happen to me this soon.

Mama tickling Drew at two-years-old
So here it goes. My son is growing up. There. I said it. Yes I know that all kids grow up, but this is different. I was okay with him growing up into a toddler.  I was okay when he started preschool. I was okay when he started kindergarten. Alright, that last one is a lie. I was a complete basket case when he started kindergarten, but you catch my drift.  I knew he had to grow up, and I was going to be a strong mom.  I just knew it wouldn't bother me one bit! 

Mama kissing Drew at three-years-old
I used to imagine what kind of a man my son would become.  While I definitely did not want to wish my life or his away, I was excited to see the kind of person he would grow into.  I didn't think that him growing up would actually affect me.  I wasn't going to be like those other moms, the ones that cry and lament that their baby is gone.  No, I was going to relish the wonderful young man my son was becoming.  After all, it is just a fact of life and it has to happen!

Drew missing his two front teeth at four-years-old
Then things started happening this summer. Things I weren't prepared for.  I had to stop using the child-size hangers for his clothes and had to buy the adult-sized ones so his shirts would not fall off.  I began to notice that when I folded the laundry it was getting harder to tell the difference between his socks and his dad's socks.  I went to put on a pair of his flip flops he left beside the door so I could run out to the car. And they fit!  I looked at him sitting beside his dad on the couch one evening, and I noticed there wasn't as much of a size difference anymore.  But where it really hit me was when I took him to the dentist right before school started, and I was told that he had no more baby teeth.  It was all I could do to keep it together right there in the dentist's office!  The hygienist took one look at my face and knew I was about to lose it.  She had sympathy in her eyes for me and told me it was going to be okay. 

Drew at six-years-old right after a soccer game

That's when I knew. No longer am I just experiencing the "firsts," but now I have started experiencing the "lasts" with him. Before I had always thought about beginnings, and new things that my kids discovered, never the last thing they would do. And that is why this mother's heart is breaking.

Drew at seven-years-old having a shake with his aunt

I can no longer pick him up and carry him...when was the last time for that, how did I miss it?  No more tooth fairy...what night was the last time for that, why didn't I realize it?   I know he doesn't believe in Santa anymore from the things he says, but he keeps it quiet because of his little sister...when was the last time he believed? Last year? The year before that?  Where was I?  Why didn't I see this happening?

Drew at eight-years-old gearing up for football season

My heart aches and my eyes are stinging with tears.  My baby has grown.  He is growing.  And there is nothing I can do about it. Nothing.  I'm not sure how I am going to handle this.  I'm not sure I'm going to be able to keep it together.  So I might have to reckon with myself that I have become one of those moms.  And you know what?  I'm okay with that. 

Drew at nine-years-old with a new haircut
Even though he is growing up fast, and he will soon be an official "tween," he still comes and gets in bed with me every morning.  He still asks "Mama will you hold me?"  And as I put my arm around him, I can't help thinking, will this be the last time? I know that day is coming. I'm not sure how I will handle it when I wake up one morning realizing that it has come.  But for now I am just going to cherish each one of those mornings...until the last

How to Make Raised Garden Beds for a Fall Garden (Absolutely Free!)

Tuesday, August 25, 2015

Some of you may remember me mentioning that my garden didn't do well this year.  To be absolutely honest that is an understatement.  It really did nothing at all.  I was able to pick some shelly beans which I saved for seed, and I got a few cucumbers out of the garden.  That was it.  My husband says that it was because we bought a new pressure canner.  We jinxed ourselves.  I say it was because of all the rain we got, (we are still! trying to fix all the leaks in our roof).   Whatever it was, our garden just sucked!

But not everyone's garden fared poorly. My niece's garden did great this year.  The rain didn't seem to bother her's at all.  I am so jealous happy for her. :-)  So what was the difference between her garden and ours?  Her's was a raised bed garden.  Ours was straight in the ground.  I probably don't have to explain that with hers the water was able to drain, while ours was sitting in water.  In fact our garden looked like a pond in some places!


So while our garden did not do well at all this summer, we are not people who give up easily.  I talked my husband into building some raised beds for us to plant our fall garden.  It really wasn't that hard to persuade him.  I asked and he said yes.  The ones he built are small so that we can try them out and see how we like them.  Also they were built from lumber we already had on hand, which also determined the size.  After all, that is the point of being sustainable, right?  


I decided if we were going to do this, I should read up on raised garden beds.  I already had a plan in mind and I was able to get some newspapers from the local library that they were going to discard. I thought newspapers would be great for putting down first to keep the grass and weeds out of the garden. Then I read where cardboard really is better because it breaks down slower.  I was in luck, because of just moving my mother-in-law, we had lots of cardboard that we hadn't gotten around to recycling yet.  Since I had both, I decided to use cardboard in one and newspaper in the other to see what works the best.  I will have to let you know after this gardening season.


So to begin, the garden bed is just a box.  We already had these put together.  In fact they are parts of a porch railing which we took out the slats.

It began life as a railing...
Then we put two together to make it deeper.  We wanted to make sure that there was enough root space for the vegetables to take hold.

Stacking one on top of the other.
Steve screwed the two together to that they would be more stable.

The perfect size!
Then we set them where we wanted.  We decided we wanted them just outside our garden area, that way it would be easy to transplant in the spring.  Our garden proper, will soon become a chicken run once again (the perfect pest control!).

After that, I layered one with newspaper, and the other with cardboard.


From this point on, it is hit and miss on what to do next.  Some used a system that was cardboard, mulch, soil.  Others put the soil right on top.  We decided that on top of the newspapers/cardboard to first put grass clippings (that is our mulch), and then we put some chicken manure on top of that.  I want to stress that the chicken manure that we used was not fresh.  It was from a pile that we had sitting out composting, or as my dad would say it was "seasoned."  

With the grass clippings
Then on top of that we used soil.  We had all of this on hand which is why we used what we did.  The point was to make these without spending any money!

Ready for seeds!
While we were getting these ready and before we actually planted in them (thank goodness!) our dear sweet Abby (our boarder collie) decided she wanted to help.  She did this by digging in them.  So we decided that we needed covers for them.  I was thinking along the line of just laying some chicken wire along the top, which we had plenty of, but leave it to Steve to get all fancy on me.

He actually used a couple of more railing sections and built me covers for my boxes.  He did use chicken wire and he even made me handles for the boxes from scratch!  He used some stout wire that he had to fashion them. 

So here it is in all of its glory.  Steve actually made me two more for a total of three.  I couldn't be prouder of my little raised beds.  The best part is that they cost $0 to make.  

All done and ready for the veggies to grow!
Wondering what I planted?  Well, I used seed that I already had saved so that was something else, I didn't have to buy.  I planted carrots, turnips, peas, spinach, and green beans.  

I can't wait for my little fall garden to start growing and I can't wait to see how these raised beds do.  Hopefully we won't have to worry so much about weeding or getting too much rain.  I'll keep you all posted on how my garden grows. ;-)

So tell me in the comments below, how many of you use raised beds? 

Throw Back Thursday: Spiced Tea

Thursday, August 20, 2015

Sending the kids off to school this morning, I noticed how cool the weather has become.  In fact the temperature is supposed to keep dropping all day.  Even though it is still August, and will undoubtedly become warm again, I can't help thinking that it will soon be fall.

Usually when fall starts, people start talking about pumpkin spice everything.  Don't get me wrong, I LOVE a good pumpkin spice treat, but today's recipe is what I think of when the fall season comes around.

When I was little my grandma and mom used to make this spiced tea mix.  I used to request it whenever it was chilly outside, or I had a cold, or I didn't feel good, or I just had a bad day.  Now that I have a family of my own, I make it for my own kids, and I notice my little girl doing the same thing that I did, requesting it when it is cold, or she just doesn't feel good.  There is something about this tea that just makes you feel better inside.
My grandma around age 18
 It has been awhile since I have posted a #TBT picture of a family member.  This is my grandma that we called "nan."  She was about 18 here which would have made it around 1937.  She passed away a little over nine years ago.  One of the things that I treasure is a copy of her spiced tea recipe in her handwriting.  It is written on the back of an envelope, and when I asked my mom for the recipe, I didn't expect her to give me my grandma's handwritten one.
My grandma's handwritten recipe
You can see the recipe is very simple.  I have seen similar versions of this tea on the internet usually called "Friendship Tea"  and it includes lemonade drink mix.  However, our family never used that version.  I hope you will try this and see how you like it.

So here are the ingredients...

The players...
 The recipe calls for a pound of Tang, a 1/2 cup of instant tea, a cup of sugar, 1/4 teaspoon of ground cloves, and a 1/4 teaspoon of cinnamon.  Back in my days (as my grandma used to always say), Tang came in a pound jar which made it easy for this recipe.  Now however it comes in a 1 pound 4 ounce container.  But if you know your measurements, then you know that 4 ounces equals 1/2 cup.  So just scoop out a 1/2 of cup and enjoy that with your breakfast.  You might also notice that I purchased the decaffeinated version of the instant tea.  This is totally your preference.  I do that because my kids like to drink this tea, and I really don't want them having a lot of caffeine.  Once you have all your ingredients, just pour them all in a mixing bowl.

Ready to get mixed up!
Once you mix it up, it looks like this:
All mixed and ready to go!
I know this sounds crazy, but I think it looks so pretty!  I normally put the mixture back in the Tang container, but I thought I would show you how I package it up to give to people for gifts.
That's a creamer bottle!
I save creamer bottles and wash them really good, take off the label and put dry drink mixes in them.  Some of the drink mixes I do this with besides the spiced tea mix are my homemade hot cocoa mix, and my Fireside Coffee mix.  After I fill the containers, I usually put these in a basket along with some home canned goodies and baked quick breads.  I almost said sweet breads, but I didn't want anyone to confuse that with sweetbreads and think that I give thymus or pancreas to people for gifts. ;-)

After it is all mixed, I use 3 spoonfuls to a mug of hot water.  You can add more or less to your liking.

Mmmmm, hot cup of spiced tea
If you would like a printable version of this recipe, then click HERE.

Let me know what you think about this in the comments below. 


Smart Strategies to Get Organized for the School Year

Tuesday, August 18, 2015

Anyone who knows me, knows that I am an organized person. In fact my husband can tell you that the messier our house gets the crazier I get. I don't like chaos and clutter. However if you were to walk into my house right now you wouldn't believe a word you had just read. But there is a reason for the mess we have now, which I promise to explain later.

Normally people do fall or spring cleaning when it comes to their house.  And while I do like to tidy up, especially in the spring, my main time to do a deep cleaning is when it is time to go back to school.  I just want the to get the house in order before the whirlwind of school starts and we get busy with activities. 

I normally start this cleaning in July.  Some of the tasks that I tackle are: clean out last year's school papers, go through the kids' clothes to see what fits and what doesn't, take an inventory of all the school supplies we have on hand, and get our command center ready to house school calendars, monthly menus, and weekly newsletters.

This year however was a little different.  My mother-in-law moved from living across the road from us to a nice place in town. Time that I would have normally spent on getting ready for the beginning of the school year was spent getting the stuff we had stored at her house moved to ours, as well as making sure she got completely moved to her new home.  So just enough chaos was thrown at me to almost drive me crazy. :-)
I was able to do a few of my back-to -school organization rituals this year and I thought I would share with you what I was able to do.

The first thing I did was of course go through the kids' clothes.  Both grew about an inch and put on some pounds.  I really wanted to see what the kids needed instead of just buying blindly.  To be honest, both kids have a ton of clothes.  I was able to get two nice size sacks full of clothes that Drew had out grown.  Carly, only a few of her clothes were outgrown.  The good news is that they did not need new clothes OR new shoes.  Thanks to a few new things that my mom and sister had been saving that they had purchased on clearance.  

I was wondering what to do with Drew's outgrown clothes, and I was given a great suggestion.  One of my friends told me that her daughter who is a 1st grade teacher, has had students in the past that had very little to wear.  She asked if I would mind donating my clothes to her daughter to have on hand for the students that needed them.  I thought that was a wonderful idea!  So if you have extra kids clothes and want to donate them, check your local school to see if they need them. 

The next thing I did was get our command center ready.  It is a place that I put the school breakfast/lunch menus, as well as the newsletters that they bring home from school.  I also have a calendar with activities for the month.  It is the only way I can keep organized and remember what each kid has going on.

Cooked and ready to go in the freezer

The last thing that I got done was a little freezer cooking.  We have a deep freeze full of hamburger meat, so I decided to thaw out 5 pounds and I made meatballs and meatloaf.  I used the same recipe for both to make it easy, which you can get HERE. Since the meat had already been frozen, I baked both the meatballs and the meatloaf in the oven, and then froze it.  This will make it super easy to reheat when I need a quick meal during the week.  

All assembled
I also made some breakfast burritos using sausage, eggs, and cheese.  After assembling the burritos, I wrapped them in plastic wrap, then put them in a freezer bag and froze them for a quick breakfast.  

Wrapped up and ready for freezer
I had some sausage left-over so I decided to make those in patties and cook them then freeze for a quick breakfast.  It would be easy to just heat them up and put them in one of my homemade biscuits. (Recipe to follow) :-)

Cooked and ready to freeze

I made some bread for sandwiches when the kids want to take their lunch.  It is cheaper and healthier than store bought bread and it makes some great cinnamon toast for breakfast! ;-)

You can freeze these loaves, but they don't last long enough in our house!
How did you get ready for the beginning of the school year?  Let me know in the comments below!

Throw Back Thursday: Lazy Woman's Cobbler

Thursday, August 13, 2015

 I can't tell you how excited I am about sharing this recipe with you.  This is one of my favorite desserts!  This recipe comes from my grandmother, but don't let the name of the recipe fool you, she was anything but a lazy woman!

What I love about this recipe is how quick and easy it is!  And sometimes, that is what you need.  In fact it is one of those recipes that you can quickly put together if you have surprise company come.  The great thing is that they will think you spent a lot of time on this one.

So without further ado...the ingredients are all staples that you probably have in your pantry.  For the topping or filling, you can use any fruit or pie filling you like.  My favorite is to use apple pie filling.  My mom likes to use a can of peaches that she spices up with a little cinnamon and nutmeg.  Whatever you choose, you really can't go wrong.

The players...
 The first thing to do is to get that stick of butter and melt it.  But you want to do it the easy way.  While you are preheating the oven to 350°F, put the butter in your 9x13" pan and let the oven melt it for you.

Next, you want to mix together 2 cups of flour, 2 cups of sugar, 2 cups of milk, 2 teaspoons of baking powder and a pinch of salt to make your batter.

Batter consistency...

This cobbler has a cake-like consistency rather than a pie.  Which is probably why I like it so much! Once your butter is melted, pour the batter right in the pan with the melted butter. 


Batter swimming in a sea of butter...yum!

Then you can add your fruit or pie filling.  Like I said, I love to use apple pie filling.  The only other thing that I add is a little bit of apple pie spice on top.

Ready to go into the oven


Then bake in the preheated oven for around 45 minutes or until golden brown. 

All it needs is a little ice cream!


Once you dip into this you get a cakey, fruity goodness that just can't be beat!  It is so good warm and a little scoop of ice cream on top. 

So try out this recipe and let me know what you think of it.  Let me know in the comments below what your favorite fruit would be to use with this recipe.  Cherry would also be great, but I have another recipe that uses cherry pie filling to make a Cherry Slice Cake.  That post will be coming soon!


And of course, to get the printable version of the recipe, click HERE.

Back-To-School Backpack Craft!

Tuesday, August 11, 2015


This week marks the beginning of the school year for my kids.  It is hard to believe that summer is over.  In fact tonight is the kids' sneak peek.  We get to go to school, see their classrooms, and meet their teachers.  It is a pretty exciting time.

I have been wanting to do more craft posts, or at least a craft post.  So last week, I thought it would be neat if the kids made something in preparation for the upcoming school year. 

I dug through my craft supplies, but didn't really find what I was looking for, so I decided to head out to our local Dollar Tree. 

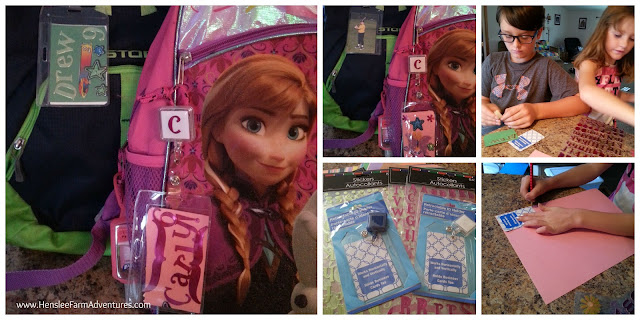
I searched the aisles looking for that perfect craft project, when I found some I.D. badges and some stickers. I thought it would be a great idea for them to decorate these to put on their backpacks. 

I added in some of my own construction paper and more stickers to round it out.

The kids traced around the card that came with the I.D. badge onto some construction paper, and from there they decorated it with stickers.  What I love was that the artwork can be switched out if they want something different.  And it only cost $2.00 a piece for both. 

Having fun creating!

I loved this super easy and quick craft.  The kids loved decorating it like they wanted, and it was an easy clean-up. 

I do wish I would have had some scrapbook paper that they could have used instead of construction paper, but I was trying to keep the cost down and use items I already had on hand. 

So back to school we go!  I hope you all had a wonderful summer!  When do your kids start school?

Zucchini Pickles and Other Things

Thursday, August 6, 2015
I know that on Thursdays I usually post a Throw-Back-Thursday recipe, but things have been kind of crazy this week.  Instead I thought I would post a little update as well as show you what I did with two different leftovers I  had.

First, for the update or as my title suggests the other things...

I have been trying very hard to post regularly, however with posting to both my blog and my YouTube channel, it has not been easy to be consistent.  I have come up with a schedule that I think will work.  You can expect a blog post from me every Tuesday and Thursday.  As for YouTube videos, look for those on Monday and Friday.  Hopefully this new schedule will help with getting more content to you.

Also thank you to all those that have requested certain content.  First it lets me know that you are reading/watching and second it lets me know what you want.  So next week expect a back-to-school craft post which the kids loved doing, and of course my regular Throw-Back-Thursday recipe post, which is one of my favorite recipes!  It is super easy, and I can't wait to share it with you!

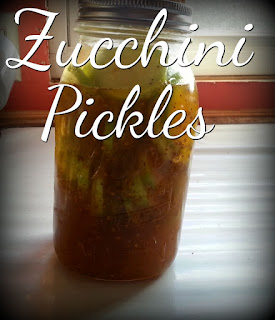
So now for my leftovers.   I was cooking some zucchini the other night, and my little girl wanted to help.  I couldn't say no, I think it is so important to let kids help in the kitchen.  But by the time we were done prepping the zucchini I had more than what I wanted to cook.  Then I remembered that I had some left over brine from my Bread & Butter Pickles that I had recently made.  I have never made zucchini pickles, but I thought hey, why not?

Leftover brine...
So I got my brine out of the fridge and decided to put the sliced zucchini in.  If you remember from my Bread & Butter Pickles post, you don't have to can them, you can put them in the fridge and eat as is.  Of course you want to let them sit for about a week.

Ready to go in the fridge
So after sitting for a week, I finally tried them, and they are really good!  Now I just need to make some brown beans and cornbread to go with them.

Mmmmmm, iron skillet cornbread
Don't worry, the recipe for this homemade cornbread can be found here! I hope you try these pickles out and I am so glad I didn't throw that brine out!  I knew I could use it for something!

Let me know below what kind of vegetables you like to pickle. 

Homemade Kefir Bread - A Bread Machine Recipe

Tuesday, August 4, 2015


How many of you have had kefir?  To be honest, even though I had seen it in stores, I really didn't pay any attention to it.

Then the other day, my sister texted me and asked if I wanted all the ingredients to make kefir.  The catch?  It had to be made immediately.  So before I said yes, I started doing some research online.  I realized that it wasn't that hard to make, and it was very good for you, so I said yes!

Once you get started making kefir, it just keeps going.  The grains grow or expand and you can use them over and over.  In fact, once they get to a certain size, you can even share them with friends.  You can see how to make kefir by watching my YouTube video.

Kefir is a great probiotic.  Like yogurt it provides the good bacteria needed in your gut.  In fact, it is even more powerful than yogurt!  It also provides great nutrients that your body needs like protein, calcium, magnesium, vitamin B12, and so on.  It also has antibacterial properties and can help aid in bone health.  The list goes on and on.

I decided that I wanted to do something different with the kefir.  I love bread.  I know there are different ideas on whether or not bread is good for you, but there is just no way that I can ever do without it.  So why not try and make it as healthy as possible? 

For the ingredients, I use a non GMO unbleached white flour, a non GMO evaporated can juice sugar, grassfed butter, and homemade kefir.  My salt and yeast are plain janes. :-)

Kefir bread ingredients...if you look real close you can see a tomato and cucumber peeking out.
For my ancient bread machine (which still works so hey, why get a new one?) I need to put the wet ingredients in first, then the dry, with the yeast on top.  I then select the "Normal" bread machine setting and push start.
If it ain't broke, don't fix it!
The cycle takes 2 hours and 40 minutes.  It was the longest time of my life.  The aroma of the bread baking was so good, I couldn't wait.

And then, it made the prettiest loaf!  I usually use a standard bread machine recipe, and last night when I wanted to make some bread, I couldn't find my old stand by recipe.  So I used the basic ingredients that I always use, only added in kefir.  Also my standard recipe calls for shortening, which is why I used the butter.  I did cut down on the yeast a little bit because the kefir also helps with the rising. 

Can't wait to eat a slice!
I had to wait till the morning to actually slice into this loaf and taste it.  I love the texture!  It is dense, but light and soft.  It will make a great sandwich bread.  You can actually taste the kefir in it and it reminds me a little of sourdough.  It is soooo good!

I hope you enjoy this recipe and let me know below how you use kefir.

To get the print version of the recipe, click HERE.
©HensleeFarmAdventures.com. Powered by Blogger.

Search This Blog

Back to Top