Showing posts with label Our Videos. Show all posts

Carly Learns to Sew - A Video

Friday, January 29, 2016
There are some pretty important life-skills that you need to learn if you want to become self-sufficient. Actually I think they are important to learn no matter where you live or what you do for a living. Some of these include:

  • Cooking
  • Gardening
  • Learn to can
  • Home maintenance/repair
  • Woodworking
  • Sewing
To me it is important to teach my kids these skills and start as early as possible.  By the age of 2, Carly could crack an egg into a bowl (without getting any shells into it) and mix it up ready to be cooked for scrambled eggs.  By age 5, Drew could cook the scrambled eggs with some supervision of course.  They learned at an early age how to sort their clothes, put them in the washing machine, add soap and start it.  They also help me every summer in the garden planting, weeding, and picking.  They each have their chores to do when it comes to the animals, and Steve has already started teaching Drew how to build small items.

My mother-in-law and I have been working on reupholstering a footstool.  This is something that I have wanted to learn how to do, and there really is more involved than I thought there would be. Don't worry there will be a series of posts in the near future so you can see the steps involved and the finished project. :-)

While we were working on this, Carly wanted desperately to learn to sew with the sewing machine. She has already had lessons in using a needle and thread, learning the blanket stitch and the running stitch, but the sewing machine was calling to her.  (She takes after her mama.)

So we took time out to let her sew a little pillowcase.  I videotaped it and it is on our YouTube channel.  Be sure and watch to the end and see what happens.  


If you haven't watched any of our videos, now is the time to start.  You can see some tutorials as well as some fun stuff, our adventures that we have on the farm.

Don't want to miss any of our videos?  I don't blame you!  Be sure and subscribe and you can catch them all!
Gardening in Winter: A Cold (Frame) Story

Monday, January 4, 2016
It has been a very mild December for us here in Missouri.  We were thankful for the weather that we did have as we laid Tippy to rest in our orchard.  Tippy was our dear sweet kitty.  She will be missed, and there is quite a void in our house without her.  Sox our other cat grieved over Tippy.  I didn't realize how much her passing would affect him, but it did, it affected all of us.

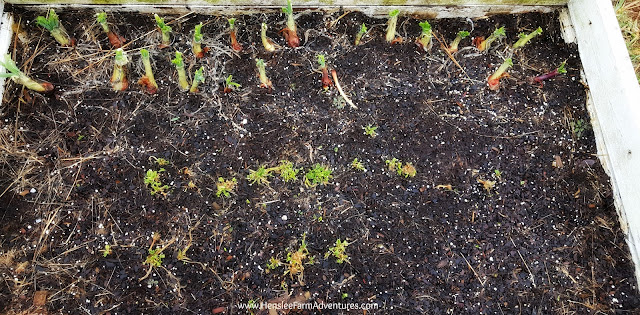
On the day we buried Tippy, the weather was very mild and we decided to take a little walk around our farm.  As we went buy our raised garden beds, I noticed some growth.  Some of our onions and spinach are growing.  I knew we had some old windows that we were saving to use for a greenhouse, so I asked Steve if he could fashion a cold frame for me.

Gardening in Winter: A  Cold Frame Story www.HensleeFarmAdventures.com
Little onions and spinach growing. 
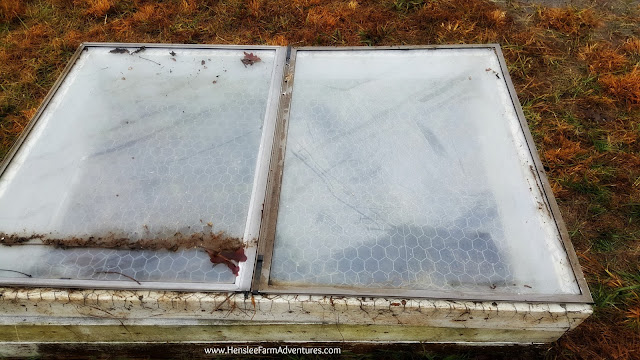
I have wanted to try and grow vegetables during the winter months, and I thought this was the perfect time to start my hand at it.  I'm not sure if this is going to work, but I will let you know.  With the raised beds, all we did was use one of the covers that Steve built, and then put the windows on top to create a greenhouse effect.  I will have to keep a close eye on them to make sure that they are getting enough water, and sunlight, but not burning up either.  A true cold frame would allow you to raise the glass so that the heat it generates from the sun does not burn the plant up.  At this time, we do not have this feature which is why I need to keep a close eye on it.

Gardening in Winter: A Cold Frame Story www.hensleefarmadventures.com
Our windows sitting on top of the cover on our raised garden bed. 
If you would like to watch the video I have it shared below.  It also shows you a beautiful view of our creek. If you would like to see more of our videos, then check-out our YouTube channel. 


Let me know in the comments below, have you ever gardened with a cold frame?

Building Shutters!

Friday, December 18, 2015
Our house, not only has new siding (check out the video here), but now new shutters!  The place looks so much better and we are so excited with how things are working out.  The weather has been cooperating and we have actually had time to be able to work on our place.

The next stop is inside to update some things in the house during the cold days of winter.  I know we will share all of those projects with you, but first I wanted to share our video on how Steve built the shutters for us.  (I love that the thumbnail is of our sweet little Abby!)


Here are some pictures of the finished project.

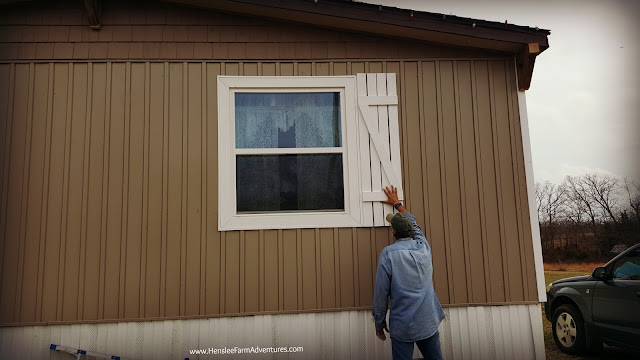
Checking the Shutters
Seeing what it will look like.
We of course had to see what it would look like before actually attaching them to the house.  I think it looks pretty good.

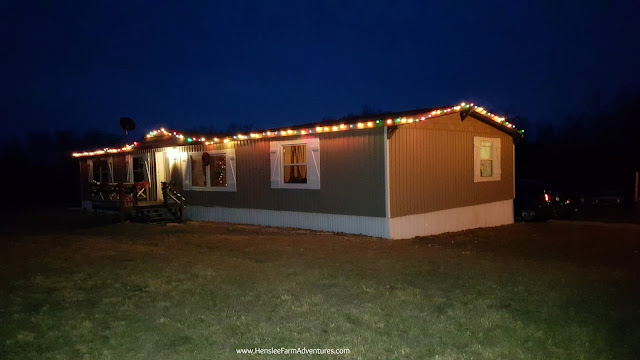
Christmas Lights
All done!
Here is a picture with the shutters done.  I love how it makes the place look!  A far cry from our old siding and shutters!

Close-up of Shutter
Close-up
This is my favorite picture.  A close up of the shutters, with the Christmas tree in the background.  We are so happy with how it turned out!

So check out our video above and see how we made these shutters.  And let me know in the comments below what you think.

Homemade Kefir Bread - A Bread Machine Recipe

Tuesday, August 4, 2015


How many of you have had kefir?  To be honest, even though I had seen it in stores, I really didn't pay any attention to it.

Then the other day, my sister texted me and asked if I wanted all the ingredients to make kefir.  The catch?  It had to be made immediately.  So before I said yes, I started doing some research online.  I realized that it wasn't that hard to make, and it was very good for you, so I said yes!

Once you get started making kefir, it just keeps going.  The grains grow or expand and you can use them over and over.  In fact, once they get to a certain size, you can even share them with friends.  You can see how to make kefir by watching my YouTube video.

Kefir is a great probiotic.  Like yogurt it provides the good bacteria needed in your gut.  In fact, it is even more powerful than yogurt!  It also provides great nutrients that your body needs like protein, calcium, magnesium, vitamin B12, and so on.  It also has antibacterial properties and can help aid in bone health.  The list goes on and on.

I decided that I wanted to do something different with the kefir.  I love bread.  I know there are different ideas on whether or not bread is good for you, but there is just no way that I can ever do without it.  So why not try and make it as healthy as possible? 

For the ingredients, I use a non GMO unbleached white flour, a non GMO evaporated can juice sugar, grassfed butter, and homemade kefir.  My salt and yeast are plain janes. :-)

Kefir bread ingredients...if you look real close you can see a tomato and cucumber peeking out.
For my ancient bread machine (which still works so hey, why get a new one?) I need to put the wet ingredients in first, then the dry, with the yeast on top.  I then select the "Normal" bread machine setting and push start.
If it ain't broke, don't fix it!
The cycle takes 2 hours and 40 minutes.  It was the longest time of my life.  The aroma of the bread baking was so good, I couldn't wait.

And then, it made the prettiest loaf!  I usually use a standard bread machine recipe, and last night when I wanted to make some bread, I couldn't find my old stand by recipe.  So I used the basic ingredients that I always use, only added in kefir.  Also my standard recipe calls for shortening, which is why I used the butter.  I did cut down on the yeast a little bit because the kefir also helps with the rising. 

Can't wait to eat a slice!
I had to wait till the morning to actually slice into this loaf and taste it.  I love the texture!  It is dense, but light and soft.  It will make a great sandwich bread.  You can actually taste the kefir in it and it reminds me a little of sourdough.  It is soooo good!

I hope you enjoy this recipe and let me know below how you use kefir.

To get the print version of the recipe, click HERE.

Throw Back Thursday: Strawberry Pie

Thursday, June 25, 2015


Today's #TBT recipe is not actually an old family recipe.  I actually got this recipe from Pinterest, but did adapt it a little for our tastes and what I had on hand.  So are you wondering why I am not doing a throwback recipe?  Well, I thought I would switch things up a bit.  What is throwback is the act of making the pie.  In my family we would make a day of it and get together making pies to freeze.

When I was little, my grandmother and mom would always spend a day together during the summer making pies to put in the freezer for the winter.  It was usually during a time that we had fruit harvested from our trees.  At the time, between my parents and grandparents we had access to apple trees, peach trees, pear trees, and cherry trees. 

We would spend one day picking, another day preparing the fruit, and then the third would be pie making day.  The pears were the only fruit that we did not make pies out of.  We either ate those right off the tree, or they would be canned to enjoy "as the snow flies" like my grandma would always say. 

I loved these days and have great memories from them.  As soon as I was old enough, I would help them with the pies.  I loved to help roll out the dough and I loved to hear stories that they would tell about when my mom was a little girl.

My sister and I got together and made strawberry preserves one day and we had some strawberries left over.  So I thought it would be great to make a couple of pies.  Since this is a one crust pie, I made one recipe of my Mom's Blue Ribbon Pie Crust recipe, put it in the pie dishes and baked for about 10 minutes.

Then we added strawberries, and made the gelatin syrup to go over the strawberries.  After that, all you have to do is chill the pie, and then enjoy!

You can watch the YouTube video.


Or you can print out the adapted recipe HERE.  The original recipe can be found at With a Grateful Prayer and a Thankful Heart.


My #TBT Peanut Butter Cookie Recipe - Update

Friday, June 12, 2015

I am so excited that one of my follower's has not only tried my #TBT Peanut Butter Cookie recipe, but she made a video about it!  I love it when people enjoy my recipes!  Please check out her video below, and check out her YouTube channel as well!  Thanks Kristin!


Throw-Back-Thursday Recipe: Mom's Blue Ribbon Pie Crust

Thursday, June 11, 2015
Welcome to #TBT recipe day!  I love these posts and I am happy that I can share them with you.  What is special about today's post is that I actually have a video for you.  This is the beginning of my video segment on my grandmother's raisin pie.  

My grandmother, or Granny as we called her, was born in 1901.  She experienced WWI as a new bride getting married in 1918 and made it through the depression years with several children.  She also experienced WWII having at least three of her sons serve during that time, but all came home safe.  With my grandfather they raised 11 boys and 1 girl.  They knew hard times and good times.  They had their struggles, but they always survived.  The raisin pie recipe is hers, but we will get to that next week. ;-)

For this week's recipe, I wanted to share my mom's blue ribbon pie crust recipe.  This is the go to crust recipe that my family uses for all our pies.  It is light and flaky, and just down right good!  It is also very easy to make.  

So sit back, sip a tall glass of sweet tea (it is summer after all), and enjoy my mom's recipe!


So let me know in the comments, do you make your own pie crust or buy it?

UPDATE: Get the printable version of the recipe here.
©HensleeFarmAdventures.com. Powered by Blogger.

Search This Blog

Back to Top