Throw Back Thursday: Homemade Pancake Syrup!

Thursday, July 30, 2015

Here lately, my recipes for #TBT have not necessarily been old recipes.  And that's okay.  They have been based on old recipes, or maybe based on a memory from my childhood.  This is another one of those recipes.

Growing up, we normally used store-bought syrup for our pancakes and waffles.  If we ran out of syrup, then we would use homemade jelly.  Occasionally though, my mom would whip up a batch of a homemade syrup using sugar and water so that we still had something to pour on.

I've seen a lot of recipes for homemade pancake syrup and I have tried some of them.  What I have a problem with is that the majority of them are too sweet for my tastes.  So I started experimenting with different recipes and I think that I came up with the perfect homemade syrup that is not too sweet, yet still yummy enough that even the kids love it!

The great thing about this syrup is that I can control the ingredients that I use, so it is not as bad as the store-bought syrups.  Also it is very economical!  And the best part, is that it is easy to make!

The ingredients are very simple as you can see below.  The only thing that I don't have pictured that you need is the water.
Ingredients you probably already have on hand!
Combine in a sauce pan 1 cup of water, 1/2 cup of the white sugar (I use evaporated cane juice sugar that you see in the jar), and 3/4 cup of brown sugar.

 Bring the mixture to a boil over medium heat.  Let boil for 5 minutes stirring frequently.

Boiling syrup
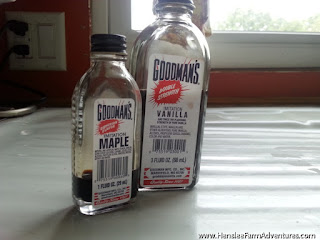
After it has boiled for 5 minutes, take off of heat and add in 1 tsp. of vanilla, and if you like 1 tsp. of maple flavoring.  I love the maple flavoring and to me that is what the syrup is all about.  But if you don't have it, or you don't want to use it, just the vanilla is fine.

My favorite brand of flavorings!  Seriously the best!
Then just pour it on your pancakes.  Or your waffles.  Or your french toast.  You get the picture. ;-)

Yum, yum!


To get the printable version of the recipe, click HERE.

How many of you have made homemade syrup before?  Let me know in the comments below!

Throw Back Thursday: Bread and Butter Pickles!

Thursday, July 23, 2015


Growing up, my mom would always make what she would call Refrigerator Pickles with the excess cucumbers we grew.  I loved these pickles!  Later on, I learned that they were basically just Bread and Butter Pickles.  The only difference is that my mom wouldn't can them.  She had a half gallon glass jar that she would save just especially to make her pickles. 

What is great is if you don't feel comfortable canning, you can always whip up a batch of these and put them in the fridge.  I have also seen recipes for dill versions as well as my favorite sweet and spicy! All of these can be put into the fridge to eat on.  They can last for several months in the fridge.  My mom's recipe says 9 months.  I have seen other recipes say 6 months, and some say 3.  I guess it depends on the type of pickle you are making.

For our family, we just don't have the space for a half gallon jar of pickles in our fridge.  However if you looked in our fridge right now, (I can't believe I'm admitting this) you would see a half gallon jar of dill pickles in there.  I know I am eating my own words, but honestly they were a gift. :-)

So back to the recipe.  As I mentioned in my Fried Green Tomatoes post, our garden is not doing that well.  I have been able to pick a few cucumbers, but not enough to be able to can.  Lucky for me one of our wonderful neighbors shared with us some of his cucumbers.  In fact he shared so many cucumbers that I decided to make a batch of pickles.  Now I already had dill, lime, and sweet and spicy in our pantry, so I thought I would get out my mom's recipe for Refrigerator Pickles and can them. 

So without further ado...here they are.
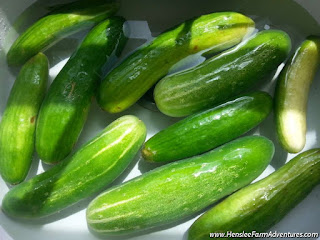
Aren't they beauts?
I did need to wash off the cucumbers, they were just slightly dirty.  They looked so pretty in my sink, I couldn't help but get a shot of them.  Just in case you were wondering, the picture above only shows a portion of the amount of cucumbers we were given.  Our neighbor was very generous!

After I washed them, I trimmed the ends and then sliced them.  This is where a mandolin slicer comes in pretty handy!

All salted and ready to sit
After slicing, you will need to put them in a non-reactive bowl.  I am using a stainless steel bowl, or you could use a glass bowl.  Let them sit for a couple of hours at least and draw off moisture.  While I was waiting for this process, I went ahead and sterilized my jars, washed my lids, and began cooking the liquid.

I completely forgot to take a picture of the liquid cooking, but you just mix together the vinegar, sugar, mustard seeds, celery seeds, and turmeric and bring to a boil.  Once it comes to a boil, lower heat and let simmer till ready to use.

After the two hours, you will need to drain off the water and rinse the cucumbers.  I did this in small batches. 
Some of the water I had to drain off
Once drained and rinsed, then pack the jars with cucumbers.  Pour the vinegar/sugar liquid over the cucumbers and remove any air bubbles.  Adjust with more liquid or cucumbers to within 1/2 inch of head space. 

Finish by processing for 10 minutes in a water bath canner.  I doubled this recipe because of the amount of cucumbers I had and ended up with 16 pints of pickles (say that 5 times fast). 

Can't wait to eat these with brown beans!

I am going to let them sit for a week or two, just to make sure that all the flavors meld together.  But as they sit on my buffet table, it is hard for me to walk past them without opening a jar! 

To get the printable version of this recipe click HERE.

Let me know what you think about the recipe, and let me know what your favorite kind of pickle is.

I Need a Favor From You...

Tuesday, July 21, 2015
I need you to visit a blog for me...

MrsHappyHomemaker
 
The unthinkable has happened.  A young wife has lost her husband, and their three children have lost their father.  This young wife and mother is a blogger.  She now is going to be supporting herself and her children with her blog. 

A blog can support a family, but not without help from all of us.  That is where the favor comes in. I need you to go and visit her blog, print her recipes, share with others.  All of this will help increase the income from her blog.  So as soon as you get through reading this, and trust me, today it is going to be short, click on the link at the top or below.

Also, prayers would be appreciated.  I know I will keep Crystal and her children in my prayers as they try adjust to their new future. 
 

MrsHappyHomemaker lost her husband tragically and unexpectedly. Here is a statement from her.

A Statement from Crystal

Throw Back Thursday: Fried Green Tomatoes

Thursday, July 16, 2015


Welcome to #TBT! Wow, this week has gone by fast!  I can't believe that it is Thursday all ready.  My recipe is really all about the batter.  This is a recipe that my mom gave me more than 20 years ago, and it is one that she has used ever since I can remember. 

Growing up, my parents always had a garden. Always. And I have great memories of summers helping them in the garden, with weeding, picking, canning, and of course eating!  One thing we always had an abundance of was zucchini and squash.  There are many different ways that my mom would fix these, but my favorite would be breaded and fried!

And of course, as soon as the tomatoes turned green and were big enough to pick, we would pick a few just to make fried green tomatoes.  We wouldn't pick too many, because we would want the majority to stay on the vine and ripen and then we would can those.  We would either can them as whole tomatoes, to eat in the winter time or put in soups and chili, or we would make tomato juice which is my favorite!

I would really like to be able to say that the vegetables that I used in this recipe were from our garden.  Alas, with the amount of rain that we received just in the past month (almost 15 inches!) our garden is not doing very well.  The squash came from Tennessee from my Uncle's neighbor.  It was a gift given to us when we were visiting. The tomatoes came from our local farmer's market.  I am very thankful that some people's garden is doing ok.

Here is a copy of the recipe as my mother wrote it. You can tell that it has been used a couple of times. I did not use corn oil for frying.  I used coconut oil and my cast iron skillet.  I did not use 1 quart of oil either.  If you notice my mom's note, she doesn't use this much oil.  You can use this batter for any veggies that you want, and my mom has even used it for boneless chicken breast.  It is super easy to make and very delicious!  You may need to adjust the amount of salt to your liking.  I actually had to add a little more and we aren't salt people.
My mama's recipe


So here are the ingredients minus the vegetables.  You can see that it is nothing fancy and all items that you probably already have in your pantry anyway.  Those are the recipes that I love!

Ingredients for the batter
And here are the lovely vegetables.  You can see the ray of light on them, intensifying their beauty. ;-)

Yummy veggies - also good to eat just like this!
 
I didn't take a picture of the batter.  It really is just basic, you throw everything into a bowl and mix it together.  Then you dip the veggies in the batter and fry them up.  Here they are frying.

Sizzle, sizzle...
You can tell when they need to be turned, because they start to get golden brown on the edge.  You can also see from the picture that I did not use a lot of oil.  Just enough to coat the bottom of the pan.  I really don't like them swimming in oil.  I did have to add oil twice before I was done. 

And now for the finished product!  They were really good, and we had this whole plate eaten in no time.  The kids loved them!  The tomatoes were actually sweet, and the batter was savory, so it was a good combination.

Nom, nom, nom

How many of you have already fixed fried green tomatoes?  If you haven't try out this recipe and let me know how you like it!  Even though this batter is great on a multitude of veggies, I do have another recipe for onion rings that I like better.  I might just share that with you sometime soon. ;-)

Want a printable recipe?  Then just click HERE.


We Are Taking Family Night Back!

Tuesday, July 14, 2015
We have gotten into a rut.  A bad rut. This rut involves us being in so many activities that for almost a year, there was only one night a week that we would actually be home.  Supper was a rushed affair usually in front of the television, and almost never eaten as a family.  This was a far cry from how we did things just a year earlier.

I was always proud of how as a family, we would eat supper together, at the dinner table, and talk to each other about our day. It was important to me and Steve to make sure that dinner time was family time. 

Friday night was the exception which we instituted as Family Movie Night.  We would usually make pizza and watch a movie as we sat together on the couch.  Wednesday was our family game night. Right after supper we would play a game together, usually a board game.  We would have fun, and we would enjoy each others company.

Then last year, life happened.  We let activities take over our evenings.  We had cub scouts, and football, then basketball, then baseball. We also had piano lessons, tumbling, and hip hop.  Then we had the regular school evening activities thrown in on top of that.  Sometimes we were rushing from one thing to another.  Or we would even be double-booked, and have to miss out on something.  Needless to say my kids were in a lot of activities!  

On Facebook we looked like a super-family.  We were going and doing everything.  In real life, we hated it!  The kids begged to have a family game night again, but because we were so busy, we just couldn't  fit it in.  

We had ceased being a family.  We were just four people, going from one activity to the next.  We stopped communicating with each other, and we stopped enjoying each others company.  I really wanted a change, as did the rest of us, but once you get started, it is really hard to stop.  

What saved us was the torrential rains we received this summer.  Because of the rain, activities started to be cancelled.  Instead of rushing home, grabbing a bowl of cereal, or a peanut butter sandwich, I was able to go home after work and cook supper.  We weren't rushing somewhere so we were able to eat as a family.  

It was really nice to start cooking, and it was nice to be together.  Then last week, instead of turning on the television, we started playing games as a family again.  The kids were the ones that asked, in fact pleaded, so we said yes.  We had so much fun, that we started playing games every night!

We have had a great time reconnecting again.  We have talked and laughed, and joked with one another, and I was thinking to myself last night as we played Phase 10, these are the times that the kids are going to remember the most. The fun times, the family times.
Our happy family!
So thanks to the rain, we may not have a garden, but we have our family back!  Tonight Drew was supposed to have a baseball game, but guess what? It was cancelled due to a rain storm.  I'm kind of glad, because now we get to finish that game of Phase 10 we started last night.  I know that while he will be sorry about not playing baseball, he will be more excited about being together as a family and finishing that game. 

For the next year, the activities are going to slow down.  We are going to be very careful what we chose.  We are not going to be gone every single night.  I know we won't be able to have game night every single night, but we are going to be home, and eat supper together, and enjoy what little time we have before the kids grow up and are gone. 

Have you found that activities rule your life?

Throw Back Thursday: Waffles!

Thursday, July 9, 2015


So I have a little secret to share.  I have this obsession... and no it isn't with waffles.  In fact isn't a food item at all, but people use it all the time to create food.  Only my close family and friends know about it, but I thought I would share it with you since it does pertain to this post.  Are you ready? 

My obsession is with...

1958 Crisco Cookbook
vintage cookbooks!

Today's #TBT recipe comes to you directly from a 1958 cookbook that I was able to purchase during a library book sale.  I love it when libraries put books for sale, I can get some pretty cool books for pretty cheap!  And the best part is that my library can use the funds for programs, books, and other resources.  So support your local library!

Ok, back to the recipe.  There are several of my vintage cookbooks that I originally purchased because of the graphics and the era that they were published, but when I got them home, they have become some of my favorite cookbooks to use!  This is one of them.  And while it is a Crisco cookbook, you can adapt the recipe to your liking.  (You don't really have to use Crisco in these recipes.)

That is what I did with this recipe.  I adapted it so that I use grass fed butter and also had to change the liquid amounts so that the batter wasn't too runny.  So without further ado, here is the homemade waffle recipe adapted from a 1958 Crisco cookbook!

Waffle ingredients

Here are the ingredients for the waffles.  They are your pretty basic players for waffles which include flour, salt, sugar, baking powder, milk, eggs, and butter.  

Start by mixing together 2 cups flour, 3 teaspoons of baking powder, 1/2 teaspoon of salt, and 2 tablespoons of sugar.

Dry ingredients, check!
In a separate bowl, mix together the 2 eggs and 1/3 cup of milk.

Wet ingredients, check! (Love that blue bowl!)
Next, melt 1/4 cup of butter (1/2 of a stick).  Add the dry ingredients to the wet, and add in the melted butter. Mix everything together.  You should have a nice sheen to your batter.  After mixing, I like to let the batter rest for about ten minutes.  This is a perfect time to get your waffle iron heated.

Ready and waiting on the waffle iron
Cook the batter on your waffle iron according to the manufacturer's directions.  I know that with mine, it needs to cook for 2 1/2 minutes.  I have a pretty simple waffle iron that I have had for almost 20 years, but it gets the job done!

Now you have a delicious golden waffle, just begging for butter and syrup.

Just add butter and syrup, yum!
What I love about this recipe is that it is so simple!  Just mix everything together and cook.  I'm not much of a morning person, so I really need simple...and coffee.  Lots of coffee. 

The other thing that I love about this recipe is that the leftover waffles can easily be frozen and then popped in the toaster or microwave when you need a quick breakfast.  

To get the recipe click HERE.

Please let me know what you think about the recipe.  Do any of you collect vintage cookbooks?

Throw Back Thursday: Meatloaf!

Thursday, July 2, 2015


Who doesn't like a good meatloaf?  Okay, I can hear groans out there.  I really think that meatloaf gets a bad rap.  Meatloaf was a staple in our house when I was growing up.  It wasn't necessarily my favorite meal, but as an adult, I do like it.  What I find funny is that my 9-year-old actually asks for it.  When he does, I like to accommodate that request.  Plus, meatloaf can make some yummy sandwiches the next day for lunch!

Freezer full of hamburger...

My husband's uncle had to butcher a cow and we, along with my mother-in-law were the lucky recipients of some hamburger.  For our family that was an awesome gift!  We go through hamburger like you wouldn't believe, but this past year we have had to slow down because of the prices.  This is one reason why we are raising our own beef.  That and honestly the meat is so much better tasting, less fatty, and you know what your own cows have been eating and where they've been!

Needless to say we have been cooking a lot of ground beef recipes lately.  My meatloaf recipe is loosely based on my mother's recipe.  I find that my mother's meatloaf is a little too wet for my taste.  My mother-in-law's recipe is too dry.  After trial and error, I have come up with a recipe that our family really enjoys.  Feel free to take this recipe and adapt it to your tastes.  Really there is no limits to what you can do with meatloaf.

Note about recipe: there are some ingredients with no specific amounts given.  I usually hate recipes that do that so I apologize for giving you one, but some of the ingredients depend on your personal preference.

Holli's Meatloaf

1 lb. ground beef (chuck/round - whatever you prefer)
1 large egg
1 8oz. can of tomato sauce
1 small onion (or amount you prefer)
handful of italian breadcrumbs (I use this because it is already seasoned, if you use plain, then you may need to add some spices)
dash Worcestershire sauce (more or less to taste)
salt and pepper to taste
ketchup

1. Grate onion into a medium sized bowl. I like grating because you get the onion juice for flavor and then the onion itself is small so you are not biting into a big chunk.
2. Add the rest of the ingredients and mix with your hands.

Ingredients all ready to be mixed
3. Put the mixture in muffin tins - that's right a muffin tin, it cuts down on cooking time and makes perfect portion sizes!
4. Top with ketchup if desired.

Ready to put into oven
5. Cook at 350 degrees Fahrenheit for 20 minutes or until down.
Enjoy!

Get the printable recipe HERE

I would love to hear what you think about this recipe.  Please let me know below!
©HensleeFarmAdventures.com. Powered by Blogger.

Search This Blog

Back to Top