Throw-Back-Thursday Recipe: Peanut Butter Cookies

Thursday, May 28, 2015
Happy TBT once again!  I can't believe how fast these weeks are going by.  The kids are out of school and it feels like summer has officially begun with how hot and humid it is here.

I thought that in honor of the kids being out of school, that I would dedicate this post to them, and one of their favorite treats. Peanut butter cookies!


I used to make peanut butter cookies all the time.  From scratch.  And let me tell you, the recipe while good, was involved.  It wasn't something I could just whip up in a jiffy (as my mom used to say).  My mom gave me a recipe for peanut butter cookies that was only 3 ingredients.  I didn't try it for years because I was under the impression that a peanut butter cookie could not possibly be edible with only 3 ingredients.

I was completely wrong!  In fact there is a lady that bakes marvelous goodies and sells them at the farmer's market in our local town.  Her peanut butter cookies were to die for!  And guess what?  She uses the exact same recipe.

So not only are these cookies super easy to bake, with ingredients that almost everyone already has on hand, but they are super delicious!  And the other thing that I like about them is that they are grain-free and dairy-free!  That is a big plus for our family since my little girl is lactose intolerant.

So without further ado, here are the ingredients.  They look kind of lonely don't they?  In fact they don't look like they would make a scrumptious cookie.  But trust me, they do.

Three lonely ingredients

Mix together 1 egg, 1 cup of sugar, and 1 cup of peanut butter until well blended.

Ingredients all mixed

Drop by spoonfuls (your choice on the size) onto a baking sheet.  I like to use parchment paper when I bake.  And then use a fork to make crisscross marks in the cookie.  The dough can be pretty sticky, so use some extra sugar to help keep it from sticking.  If the grain-free part doesn't matter to you, flour will work as well.

Ready for the oven

Just bake these beauties for 10-12 minutes in a preheated 350°F oven.

Nom, nom, nom

Don't these look scrumptious?  These would be really good with a cold glass of milk, or in my family that would be a cold glass of almond milk.  Yum, yum!

So what do you think?  Let me know in the comments below.  Has anyone tried something similar but used almond butter instead of peanut butter?  I would love to know how it turned out!  Please share!

Memorial Day

Tuesday, May 26, 2015
I hope that you all had a wonderful weekend!  I know I did.  I really wanted to get this post up yesterday, but I love getting to spend the long weekend with my family so much, I didn't take the time.  I just enjoyed them.  And yes we did barbecue, and man was it good!  But most importantly, we celebrated Memorial Day, remembering our loved ones that have gone before us and especially those that have died serving our country.  

Flag on my great great uncle's grave
I was really surprised at how many couples now take this time to spend the holiday at the lake or the beach, or somewhere other than what the holiday was meant for.  I appreciate all our veterans who are still alive and also those that have passed.  I have many family members who have served in the military and I am so thankful to each and everyone of them.  They have served in both peace time and war time.  What I am thankful for is that they have all come back.  Not all families can say that.

My great great uncle's military marker

One of my family members served during World War I.  He died when I was 13, almost 14 and I wish that I could go back now and ask him questions.  I do know that he was stationed in France and I am sure that he was in battle.

Of course Memorial Day is also used as a time to remember our family and friends that have gone before us.  Our family uses it as a time to teach our children about our family history.  We talk about our family tree, stories about our loved ones, and decorate the graves so that they have not been forgotten.

My grandparent's grave
My favorite place to visit is the small church cemetery where I have family on both sides buried.  What I love about that cemetery is that you can plant real flowers.  Below is a picture of my great, great grandparents grave as well as other family members.  I love that they have peonies planted so that every year their graves will always have flowers.

Beautiful peonies
 You can see the little rock church in the background.  It is such a beautiful place!

I hope you all had a wonderful weekend, and I hope that you took time out to remember your loved ones.  Let me know in the comments below how you spent your Memorial Day.

Throw-Back-Thursday Recipe: Banana Bread

Thursday, May 21, 2015
Happy TBT!  Today's recipe comes from my sister who has been making this recipe for the past 30 years.  It has to be the best banana bread that I have ever tasted.  She gave me the recipe about 20 years ago and it is the only banana bread recipe that I will use.  I have tried others, but I just keep coming back to this one.  It is that good!
Nom nom nom...
So I really wanted to post a picture of my sister and me when we were little, but because of our age difference, I didn't really find one.  She is 12 years older than I and was married and out of the house when I was 8.  When I was younger, we really didn't get along that well.  We were too much alike.  But now that we are older, she is one of my best friends!  I admire her so much.  She is such a strong lady and I hope that I can be as strong as she is one day.
My sister and son.
Here she is with my son when he was just 3.  That was 6 years ago!  My how time flies!  Now onto the recipe.

Here are my ingredients ready to go.  You can see that it is all the basics...flour, sugar, butter, egg, milk, baking soda, baking powder, vanilla, salt, and of course bananas.  (If you are wondering, the salt is mysteriously missing.)
Ingredients
If you notice, the bananas are ripe.  Verrry ripe.  To me that is the perfect time to use them to bake with.  With them that ripe, it really brings out the sugar in the banana and intensifies the flavor.  Most people would throw these out, but to me it means fresh banana bread!  Or in this case, muffins.
Very ripe bananas

Preheat oven to 350°F.  Then cream the butter and sugar together.  Make sure that the butter is room temperature so it makes for an easier process.  You can see below I still have some clumps of butter.  No worries, just cream it together a little more.
Butter and sugar

Next add to the butter and sugar the milk, egg, and bananas and mix well.  You may have noticed in my ingredients that I am using almond milk.  I am very happy with the way my baking is turning out with the use of almond milk.  You could also use coconut milk, or just ole plain milk. Then sift together the flour, baking soda, baking powder, and salt and add to the liquid mixture.  Mix it all together.  Last, don't forget to stir in the vanilla.
After all ingredients added
Now you have a choice to make.  You can bake this in a standard size loaf pan for about an hour.  Or make two smaller loaves, or do what I chose to do and make muffins.  For muffins they only need to bake for about 25 minutes or until golden brown and a toothpick inserted in the middle comes out clean.
Ready to eat
And here they are, ready to eat.  The hardest part is letting them cool.  Seriously I could eat all of these.  At one sitting.  No joke.  I can eat them as is, or with a little butter, or some honey.  But you want to know my favorite way of eating these scrumptious muffins?

With homemade strawberry preserves!
So to get the printable form of the recipe click HERE.  And let me know in the comments below what you think about this scrumptious banana bread.

Wondering about my strawberry preserves recipe?  Well, I am going to make you wait for that one.  My sister and I are going to get berries this weekend and work together on putting up some preserves. I foresee a YouTube video in the future. I can't wait!

Throw-Back-Thursday Recipe Post - Simple Yeast Bread

Thursday, May 14, 2015
I just love Throw-Back-Thursday or otherwise known as tbt.  I love seeing all the pictures on Facebook and at times I will get tagged in pictures from my younger days.  I thought it would be a great idea to make every Thursday here a tbt with a great recipe from my parents or grandparents.

So today I am sharing with you a very simple recipe for yeast bread.  This recipe comes from my mom who uses it for her homemade rolls.  When I made this yesterday for my family, I made it into two loaves of bread.

I thought I would share a picture of my mom.  In fact this is my mom and dad circa 1960.  They were not married yet, but I believe that they were engaged at this time.  They were on their way to my dad's brother's wedding.  I just love the clothes, the hat, the gloves.  Ah, why can't we dress like that anymore?
My mom and dad circa 1960
 Anyway, back to the bread.  Have you ever gotten recipes from your family and just by looking at it you know that not all the steps are included?  Well this is how this recipe was.  Luckily I love to bake and I knew the steps to making the bread.  I will of course include the steps here for you.

So the recipe that my mom gave me was this:

Yeast Bread
2 cups warm water
1/3 cup sugar (a little more)
1/4 cup melted shortening (not oil)
1 egg
2 pkgs yeast
1 1/2 t. salt
6 cups flour

Mix first 6 ingredients together.  Place in a greased bowl and cover.  This will also keep in refrigerator.

That's it.  That's all she wrote. Literally. Now if you follow these directions, you add in all the ingredients except for the flour.  Then place in a greased bowl and cover.  So like I said before I think there might be a few steps missing. ;-)

So here are my ingredients that I have ready for the bread.  I just have to say that I love my little baking corner that I have set up in my kitchen.  It makes it so handy to bake, and cook for that matter!
My ingredients
I do mix the first 6 ingredients together and that is what you see next.  Actually you see them before I mix them together.
First 6 ingredients
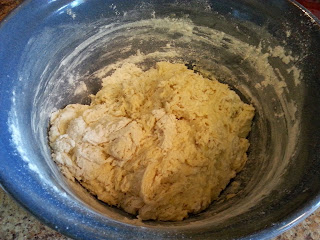
Next I add the flour.  I first add 3 cups and mix it up.  Then I add another 2 cups and mix that.  That is what you see below.  It is a sticky dough and it still needs more flour, but I like to add that last cup as I am kneading the dough.
After 5 cups of flour added
So here is my dough after I have kneaded the last cup into the dough.  You want a nice and soft smooth dough.
Kneaded dough
Now this is where you will put it in a greased bowl and cover.  From here you have two options.  You can let it rise which is what I did.  You want it to rise until doubled which for me was about an hour.  Or you can put it in the refrigerator overnight and take it out the next day to get it ready for the second rising.
After first rise
So here you see how my dough has doubled.  I need to take out the dough and divide it in two equal parts.
Ready for second rising
I form each of those parts into loafs and put them in a greased loaf pan.  Now they are ready to rise for the second time.  This time it will only take about 30 minutes to rise.  Be sure and keep an eye on your dough.  I know from experience that I have let it risen too long (because I forgot about it) and they fell.  :-(
Ready for oven

Now they are ready to bake in a 350°F preheated oven.  They will need to bake for 25-30 minutes. See my beautiful loaves below!  Now the hardest part of the whole recipe is waiting until they are cool to slice into them.
Beautiful baked bread!
What a beautiful soft bread!  Tastes so wonderful and I love this bread toasted with some homemade jelly on top!  To get the printable version of this recipe, go here.

Pass the jelly, please!
Tell me in the comments below what you think of this recipe and let me know if you have a favorite bread recipe.

It's Garden Time!

Tuesday, May 12, 2015
I love the spring time! It means trees are budding and flowers are blooming, but best of all it means garden time!

It seems like every year we are late with putting out our garden.  Something always happens, whether it be life or the weather that postpones when we had planned on planting.  This year however we had big plans!  I started some seeds indoors and we were going to get our cool weather crops out, then go on to the summer varities.  And then life happened.  My mother-in-law put her house up for sale which meant that we had buildings to move to our place (YouTube video coming soon) as well as a few other big items. And if that wasn't enough, I ended up needing major surgery.  That means 6 weeks no heavy lifting and no hard labor. In fact no work at all, which is almost impossible for me to do!

So once again we are late with gardening season.  Here it is the middle of May and the garden isn't even tilled let alone planted.  But I haven't given up hope.  I have an idea that I think will work.  I just hope my family will help out since I won't be able to do the work myself.

Sox the tomato plant lover.

I thought I would share with you the pictures of my plants that I do have growing.  My peppers did wonderful.  My tomatoes, not so well.  That was due to a certain cat that couldn't keep out of them.

Here is where I started.  A blank slate.  I started these seeds on March 1st.  There was snow on the ground and dreams in my heart of the fresh vegetables to eat and can in the coming summer.  I planted seeds for four different kinds of tomato plants and three different kinds of peppers.  Some of the seeds I had purchased, and some I had saved myself from the ones I grew last year.
Starting seeds,

And here are the plants one month later.  The plants have grown some and so have the dreams.  They look wonderful!  I am so excited and my husband and I start talking about when we need to start working the soil.  This also includes redoing the chicken run because during the late fall and winter, we let the chickens loose in our garden spot so that (hopefully) they would eat the bugs we had trouble with in our garden last summer.

Tiny pepper plants
Tiny tomato plants


It was after these pictures that things started happening.  And now here it is in May.  You can see how much the plants have grown and I am determined to still get my garden out.

Pepper plants

Tomato plants


So here is my idea.  Instead of tilling the whole garden, I am thinking of having someone just make rows.  The chickens have done a good job of trampling down the straw that was in there last year.  That straw can serve as a mulch between rows.  I have done this before, but it was on my small garden plot.  I am sure it would work on a larger garden as well.

So is there anyone else out there that is late with their garden?  How are your plants doing? Please post a comment and let me know!
©HensleeFarmAdventures.com. Powered by Blogger.

Search This Blog

Back to Top