Showing posts with label diy. Show all posts

DIY Burp Rags

Tuesday, April 19, 2016
My niece is expecting her second child, a boy, in May. For her first son, I was able to crochet a beautiful blanket. And I was thrilled when she used the blanket for her son's first professional pictures.

This time around however, I have not had time to crochet anything! In fact I wasn't even going to make her anything, I was just going to buy a present, but I started thinking that there must be something that I could make that was easy, cute, and practical.
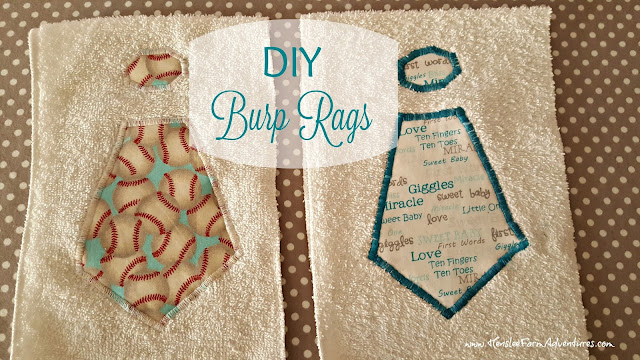
DIY Burp Rags  www.HensleeFarmAdventures.com


Searching through pins on Pinterest, I found a couple of ideas and decided on both. One was an idea for a burp rag, and the other was a swaddling blanket. They both looked easy enough, and I thought I would share what my version of the burp rags with you.

For my version of this project, I really wanted to use items that I already had on hand, so I decided that a white terry cloth towel would make a great burp cloth. The thing that I love about the towel is that it is absorbent, but not bulky and it fits perfectly over your shoulder.

Since my niece is having a boy, I love the idea of appliqueing a tie on one side of the towel. I could have also tried my hand at a teddy bear, but decided that the tie would be easier. For a little girl, a butterfly would be adorable.

So here is my towel that I cut into thirds. You can cut yours into however many you want, based on the size of the towel and how big you want your burp rags. I used my mother-in-law's serger on the sides that were raw. You could also zigzag stitch them, or you could hem them as well. For me I'm all about ease and I love using a serger!

DIY Burp Rags  www.HensleeFarmAdventures.com
My towel, cut apart and serged.


Next you want to make your template for your tie or what you plan on appliqueing. Here is mine. I just grabbed a sheet of construction paper and free-handed it. The first one I made was too small. So I made a larger one and it worked better with the size of my burp rags.

DIY Burp Rags  www.HensleeFarmAdventures.com
My free-hand template...not too bad from someone who is not artistic!


Then pick out your contrasting fabric. I was planning on using some that I already had, but I didn't have a lot of what would be considered "boys fabric." While I was at Wal-Mart, I found these cute fat quarters and since they were less than a $1.00 each, I decided to get them. I could have bought just one fat quarter and made the towels the same, but I couldn't decide between the fabrics. So I decided to get both. If I had bought just one, it would have yielded me three ties. So that means I have leftover material to make more in the future!

DIY Burp Rags  www.HensleeFarmAdventures.com
My ties, ready to be adhered to the towel.


Use the template to cut out your ties on your fabric and then use HeatnBond Lite to adhere it to the towel. Iron on the HeatnBond first to your ties. Make sure that you use the lite version, because you want to sew over it. All this does is stick it to the towel so it doesn't move, and it gives it a little substance as well.

DIY Burp Rags  www.HensleeFarmAdventures.com
Make sure you use the "lite" version.


Once you have ironed the HeatnBond to your tie and you have it positioned onto the towel, then peel off the backing and iron the tie to the towel. If you are unsure about this, just follow the directions on the package, they are really easy. I positioned my tie, 2" from the bottom of the towel, and then left a 1" space between the bottom part of the tie and the top part. That gave me plenty of room for sewing around it.

DIY Burp Rags  www.HensleeFarmAdventures.com
Ready to sew around.


Once you have it ironed on, then you need to sew around the fabric using a zigzag stitch. The stitch was adjusted so that it is close together. The first one I did, which was the baseball one, was easy. In fact I should have known that it was too easy. My next one was of course the tie with the words on it, and I had some trouble with the thread catching. So while the second one isn't perfect, I finally finished it.

DIY Burp Rags  www.HensleeFarmAdventures.com
Finished project...not too shabby!


I thought they turned out pretty good. And they were easy enough a beginning sewer could definitely make these.

The best compliment that I got was from my sister-in-law. She said that they looked like they came from a specialty shop. That is really something coming from her, she is the craftiest person I know! She makes me some of the most amazing Christmas gifts!

So there you have it. A quick, easy, cute, and practical baby gift. I really wish I had found these before. Everyone would have been getting these great burp rags from me! :-)

Let me know in the comments below what you think about these.

Our Own Little Coffee Bar

Tuesday, February 9, 2016
I've been seeing pictures of coffee bars on Pinterest and have always wanted to do something similar in our house.  Coffee is a pretty important beverage in our house, with the only things that come before coffee is Jesus and family!


I was able to acquire an old antique buffet from my grandfather.  I believe that it belonged to my great-grandmother and she used it as a buffet.  When my grandfather had it, he used it as storage for his tools in his little wood shop. 

After both of my grandparents had passed away, it came to me (because really no one else wanted it).  Even though I loved it and thought it was beautiful, it was dirty and the drawers had oil spilled in them, the doors were falling off and it smelled to high heaven!  It took several years for me to get that smell out of the drawers.  I scrubbed it on a monthly basis and put fabric sheets in it. I honestly thought that the oil would never come out and the smell would always be there.  I almost gave up hope on ever being able to use it.

When I did start using it, it first became storage for my then toddler son's underwear and socks which I put in the top drawers and books in the bottom part where the doors are.  When we moved to the home we currently live in, I thought that we didn't really have room for it.  I let my niece use it as a kitchen island which was so cute! She took the one remaining door off and put baskets below.  She put utensils in the drawers. I was happy that it was being put to good use and staying in the family.  However, she moved and was not able to take it with her, so I took it back and decided to make room for it.

Buffet before

It was actually perfect because I needed storage for my grandmother's china that I inherited from her. I was able to put the buffet right off the kitchen and put the china in the bottom part, table cloths and other holiday themed items in the middle drawer, and tea towels and dish cloths in the two upper drawers.  I just set some decorative items on top to make it look pretty. Although if you look at the picture above, it just pretty much looks cluttered!

What really spurred me on to create the coffee bar was when our coffee pot died one morning not too long ago.  We were looking to buy another coffee pot, but it had to be something that my husband and I both liked, but didn't take up too much room since I had it sitting near the sink and my baking station. 

I thought that moving it to this buffet and making it a coffee bar would give me more room to bake (yay!) and also allow me to keep all the coffee and tea items together.  I told my husband about it and showed him some pictures on Pinterest.  He loved the idea!  It also allowed us to purchase a coffee pot that was function, fun, and funky!

Our new coffee/tea bar
Here is our coffee bar.  The only thing new in this picture is the coffee pot.  The canisters, which sorry I didn't get a close up picture of, say coffee on one and tea on the other.  I also have a cup stand that was given to me by my mom all sitting in a tray that my husband bought for me.  You can't see it very well, but I also have my coffee bean grinder that was a gift from my sister several Christmases ago.  And of course next to the lamp is my homemade spice tea mix.  To get the recipe for that click HERE.


Yummy spiced tea.
I also cleaned out one of the top drawers and was able to put coffee, tea, and hot chocolate in it so it would be easily accessible.

Everything is right at hand.

We love our new coffee bar!  My husband said that his was one of my better ideas and I am so glad that we carved out a little space and reused things that we already had to be able to create this.  I am sure as we use this it will evolve into an even more organized space that our family will love and use. 

Think you can't have a coffee bar?  That's what I thought, but start looking at your space in a different light.  Start imagining how things would look in different places.  And there is no reason why you can't carve out a little space for yourself.

If you have already created a coffee bar, then please tell me about it in the comments below!  Or let me know what you think of our space!

An Easy T-Shirt Skirt

Tuesday, January 26, 2016
I have had a pile of old t-shirts that I have wanted to make into skirts for quite some time.  It seems like there is always something else that needs to be done.  Like now, I am working on a baby afghan, and trying to clear out our clutter, and trying to deep clean the house as well as enlarging our master closet.

An Easy T-Shirt Skirt  www.hensleefarmadventures.com

But the other night my sewing machine (a 1961 Singer Slant-O-Matic "Rocketeer") was calling to me.  This was a Christmas gift last year from my parents.  I had been wanting a new sewing machine and I was painstakingly trying to decide which machine to purchase.  I was surprised when my parents presented me with this gem of a machine that they found at a garage sale.  They of course took it to a sewing shop and had it serviced and now I am the proud owner.  However it had been about six months since I had even used it.

An Easy T-Shirt Skirt  www.hensleefarmadventures.com


Even though I didn't really have the time to spare, I decided to go ahead and do something I have wanted to do for a long time.  I decided to finally make me a t-shirt skirt.

A t-shirt skirt is a great way to upcycle an old t-shirt into something new.  I love being able to refashion something old into something new.   And this project is about as easy as they come.

An Easy T-Shirt Skirt  www.hensleefarmadventures.com
The old t-shirt
This is what I started with.  It is a men's size XL.  You do want to get a t-shirt that is overly large for you.  I normally wear a women's medium, and a men's large would probably be big enough for me to make a skirt out of.  However I was already given this and wanted to use it.

The first step is to cut the shirt right below the arms.  This will be your skirt bottom.

My skirt bottom An Easy T-Shirt Skirt  www.hensleefarmadventures.com
Bottom part of shirt cut off.
You really don't have to do anything else to this.  If you wanted you could cut the sides to make it an A-line, or you could sew darts in the back to take it up a little.  I didn't do either on this one, I wanted to try and refashion it as simply as possible.

The next step is to measure your waist.  For me, I also had to try and not faint dead away when I saw what my waist measured.  Seriously people, I just about croaked!!  So for my fantasy I am going to say I was a 28 waist.  (Please just let me have my little dreams).  Keep (your real) waist measurement in mind, you will need it.

I decided to make a waistband out of the rest of the t-shirt material.  I cut off the collar and the sleeves and discarded them and used what was left of the t-shirt to fashion my waistband.

Removing collar and sleeves An Easy T-Shirt Skirt  www.hensleefarmadventures.com
Removing the collar and sleeves
I thought I wanted a plain white waistband, but then I thought that the graphic would look cool as part of the waist band and keep with the overall look of the skirt.  So I made sure and cut off enough so that the plain white part would be the back of the waistband and the graphic would be the front part.

Now this is where the waist measurement comes in.  If you have a 28" waist, you will want to divide that in half and add at least a 1/2 inch for a seam allowance.  To keep it simple, let's say we do want a 1/2" seam allowance, which would mean that I want to cut two strips, each 14 1/2" long.  In this case, I want  14 1/2" of the plain white and 14 1/2" of the graphic part of the t-shirt.

I then had to cut and straighten my pieces I was using for the waistband.  I wanted to get rid of the ragged part of the material so that I would have a smooth and straight piece to work with.

Ready to become the waistband  An Easy T-Shirt Skirt  www.hensleefarmadventures.com
Straightened and ready to sew...however the ends did like to roll on me. :-(

Next you want to determine how wide you want your waistband to be.  I just used the width of what was left of the t-shirt material, then folded it over, wrong sides together.  The width of your waistband will help determine what length your skirt will be.  The width of this waistband created a skirt that was knee length which is exactly what I wanted.  Next I sewed the front of the waistband to the back of the waistband using a 1/2" seam allowance on both sides. Once sewed, be sure and try the waistband on to make sure that the fit is good.

Finished waistband An Easy T-Shirt Skirt  www.hensleefarmadventures.com
My finished waistband
After the waistband is done, you need to pin it onto the top of the skirt.  The waistband will be much smaller than the top of the skirt, so you can either gather the skirt  as you go, you can sew darts in the back, or you can create a couple of gathers on the side.  I decided to create a couple of gathers on the side to keep it more uniform and not have to try making gathers all the way around.  This is the option that I chose.

An Easy T-Shirt Skirt  www.hensleefarmadventures.com
Pinning waistband to skirt

Be sure and pin the right sides together, and then sew around the edge allowing for a 1/2" seam allowance. Press the seams open and trim as needed.  And voila!  You are done!  The bottom hem of the shirt is now the bottom hem of your skirt, so you don't have to worry about hemming which is my least favorite thing to do when it comes to sewing.

An Easy T-Shirt Skirt  www.hensleefarmadventures.com
Finished skirt
I wore the skirt to church the next day and was complemented on it.  It made me feel good knowing that I was able to create this from a shirt that might have just ended up in the rag pile.

An Easy T-Shirt Skirt  www.hensleefarmadventures.com

An Easy T-Shirt Skirt  www.hensleefarmadventures.com

You can see I'm not really a model, but I do love how this skirt turned out!  Plus knit skirts are some of the most comfortable skirts that I have.  I love that I left this a little big on the sides since I don't like clothes that cling either.

I hope that you try and make a t-shirt skirt yourself.  Look for the ones with great graphics at Goodwill, or if they are marked down to $1.00 at your local store.  Keep in mind what would make a cool skirt.  Let me know below what you think about this project.

Happy sewing!


Building Shutters!

Friday, December 18, 2015
Our house, not only has new siding (check out the video here), but now new shutters!  The place looks so much better and we are so excited with how things are working out.  The weather has been cooperating and we have actually had time to be able to work on our place.

The next stop is inside to update some things in the house during the cold days of winter.  I know we will share all of those projects with you, but first I wanted to share our video on how Steve built the shutters for us.  (I love that the thumbnail is of our sweet little Abby!)


Here are some pictures of the finished project.

Checking the Shutters
Seeing what it will look like.
We of course had to see what it would look like before actually attaching them to the house.  I think it looks pretty good.

Christmas Lights
All done!
Here is a picture with the shutters done.  I love how it makes the place look!  A far cry from our old siding and shutters!

Close-up of Shutter
Close-up
This is my favorite picture.  A close up of the shutters, with the Christmas tree in the background.  We are so happy with how it turned out!

So check out our video above and see how we made these shutters.  And let me know in the comments below what you think.

DIY Teacher Gift for Christmas!

Wednesday, November 18, 2015

I am so excited that I finally get to share with you a DIY Christmas gift!  I had really wanted to start sharing my gift series with you sooner, but it seems like life always has other plans.

For the first Christmas gift post, I thought I would share one of my favorite ones to make. It is a cool gift for a teacher.  This is something that I have given to my kids' teachers in the past and they always love it!

I have family members that are teachers, and their usual gift they receive is something like hand lotion, soaps, or a coffee mug. Instead of giving them the usual items, give them this wonderful little goodies box that can be personalized in a way that can include items that teachers need in their everyday use at school, as well as include some nice treats.  So without further ado, here is how I made these.

Teacher Gift Boxes Items
Items I used to make the boxes


You'll want to start with the box.  In the past I have purchased small tackle boxes from Wal-Mart that are around $3.00 per box.  They are great because you can customize the size of the compartments inside.  The boxes are sturdy, and they can continue to use them for small desk supplies.

Then one day while I was at Target and I found these great plastic boxes for only $1.00!  I loved these and picked up a couple, one rectangular, and one square.  Of course you can't change the size of the compartments inside, but for the price, these are perfect!

The magnets and the pretty alligator clips I got from Wal-Mart, the rest of the supplies I purchased from Dollar Tree.  I loved the fact that our Dollar Tree had some pretty paper that I could use to decorate the lid of the box and the best part is that it had an adhesive backing!  How easy!  Before I had always used scrapbook paper and a glue runner.

Adhesive Scrapbook Paper
Adhesive paper.  If you look real close, you can see where I scored it to put on top of a box.
The first thing I did was to make a mark, or score the paper to the size of the top of the box I was using.  You can see in the picture above the crease of where I need to cut the paper to size.  You could also be more exact and measure, and I even thought about getting out my rotary cutter, but to be honest, I was a little lazy.

After I cut the paper to size, I peeled off the backing and stuck it onto the lid of the box.  Here is where I had some trouble.  I found out that once it sticks, it sticks!  There is no re-positioning this paper, so you have to be very careful.

Once I got the paper on the box lid, I then decorated it with stickers and glitter letters.  This is where to get the kids involved so they can customize their own teacher's box.  I usually put the teacher's name on the lid as well as some stickers.  For this project, I used what I already had on hand.  It just so happens that I had leftover glitter letter stickers and some 3-D stickers that I had purchased from the Dollar Tree for the Back to School Backpack Craft.

Decorated Teacher Gift Boxes
Here are all three boxes, decorated.
Next, comes the fun part of putting the goodies inside.  I used some items that I already had on hand, paperclips, staples, and pencil lead, and then added in the decorative magnets, alligator clips, and of course the candy!

Goodies inside the smaller decorative boxes
Inside the smaller boxes
You can see that in the square box, there were four compartments.  Besides the school supplies and candy, I decided to add in some tea.  For the rectangular box, there were only three compartments so I wasn't able to add as much.  The one good thing about these compartments though is that they are deep, so I can double up on items and fit more things in.

Goodies inside the bigger decorative boxes
Inside the bigger box
As you can see the bigger box has more compartments and they are adjustable as well.  I have several different things that a teacher may need.  You can customize this however you like.  If you know there is something special that the teacher needs or likes to use, then you can throw that in there as well.  I do plan on adding a few more items before I give these to our teachers this year.

Ideas on what to add to the compartments (provided by my Aunt Linda, a retired teacher...thank you!)
  • Post-It Notes
  • Chapstick
  • Nail File
  • Nail Clippers
  • Stamp pad
  • Emergency Sewing Kit
  • Safety Pins
  • Gift Card (Amazon or iTunes)

One thing to remember when you are making teacher gifts, don't forget the special teachers!  That would include music, art, gym, computer, and whatever else your school might have.  They too deserve a great Christmas gift!

Decorated Teacher Goodies Box


I hope you all enjoyed the first in a series of DIY Christmas gifts.  Let me know in the comments below what you think of this idea.


DIY Porch Railing

Tuesday, November 10, 2015
DIY Porch Railing

We have moved on to our next project in our steps to beautify our home.  We have purchased siding and now we are waiting for it to come in and be delivered.  In the mean time, Steve decided to update our front porch railings.

Our front porch and back decks are a real sore spot with me.  In fact they are a sore spot with Steve as well.  When we had our mobile home moved onto our land, it just so happened that our insurance company decided to make a surprise inspection.  When they saw that we had no porches or decks in front of the doors...well you can imagine.  We were given one month to rectify the situation.  

This seems like a long time, but when we both have full time jobs, and two small children to take care of, it's not as easy as you think.  We decided to go the easy route and buy deck kits for all three entrances.  Before that decision was made and before the insurance gave us an ultimatum, we had actually been drawing up plans, and dreaming of the deck that we wanted to build, but at this time we knew we had to put our dream deck on hold.  

We had to build our decks during some of the hottest days of July.  I'll never forget trying to dig for footings for the deck.  There actually was no digging.  We kept hitting rock.  It was almost impossible, it was extremely hot, and the deck kit ended up being a lot uglier than I thought it would. We did our best and we got three decks built in just a little under 4 weeks.

Porch railing before
The porch railing before.  Steve started dismantling it before taking a picture.
The biggest issue with me and those decks are the railings.  You can see in the picture above, just how ugly the railings are.  In preparation for our new siding, the railings on the front porch had to be removed.  I have asked Steve for a couple of years to change out the railings in front.  There was another issue with those railings that I hated besides the way they looked.  If we ever sat on our front porch, those railings were right at my eye level!  I couldn't see anything except ugly railing! So they had to go, and while Steve was more than happy to do that, something had always come up that was more important.  Now that the railings are removed, Steve decided to take the time to build new ones.

In this process we also decided to move the stairs to the middle of the porch rather than against the house. Weeds would grow between the house and the stairs and it was almost impossible to keep them cleared out!  The picture above shows the new placement of the stairs.

Determining Porch Railing Height
Determining railing height so I could actually see over them!
Since we are planning on painting the deck and railings white, we was able to use scrap lumber that he already had.  He knew (and got my okay) that he wanted to make X's along the front, but he wasn't sure how he was going to do it.

Close up of front porch railing
Close up of the X's we both liked!
He said that he tried laying the boards different ways in order to make one big X  in each of the sections, but when it didn't look good, he decided to make a couple of X's in each section.  If you look closely below, you can see that he actually made two V's.  An upward V on the frontside of the railing and a downward V on the backside of the railing. 

Close up of inside of railing and you can see how he constructed it.
When I saw the picture, I fell in love.  It looked so good and I am so happy with it.  It is not completely put together, as you can see above, he will wait until the siding is up and then put the porch back together and secure all the X's back in, plus he wanted to make sure I was 100% happy with it before making it permanent.  Smart man!

Front view of porch railing, and view of how desperately we need siding!
I can hardly wait for the siding to go up and to share that with you, but also for the new porch railing as well. I love that this project cost us ZERO DOLLARS because we were able to use lumber from an old deck that we dismantled.  It is great that we can use what we already have on hand to help make our place more beautiful.

Let me know below what you think of the porch railings!

Our Kitchen's New Window Trim

Thursday, November 5, 2015

We are on a mission to update our place.  We had really wanted to build a house and had even gone as far as talking to a builder.  But where we are right now in our lives, we decided that the best thing to do would be to postpone that idea and work on our home.

We currently live in a mobile home, and square footage-wise it is bigger than the bungalow that we moved from.  However our bungalow had a ton of built in storage that I miss.  A lot!  Steve has promised to build me some built-in book shelves this winter and I can hardly wait!  But in the mean time, we have set out to beautify the place a little bit.

I showed you pictures of our front door that I painted and our french door in the back that had to be completely taken out due to rotting headers and footers.  It looks so much better!  We will also be putting new siding on due to our present siding being rotten in more places than what we originally thought.  We also hope to take out the underpinning and put in a rock or a decorative cement block foundation.  And Steve has already built one shutter to see if we would like it.  We did!  It should look a lot better when all of that happens!  I can't wait to share those projects with you!

Our latest beautification project was made possible by Pinterest.  I can just imagine what Steve does whenever he gets a notification that I have sent him a pin.  9 times out of 10 it means more work for him.  What is so wonderful is that I don't ever hear him complain about it.  He may tell me why it wouldn't work, or wouldn't be possible for us, but he is always open to new ideas and will at least give them serious thought.  Thanks honey!

This specific pin was for trim work around windows. We had new windows installed early this year and it was a very good decision!  Our utility bill went down, in the first month by $100.00!  It has stayed down every month since, so they will eventually pay for themselves in the long run.  So with new windows, we really needed new trim.  The trim that we had around some of the windows was just the wood corner round. On our kitchen window it was the plastic corner round.  Needless to say, it did not look good.  We took it down and for months, our kitchen window has been trim-less.

Kitchen window with no trim
No trim, messy kitchen, and picture taken at night equals one ugly mess!
 I sent Steve several pictures of trims that I liked and we agreed and what we wanted.  We didn't follow one pin over another, we just took ideas and measurements and went with what we liked and what would work for our window.

Now comes the simple living, self-reliant part...we used lumber we already had on hand.  That's what I love about this!  It didn't cost us a dime.  Now if we want to do more windows, which we do, we will have to buy some lumber.  But for this first window, we didn't have to.

You may notice in the picture that the drywall below the window is bowed up.  The people that installed the window was supposed to fix that, but they didn't.  We weren't real happy with that and Steve was toying with the idea of removing the window, fixing the frame and then reinstalling it.  Neither of us really wanted to do that.  Well with the trim that we choose, we were able to hide the fact that it was not level.

Kitchen window after trim added
Clean kitchen, pretty trim, picture still at night equals much prettier site!
I love the trim work that he did.  The best part is that it has a ledge!  It is not a big ledge, but just big enough I could put a small plant on it.  Steve is planning on tackling the other windows on the days that he can't work on the outside of our house.  Slowly but surely, our place will become beautiful once again.

Let me know in the comments below what you think about the trim.


©HensleeFarmAdventures.com. Powered by Blogger.

Search This Blog

Back to Top