5 Reasons Why I Read Banned Books to My Children

Tuesday, September 29, 2015

This week is Banned Books Week and I wanted to share with you why I read banned books to my children. 

While I was working towards my master's in library science, one of the classes that I took discussed banned books.  I had always assumed that if a book is banned or even challenged that it had to be because the content was so vile, so horrific that no one would be able to read it.  I was wrong.

Some of the books that have been banned and/or challenged include: 

  • Harry Potter Series
  • Little House in the Big Woods
  • To Kill a Mockingbird
  • Gone With the Wind
  • The Lord of the Rings
  • A Farewell to Arms
  • The Grapes of Wrath
  • The Great Gatsby
  • Charlotte's Web
  • Where the Wild Things Are
  • And many more...
What is the Difference Between a Challenged Book and a Banned Book?
So what is the difference between banned books and challenged books?  Challenged books are those that someone finds offensive and has asked that they be removed from a library.  That library can be a school library, a public library, or a college library. Normally if the book is challenged, it will be removed from the shelves and unable to be checked out until a decision is made.

If it is decided that the challenged book should be physically removed from the library after the challenge has been reviewed, then it goes from being a challenged book to a banned book and it will no longer be a part of the library collection.


5 Reasons Why I Read Banned Books to My Children

So you might wonder why I read banned books to my children, and as they get older, they will be reading the books themselves. As you can see from the very short list of banned/challenged books above, if I didn't read or allow them to read banned books, they would be missing out on some truly tremendous works of literature.  I thought I would share some of the other reasons why and then you can decide for yourself whether or not to allow your children to read banned books.

1.  I want to be the one to decide what my child reads and doesn't read.

I really never could understand the reasoning behind banned books.  If you don't want your child to read something, then don't allow them to.  I may be naive in my thinking, but it should be up to the parent on whether or not a book is appropriate for that child.  I want to be the one to decide that for my children.  I do not want another parent deciding what is or isn't appropriate for my child.  

2.  I want my children to become free-thinking adults.

In order for my children to become free-thinking adults, then they need to have read a multitude of diverse ideas.  I want my children to be able to make up their own minds and to create their own ideas.  Reading a diverse set of books is a great way to shape who you are and who you want to become.  

3.  I want to expose my children to different cultures, traditions, etc.

This goes along with #2 above.  I want my children to learn about different cultures, traditions, histories, etc.  The only way to do this is to allow them to read about it and to experience these cultures.  It is not always possible to personally experience how certain people live, but the next best thing is to read about it.  

4.  Too much "protection" can backfire.

I am all for wanting to protect my children from inappropriate material.  There are certain t.v. shows that I do not allow my children to watch for various reasons.  There are also certain books that I wouldn't let them read at the age they are because they just wouldn't understand. However, trying to protect your child too much can have negative effects.  They can either enter the world unprepared for what it holds, or they can go behind your back and do the things that you were trying to protect them from in the first place.  Neither scenario is a good one.  I hope to keep the lines of communication open with my kids and make sure that they are prepared when they go out into the world.

5.  I want my children to read some great works of literature

If I didn't allow my children to read banned books, they would miss out on some great works of literature.  Several award winners have been banned or challenged.  My son would not be able to read Mark Twain, and every boy needs to read Tom Sawyer and The Adventures of Huckleberry Finn. My daughter would not be able to read Judy Blume. I read Are You There God? It's Me, Margaret. so many times, the book fell apart!  I can't imagine my kids not having the same kind of experience with books that I had.  There are certain books that shaped me into the person I am today.

An extra thought: It's okay to say no to some books:

6.  It is okay to NOT allow your child to read a book

When my son was in the second grade, he brought home the book Jack's Run, by Roland Smith.  I had not heard about it, but decided to read about the book before delving into it with him as our evening reading.  I realized that not only was the reading level too high for him, but so was the content.  This is the first time I told him that he needed to take it back to the library and we would check it out again in a couple of years.  Later that same year I had the pleasure of meeting Roland Smith as well as his wife Marie Smith, who is also an author.  I told Marie about my son bringing home one of Roland's books to read and then we started discussing my son's age.  I felt relief when she agreed with me that 8-years-old was too young to read Jack's Run.  So sometimes it is okay to say no.  This goes back to reason #1.

What You Can Do

Read banned books, support your local library, and educate others about the right of freedom of speech.  And if your child brings home a book you don't want them to read?  Just say no, but please don't take the right to read it away from others. 

Comment below and let me know how many of you read banned books?


Throw Back Thursday: Our Anniversary!

Thursday, September 24, 2015
Happy Thursday!  Fall has officially started which I am very excited about!  One other thing I am excited about is that tomorrow is my wedding anniversary.  My wonderful husband and I will be celebrating our 11th anniversary!


I would like to be able to say that it has been completely wonderful and a piece of cake, but I think any of you who are married would know that it would be a complete lie.  Marriage is not easy.  Marriage is hard work. There are times where you don't feel like putting in the work.  Times when things are so bad that you wonder if it would just be better to walk away.


I'm here to tell you that those bad times, the times that make you wonder, are the times that make the good ones even sweeter.  Working through the bad times and surviving is worth it in the end.


What has helped me and my husband is the fact that we truly love and respect each other.  Girls, I have to tell you I got a good one when I married this fella!  He treats me with respect, he loves me unconditionally, and he thinks I am the most beautiful woman on this earth!  And the best part is that I feel the same way about him.


So tomorrow, we are finally getting away and spending some time with each other.  If we are lucky, a couple of times a year we are able to get away for a day and a night.  Well for this anniversary, we are going to be gone a whole weekend!  We are also going to be doing something that I love to do that we haven't done in a long time!  We are going antiquing!  I already have some items on my list that I want to buy to restore for our home.  Hopefully I can find what I am wanting.  If I do I plan to share my projects with you!


The other exciting thing that is happening today is that we are getting new internet service.  As you would expect (from the title of my blog) we live in a very rural area and so our options are limited (one), until now.  We now have another option so we are going to go with that one and see how it works.  I am hopeful that our service will be better and more consistent.

So have a great weekend and next week I promise another recipe and the start of the Christmas series. See you then!

Our Family's Fall Bucket List: How to Purposefully Create Time Together

Tuesday, September 22, 2015

Fall is a time to get back into the routine of school days, extracurricular activities, and all the things that keep us busy.

This year, we promised ourselves that it would be different. We had planned to say no to extra activities, we would stay home and enjoy our time as a family.  But here we are again, our days are filled with work and school, and our evenings with extracurricular activities.  With everything that we have going on, we are only home two nights out of the week.


Family time is so important to me.  I don't want to get so busy with our lives, that we forget to remember the important things.  Recently I shared with you a post on my son and how fast he is growing.  I didn't realize how fast it was going until I realized that I had already missed the "lasts."  Our lives can get so busy, that sometimes we forget what really matters the most.  We have to be purposeful in our time that we spend together, or it just doesn't happen.  


I have seen on Pinterest different ideas for "bucket lists."  Some are lists you make of things you want to do before you turn 30 or 40, others are geared towards a season or holiday.  For us I thought we could work together to make our own family bucket list to purposefully create things that we can do together. This would allow us to have our family time. 


Fall is my favorite season, with springtime a close second.  For us, it makes sense to create a list of activities that we can do during the fall season.  I thought that I would share that list with you.  These are all things that our family loves to do.  These items were decided based upon what our family wanted to do.  This is a list that is personal and meaningful to us.  It is not meant to be a list that your family has to follow.  Instead use this list as a guide to create your own bucket list.  Create this list as a family and incorporate at least one thing from each member.  

The important thing is to make it unique, make it special, and make it memorable.  And of course most importantly make it fun!  

So here is our list of 20 things that we have done or will do this fall.


So let me know below, have you made a family bucket list?

Canning Ring Pumpkins - A Craft Project!

Thursday, September 17, 2015

I am really excited about today's post.  I know, it isn't my usual recipe post, but it is a cool and easy craft post. And since I've been asked to do more craft posts, I thought this would be perfect.

I have seen something similar to this on Pinterest, and last night my sister texted me a picture of canning rings put together like this, but decorated for Christmas.  She said she thought it would be cute and I should do one for my blog.  I thought, hey why not?

The best part about this craft is that it cost me a whopping $0.10 per pumpkin to make. The only thing that cost were the decorative leaves and the zip ties. We actually already had the zip ties, but I thought I would go ahead and throw in their cost as well.

What helped with the cost was getting canning rings from my parents.  I had a feeling that they might have some and boy did I hit the jackpot.  What I love about them is that they are rusty and old looking.  But it wasn't my intention to leave them that way.

Bag full of wide mouth and regular mouth canning rings.
My plan was to spray paint the rings orange, in fact I had orange spray paint that I had bought for another project, but after I got home I realized that it had been used on a pine wood derby car.  So I looked through my spray paint, and decided to paint them a brown color.

My wonderful hubby helping out!
I thought that the brown would work and I really didn't want to have to wait another day, or spend more money on this.  I really wanted to be able to use what I had at home.  One thing I did purchase, was a bag of sparkly decorative leaves from the local Dollar Tree that I thought would go perfect as part of the decoration on the pumpkins.  After spray painting the rings, I started looking at the ones we had left.  And I kind of liked the way they looked.  Steve talked me into making one with the rings as is.

Wide mouth rings sans paint
That is when he took over the project and let me snap some pics.  It was kind of nice for a change! He made both a wide mouth sized pumpkin and a regular mouth sized pumpkin.  For the wide mouth size you will need between 18-20 rings.  For the regular mouth sized pumpkin you will need 15 rings.

Putting the rings together
You will want to put the rings together like the picture above.  Don't try to fan them out yet.  That will come later.

Once you have them together, the best thing to hold them is a zip tie.  Steve used two zip ties to make it large enough to go through all the rings.  You will need a pretty long zip tie.
Zip tying the rings together
Once you have the zip tie in place, you will need to work with the rings and get them to interlock with each other.
Make sure the rings are interlocking 
You may need to also adjust the zip tie and pull it tighter as you are interlocking and fanning out the rings.  Once you get it the way you want, then you should have a beautiful pumpkin shape.

My soon to be pumpkin.
I believe the one that I saw on Pinterest used a cinnamon stick for the pumpkin stem.  I looked through my cabinets and didn't find any cinnamon sticks, so again Steve came to my rescue and found me some actual sticks from our yard that I used as the stem.  I believe that I actually like the use of a real stick which adds to the rustic look of the rings.  I also added in one of the sparkly leaves for color and voila!
Super cute pumpkins!
After making these and leaving the rings as is, I really like them.  In fact I think that I like them better than the painted ones.  I actually haven't made a painted one yet, but I will just to see.  I also love that these are old and rusty and antique looking.  I think that they are perfect!

So comment below and let me know what you think about this easy and cute craft. 

Going Camping: What to Do and Not Do

Tuesday, September 15, 2015
Our family loves to go camping.  It is a great way to get away and really enjoy nature and each other.  And talk about some great family memories and adventures that are made on these trips!

Just this past weekend, our family went on a camping trip to one of our state parks.  It was a beautiful weekend.  The weather was not too hot and not too cold.  We went during Bass Pro Outdoor Days and camped with some friends that are in the same scout pack. To be honest, I think that our kids enjoyed it more than our family vacation we took this summer!

I thought it would be great to share with you some of the ways we prepare for the camping trip, and some of the things that we took or we wished we would have took. 

Note: With our kids we are not hiking-in our camping equipment. So at this time weight is not an issue with us. Likewise we are not interested in "glamping." We try to bring the necessities and at the same time pack light.  Here are some of the things that we pack.

TOTES

We have totes that we use to keep some things at the ready.  For this camping trip, we took two totes, one for food and kitchenware, and one for general camping supplies.

Our kitchen camping tote

Our kitchenware tote included:
  • eating utensils
  • pans for cooking
  • spatula/knife/cutting board
  • spices
  • percolator/coffee
  • food that did not need refrigeration
What I would do different:
  • prepare veggies ahead of time and place them in the cooler
  • bring sandwich bags for storage (really just an oversight) 
  • bring more paper towels (something that we try and not use too much of)
Our general camping tote

 Our general camping supplies tote included:
  • lantern
  • 2 head lamps (these were a lifesaver!)
  • lighter/matches
  • camp stove
  • extra propane for camp stove
  • trash bag
  • hammer
  • first-aid kit
  • twine
What I would do different/What I forgot:
  • pack more trash bags
  • pack a small tool set (hammer was good, but it would be nice to have a few other pieces if needed)
  • check first-aid kit to make sure it has everything (we were missing bandages which we needed!)
  • save up dryer lint and bring as a fire starter 
COOLER

We brought a cooler so we could bring foods that needed refrigeration.  We wanted to make good meals for our camping trip and I think that we did that.  The first night we had chili, then in the morning we had breakfast burritos, then the second night we had a polish sausage, potatoes, onions, and peppers dish.  We probably could have cut down on the amount of items we took by sticking to hotdogs and pbj, but I love to cook out in the open.  Of course we also had some bottled water that we brought.  
 
TENT AND BEDDING

Our tent is supposed to sleep  4-6 people.  I'm thinking that 4 would be the most comfortable.  With any tent, make sure you are getting the size you need for comfort.  And while a pop-up tent would be nice to set-up, its size would not be good for us.  And honestly, once you get familiar with how your tent is set-up, it shouldn't be too hard.  Note: Set up your tent before you go camping and make sure all the pieces are there, and don't forget the instructions!

What we took:
  • tent
  • sleeping bags
  • pillows
  • old quilts 
What I would do different/What I forgot:
  • bring an air mattress (multiple so 4 people would all be sleeping on them)
I would highly recommend an air mattress.  We did not have one this camp out, we slept on some old quilts, and then our sleeping bags on top of that.  It wasn't too bad, but after two nights, that was about all we could handle.  We did have a foam mat that was supposed to be big enough for the kids, but I think only one kid ended up being able to sleep on it.


CLOTHING/TOILETRIES

We wanted to pack as light as possible, which really for this trip, we were running out of room in our car, so one duffel bag for four people was all I packed.  We were gone for 3 days and 2 nights.  In the future, I'm going to try and pack 2 duffel bags for us.

What we took:
  • 1 duffel bag
  • 2 sets of clothing for each person
  • 1 set of pjs for each person
  • toothbrushes/toothpaste
  • hairbrushes/combs
  • deodorant 
What I would do different/What I forgot:
  • towel and soap (I completely forgot and this campground had a shower!)
  • 2 duffel bags, one for the kids and one for adults.  Or another idea would have each kid pack a backpack with their items in it.
I thought I would show you how I packed the clothes.  I put a complete outfit together with shirt, pants, socks, and underwear like below.

One complete outfit
And then I rolled it up and stuck it in the duffel bag.  This way, we weren't searching for a pair of socks or underwear.  Everything was together.

Rolled up ready to be packed.
Something we did take that we weren't able to pack in a tote, was our dutch oven.  I did take a skillet as well, but our dutch oven would have been sufficient enough to cook in. 

As for our next camping trip, I know that we will be even more prepared.  We are all eager for that next camping trip and we hope that it will be as much fun.

Let me know, what do you take on your camping trip?


Throw Back Thursday: Cast Iron Skillet Cornbread

Thursday, September 10, 2015
A while back I promised you a recipe for my cast iron skillet corn bread.  Well now the time has come to deliver on that promise, but before I share that recipe with you, I thought I would tell you a story.

My dad was born in the middle of the great depression.  He was child number 9 out of 12 for my grandparents.  Can you imagine trying to feed that many mouths during good times, let alone during one of the longest economic downturns that our country has ever seen?

I know what helped was the way that they lived.  They had a vegetable garden, and raised their own meat.  They had a milk cow for milk and butter, chickens, and hogs and they had land they could farm. During the toughest of times, my grandfather and the eldest son went away to find work at a logging camp out west.

Growing up, I heard many stories about my dad's childhood.  Those stories would come from various family members and it gave me a real insight into how life must have been during that time.

During one visit with my grandmother's sister, I remember discussing cornbread.  That family was known for their good cooks, and great recipes, so talking about food was not uncommon.  My dad mentioned making cornbread with milk and eggs.  His aunt just looked at him and in the way she would always draw out her words she said "oh honey, you weren't brought up that way."  She went on to explain that they were too poor to make cornbread with anything other than water and cornmeal.  My dad just smiled and gave me a wink.  He didn't argue with her.  He knew that there was a time that cornmeal and water was probably the only way they could make cornbread, but he also knew that when the ingredients were to be had on their farm, milk and eggs were added as well.

I haven't tried my great aunt's version of cornbread, I'm thinking that it is probably a hot water cornbread.  This recipe is going to be more than just cornmeal and water and I can tell you that this version is very tasty!  Even my cornbread hating husband loves this one.

Simple ingredients make for a delicious and cheap recipe!

So here are the ingredients.  You might be asking yourself, "what is in that jar?"  Well that is my secret ingredient and what my grandmother always used, to make her cornbread.  Bacon grease.  I know what you are thinking...heart attack waiting to happen, but the bacon we use is from grass fed pigs.  When I save the grease, I strain it so it is "clean."  And honestly, it gives the cornbread so much flavor.  Trust me.

Not sure about the bacon grease?  Well, I guess you can use oil, whichever one you prefer.  It will still do the job (just not as tasty). :-)

See, that bacon grease doesn't look so bad!

Turn the oven on to 350°F.  Put two spoonfuls of bacon grease, or about 1/4 cup of oil in your cast iron skillet and then put the skillet in the oven.

Next mix together 2 cups of cornmeal, 2 eggs, and 1 1/2 cups of milk.  You can use sweet milk or butter milk, whatever you have on hand.  Mix well.


Once the oven has preheated and the skillet is nice and piping hot, take it out of the oven and pour a little bit of the grease or oil into your batter and stir.
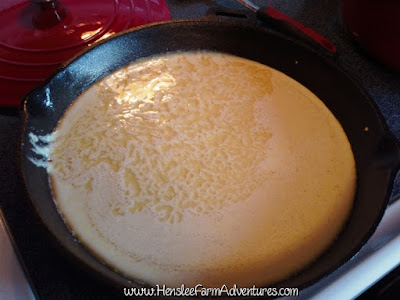
This is the batter ready to be baked.  Thanks to the hot pan, it has already started to brown around the edges.

Then pour the batter into the skillet.  It should sizzle as it hits that pan.  Turn the oven up to 400°F and put the pan back in the oven.  Bake for 15-20 minutes or until golden brown.

Yum, yum!
And here is the finished product! This was so good!  I love cornbread, especially with chili, or beans, or a hearty soup.  I even love it as a dessert with honey drizzled on top.  Want to know what we ate with this cornbread? 

Cheeseburger soup!  I'll share that recipe with you very soon!

This was unbelievably good!  One of our family's favorites!
I hope you enjoyed this easy iron skillet corn bread.  If you want the printed version of the recipe, then click HERE.

Let me know in the comments how you make your cornbread.


We Put the Labor in Labor Day!

Wednesday, September 9, 2015
I hope you all had a wonderful Labor Day weekend!  We had quite the weekend and with all the projects we tackled, we put the labor in Labor Day!  I thought I would share some of the projects that we did.

After the doors came out.  There's a lot of work ahead for Steve!
Our first (and biggest) project we tackled was pulling our french doors at the back of the house, replacing both the header and footer, building a new door frame and reinstalling the doors.  It took the entire holiday weekend to get this project done and for two nights we had a gaping hole in the back of our house.  Luckily Steve was able to put a tarp up to half-way keep the critters out (that will be another story for another time).

Still need to paint and put up trim, but at least we have a back door!
While I did help Steve with this project there were times that he didn't need my help.  So that left me free to tackle a couple of other things that needed to be done.

The first and the only thing that I did this weekend that was not a necessity, was to paint our front door.  The door itself is solid wood and a beautiful door.  However the sun had damaged the outside of the door over the years.  Last year I tried to sand it and stain it, but because of the damage the stain did not go on even and so we had a two-tone door.  It was not pretty.

Our two-tone door. 

I finally talked Steve into letting me paint it.  But more than that, I was able to paint it red!  I love the color that I ended up with.  I purchased Valspar Posh Red.  It is not a bright cherry red, neither one of us wanted to go down that road.  It is more of a brick red and looks great with our tan house color...otherwise known as Canyon Ridge. :-)

Our beautiful red door!
I'm not sure if the picture does it justice, but I painted it in a way where you can still see the browns from the door stain coming through.  You can also see the grain of the wood which Steve loved.  All-in-all I thought it turned out great!

Another fast project I did was spray paint our back outdoor light, sorry no pic. :-(  It was originally black, but was extremely faded.  I had some metallic oil rubbed bronze spray paint that I had used for another project.  It was perfect and took less than five minutes to spruce it up!  Before I did that I had been ready to buy a new one!

The third project that we started but didn't get to finish was replacing our rotted trim boards around the house.  While Steve was working on installing the back door, I primed and painted the trim boards so that our last day before going back to work we could put them up.  Well, as I was removing our rotted trim boards, I realized that there were several places where our siding was also rotted.  So guess what?  The trim boards did not get put up, and now we have to purchase siding and replace what we need to.

Not a pretty site...bad trim boards and lots of weeds!
After tackling the door this weekend, another big project was not what either of us wanted.  We were ready to throw in the towel and just call some one to put vinyl siding on it, but money-wise it is cheaper (although more labor on our part) to replace the rotted pieces, so we will be doing that as soon as we can.

While I was taking off the bad trim, I was also trying to weed, which was just ridiculously out of control!  We really let our place go this spring and summer, but we had good reasons.  Now, we just have to get it back in shape before winter comes!

So our next projects (besides the siding and trim of course) will be to move the stairs on our front and back decks and to replace the railing on our decks.  I also bought some cool fabric which I will be making curtains, recovering a footstool, and recovering some bar stools.  I can't wait!  I will keep you updated on how that all goes.

Can't wait to use this fabric!
Keep an eye out for my homemade Christmas Gift series.  I will start posting that very soon.  I am getting so excited about it as I get everything together and start working on it.  I know you guys will love it!

Let me know in the comments below, what did you do for Labor Day?  Rest or labor?

Throw Back Thursday: Stuffed Peppers

Thursday, September 3, 2015

My #TBT recipe post is back!  I hope you all are as excited as I am.  The recipe I am sharing today used to be made by my grandma and my mom  when I was little.  My mom always loved it, but to be honest, I really never cared for stuffed bell peppers.  I just didn't like the cooked peppers.  Also the filling had rice in it and as a kid I didn't care for rice either.

So you might be asking yourself why am I sharing a recipe that I didn't like growing up?  Well because my tastes have changed and a couple of years ago, I came up with my own recipe for stuffed peppers that I loved.  In fact even the kids loved it! 

What I did different is halved the peppers and laid the halves cut side up and stuffed them that way.  I liked that because there wasn't as much pepper to eat.  I also omitted the rice and instead used some black beans and corn along with hamburger meat that I flavored with my taco seasoning blend and then added a little salsa.  I topped that with cheese.  It was wonderful!

Even though I love that recipe, it is not the one I am going to share with you today.  These stuffed peppers were actually made out of leftovers and more closely resemble my grandma's recipe that she used.  HINT: Once the peppers are assembled they can be frozen for later. 

So now on to the recipe.  Actually there really is no recipe for it.  I could have sworn that I had a written recipe for my grandma's peppers, but when I went to look for it I couldn't find it.  I do know that she would stuff them with browned hamburger, cooked rice, and homemade tomato juice.  Then she would cook them until the peppers were done.  So I based my recipe on that.

My ingredients...so glad I could make over my leftovers!

Here are my ingredients.  I had some leftover meatloaf that wasn't enough to feed all of us, but it was perfect for this dish.  Plus I thought the way the meatloaf was flavored would give the peppers a great taste.  I also had tomato juice left over.  This of course is my family's homemade version.  It is better than any tomato juice you can buy! If you don't have tomato juice on hand, you can always use tomato sauce, or even marinara sauce would be yummy.  I used a 1/2 cup of dry rice and three sad looking big peppers that I knew needed to be used very soon.

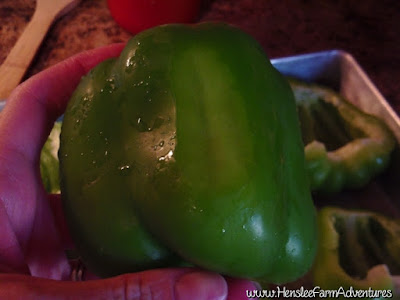
I started by preparing my peppers.  I cut them in half long-ways and removed the seeds and membrane.  I put them in a greased pan. 

Here is where I shaved off a piece on the backside so it would be stable.
Some of the peppers didn't want to "sit" very well, so I sliced off just a little of the underneath side so that they would be stable and wouldn't slide around or tip over. 

As I was preparing the peppers, I had already started cooking the rice.  After the peppers were ready and before the rice was done, I chopped the leftover meatloaf into a bowl.  Once the rice was done, I added it to the meat and then poured in some tomato juice, and mixed well.  You can see the consistency below.  I didn't want it too soupy, but moist enough so that when it baked, it wouldn't dry out.

Stuffed and ready to bake!

I then put this mixture into each of the peppers.  I just spooned it in and made sure not to fill it too full.  Once they were all full, I put the peppers into a 375°F preheated oven for 20 minutes.

After about 20 minutes, I removed the peppers and put a generous helping of grated cheese on top of each one.  Then I put them back in the oven and let them cook for another 10 minutes.

Depending on the size of the peppers and also how done you like them you may need to cook them a little longer.  I do not like the peppers mushy.  Thirty minutes was perfect for me.

These were even better than I thought!

The family loved these!  They were super easy to make AND I was able to use up leftovers which is always a plus in my book.  These lasted us two meals (supper and lunch the next day) which is also a big plus. 

So usually I have a recipe link that you can click on and print out, but for this one I don't have a recipe.  If you wanted to make it from scratch for a family of 4, here is what I think you could use:
  • 3 large or 4 medium size bell peppers
  • 1/2 pound hamburger, browned
  • 1/2 cup dry rice, cooked according to package directions
  • 1/2 cup tomato juice
  • 3/4-1 cup shredded cheese (however much you like)
Besides using leftover meatloaf like I did, leftover taco meat would be great as would leftover sloppy joe meat.  You could also add in a few veggies like I did in my original version (the mexican one)  to suite your tastes or to use up any leftover ones you may have. No matter what you do, these are sure to be yummy!

So let me know in the comments, have you had stuffed peppers and if so how did you make them?

Happy No Rhyme (Nor Reason) Day!

Tuesday, September 1, 2015
Today is national No Rhyme (Nor Reason) day.  I'm sure you are all going to be celebrating this wonderful holiday!  In case you aren't in the know, and have never heard about this holiday, it is the day that we celebrate those words in the English language that do not rhyme with any other word.

Have you thought of any yet?  If not, let me give you a few:
  • orange
  • bulb
  • month
  • amongst
  • fifth
  • flange
  • pierced
  • false
There are actually quite a few and the list above is just a very small list.  Did you think of any others?  Comment below and let me know if you can add to the list.

This past weekend we had some friends come to the farm that we hadn't seen in quite awhile.  We had a great time just visiting with them, and they were able to see all the new additions that we have.  We got out the dutch oven and made campfire chili and fry bread over an open fire.  It was delish!  Our friends happen to be YouTubers just like we are.  The funny part is that there was hardly a time when something happened that there wasn't at least one person yelling out "get your camera!" or "why isn't anybody filming this?"  After awhile we all started laughing about it.

However because of us wanting to film just about everything we did, we got some great videos.  Some will be posted soon to my channel at Henslee Farm Adventures .  In the meantime, you can watch this great video from RobThePirate about their time at the Henslee Farm.  Once your done, please check out his other videos, they are cool and funny!


In other news, I will be starting my Christmas gift making series.  I will be showing you some things you can make for Christmas gifts.  After all there are only 114 days  or only a little less than 4 months until Christmas!
 
©HensleeFarmAdventures.com. Powered by Blogger.

Search This Blog

Back to Top