Showing posts with label gardening. Show all posts

Freezing Corn for Winter

Tuesday, July 12, 2016
I absolutely love summer! And boy is it in full swing! I could do without the blazing temperatures and the humidity, which turns my naturally wavy hair into a frizzy mess (think 80's perm).  But I am loving time with my family, swimming in the pool, and one of my all time favorite summer time activities, putting up vegetables!

Yes, you read that right. I love preserving the food that we grow, whether that means freezing it or canning it. For me it brings back memories of getting together with my grandparents and sometimes my aunt and uncle, and sharing in the work. It was always so much fun, and after the day was done, we would split the food that was preserved between the families. All winter long we would enjoy the good food that we grew. It was almost like having a little taste of summer during the bleak cold winter days. I thought I would share with you how to preserve sweet corn on the cob so that you too can enjoy it all winter long!

Freezing Corn for Winter  www.HensleeFarmAdventures.com

First, I have something that I must confess. I didn't actually grow this corn. We have tried growing sweet corn for several years and we have just not had any luck. In fact the best year we had for corn was one where we were able to harvest 6 ears!

While I was excited about the 6 ears, I felt like a failure that I could not carry on our family tradition of freezing corn for winter. I grew up thinking that you could only preserve the food that came from your own garden. Somehow in my mind if you tried to preserve someone else's food it would rot, or magically disappear. I know, it sounds weird. But I have since learned that you CAN preserve any food! Imagine that! ;-)

I have to give a shout-out to the wonderful lady that grows the corn that I froze.  Her name is Sherri and she has a corn farm.  It is called Farm House Corn. It is absolutely wonderful corn, and she is the sweetest lady! What I love is that she only raises non-GMO corn and she uses no pesticides! I love it when you find a farmer that has the same ideals as you. Check-out her website, she is just starting her business (I am NOT getting paid to say any of this).

Now, back to freezing corn. I used to think that you could just wash your veggies and put them in a freezer bag and you are done.  With some veggies you can do this, but with others, corn being one of them, you have to blanch it first.

Blanching is where you partially cook vegetables, then dip them immediately into a cold water bath to stop the cooking process. Once the vegetables are blanched and dry, you can prepare them for the freezer.

The first step is to shuck the corn and remove the silks.  To remove the silks, scrub (not hard) with a vegetable brush while the corn is in cold water.

Freezing Corn for Winter  www.HensleeFarmAdventures.com
Beautiful corn, with slight blemishes. I love it! To me it means no pesticides.
Once the silks have been removed, cut off any bad places.  I thought I would share this picture with you.  The majority of the corn I got was pretty much perfect, however there were some that looked like the picture above. To me, that shows that pesticides are not being used. I just cut off the tops and we were good to go!

Freezing Corn for Winter  www.HensleeFarmAdventures.com
A treat for my chickens!
Next, bring a pot of water to boil and put in as many ears that will fit and boil for 6 minutes. Unfortunately, I do not have that big of a pot, so I had to boil my corn in batches of four.

Freezing Corn for Winter  www.HensleeFarmAdventures.com
Boiling corn.
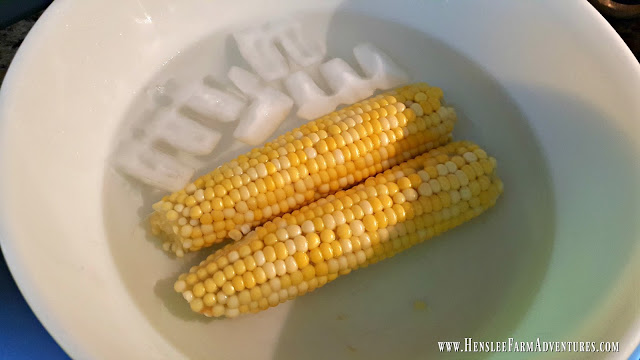
As soon as the 6 minutes are up, you need to immediately immerse the boiled corn in a bowl of ice water.
Freezing Corn for Winter  www.HensleeFarmAdventures.com
Ice water bath.
The ice water will stop the cooking process.  Isn't the corn a beautiful yellow?  And yes, that is two colors that you are seeing. This corn happens to be a bi-color corn.

Lay the corn out on clean kitchen towels to dry.

Freezing Corn for Winter  www.HensleeFarmAdventures.com
Beautiful corn! I believe that is a peach photo bombing this picture!
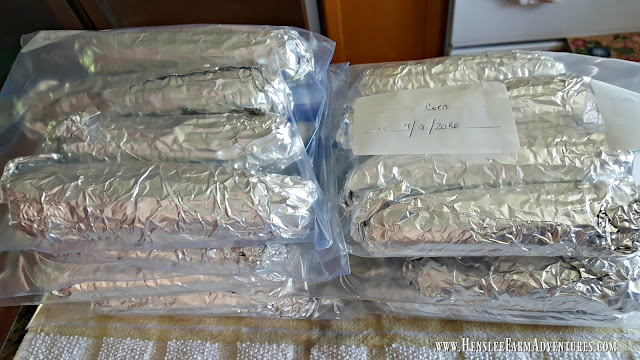
Once the corn is dry, you can roll it up in foil, and put it in freezer bags. After that all that is left to do is put it in the freezer!
Freezing Corn for Winter  www.HensleeFarmAdventures.com
Ready to freeze to eat this winter.
There really isn't much to getting corn ready to freeze. My kids love corn on the cob, and this winter, we will enjoy this corn. We can also thaw it and cut it off the cob and use it for stews and soups. It will give them a fresh from the garden taste! Trust me, after trying this, you won't want to buy canned corn again!

Be sure and let me know in the comments below what vegetables you preserve for winter.


When Life Gives You Lemons...

Tuesday, May 10, 2016
My days have been spent baking savory breads and making jams and jellies (a post is coming soon on the jams and jellies). We have been so busy that we have almost let the garden go. But this past weekend we decided it was time. We had talked about putting in a big enough garden that we could sell our produce, in fact we already have requests for produce from friends and family.

But that was not to be. Our tiller decided to not start. Mr. HFA is pretty handy and mechanically inclined so he can fix almost anything. When he couldn't fix it, I knew we were in trouble. Of course his first comment (out of frustration) was we might as well forget about a garden this year. But for me, that is not even an option.

Last year our garden was a total flop. We had so much rain within a 30 day period that not only did our garden flood, killing everything in it, but our roof on our house leaked sending a steady stream of water into our living room floor. With that amount of rain, we did not have a garden last year, and I did not want to repeat the same fate this year.

In the fall of last year, Mr. HFA built me some raised garden beds with wood we already had on hand. You can read about it here. We decided to add on to our raised beds and make a bigger area.

When Life Gives You Lemons  www.hensleefarmadventures.com
Blackberry blossoms, our hillside is covered with them!

We have seen signs this spring of a good harvest. I hope that it continues. Our blackberries are filled with blooms. In fact I have never seen so many in the 4 years that we have been on our land. The last time we picked blackberries, we were able to get a bucket full and that's it. This year, I already have dreams of blackberry cobbler, blackberry jelly, and selling blackberries at the farmer's market.

When Life Gives You Lemons  www.hensleefarmadventures.com
Our wild gooseberries! The berries are getting so big!

Our gooseberries are also doing really well. In fact it won't be much longer before they are ready to pick. The gooseberries are wild, and usually the wild ones are small. However when we went walking this past weekend checking out our berries, I noticed that they are huge for being wild.

So our garden has started. Since I didn't take the time to start my own plants this winter, I do need to buy some more tomato plants. Of course I will get those at the farmer's market. They are better quality and less expensive than getting them at a big box store. And we need to finish up the addition on to our raised garden bed.

When Life Gives You Lemons  www.hensleefarmadventures.com
Our pepper plants. Since our chickens are free range, we have to have covers for our garden.

Currently we have a tomato plant, cucumbers, peppers, green beans, and okra. I will be adding more as we get more space.

When Life Gives You Lemons  www.hensleefarmadventures.com
Our loan tomato plant, but it won't be for long.

I think we will try and fix a spot in our "normal" garden area for some pumpkins, gourds, and watermelon. They need lots of space to vine.

When Life Gives You Lemons  www.hensleefarmadventures.com
Our raised garden. You can see our original garden area right behind it.

So while normally we would feel defeated, I'm not going to let set-backs ruin my garden this year. Is the raised garden pretty? No, not by a long shot, but it will be beautiful when all those vegetables start growing. And if we only get enough to feed our family, then I will be more than happy with that. Of course I'm hoping to have enough cucumbers to make some of my yummy sweet and spicy pickles and our family's favorite lime pickles.

So I guess the moral of this post (there is always a moral, isn't there?), is that no matter what life throws at you, find a way to keep on. You may need to reinvent your original idea, but don't let anything stop you!

Let me know in the comments below how your garden is doing!

It's Spring Time!

Tuesday, March 29, 2016
I absolutely love spring!  Flowers are blooming, gardens get planted and that means fresh veggies and canning season right around the corner.

I can't wait until the produce I have on my window ledge actually comes from my garden!
We are getting our garden beds ready to plant.  I am glad that I have held off because we have had some hard freezes still yet in our area.  However I believe that we are ready to go ahead and plant some veggies.

In the past we have always tilled a big 40 foot by 60 foot plot and planted, but we had so much rain last year, that nothing grew, except a pond of course! ;-)  That is when we decided to make raised garden beds (you can read about how we made them HERE).  This year there isn't much to do to get them ready except add a little soil.  And the exciting thing is that while we did have to buy some soil this year, next year we won't have to.  We should have enough compost to add to our garden beds, and after all that is what we are striving to do, to become self-sufficient.

So I thought I would share some pictures with you about how we are getting ready on the farm for our garden.  The pictures below only show one of our garden beds.  We currently have three and will be adding more this summer.

Adding the soil
I can't stress how important it is to let your kids help with the gardening.  We have to teach our younger generation where food comes from, good nutrition from fresh veggies, and how they can feed themselves as they get older.  I am so glad to see that gardening and canning are making a comeback, because it is an art that should never be lost!

But Mom, we have to spread the dirt around with our hands!
I can't blame them, I love getting my hands and bare feet in fresh soil.  There is nothing that feels better.  The soil we bought did end up with a lot of clumps, so getting them out was a job that my kids loved!

Why, yes! That is a poodle skirt she is wearing to garden. :-)
Here they are leveling out the soil.  Next come the seeds.  My dear friend Amy gave me some wonderful seeds that she had and wasn't going to use.  It was like Christmas and my birthday all wrapped up into one looking through those seed packets.  I was trying to figure out which ones to plant, there were just so many to choose from!

Some of the seeds I will plant.
I have not had good luck with carrots in the past, but each year I keep trying and I am bound and determined to grow some, someday.  I really think our soil is just too rocky, but hopefully with the raised beds, that will help the situation.

I also thought I would share a couple of pictures that to me mean springtime.

Our forsythia bush
Growing up we always had forsythias.  I love their yellow flowers in the spring and lush green leaves in the summer.  They are almost always the first thing to bloom letting us know that spring is almost here.  I planted this little guy from a small start about 4 years ago.  It is slow growing, but it is growing and each year, I get more and more blooms.  I just love it!

Dogwood bloom
This is one of those pictures that I didn't think was going to turn out, but I was pleasantly surprised. Dogwoods are another one that signifies the start of spring to me.  I have tried to grow dogwood trees in my yard, but they don't make it.  They need cover, which is why they grow in wooded areas so well. They love the cover of the taller trees.  I hope someday to have a pink dogwood tree near my house that I can enjoy.

So how are your plants blooming?  Do you have a favorite spring flower or tree?  Let me know in the comments below!


Gardening in Winter: A Cold (Frame) Story

Monday, January 4, 2016
It has been a very mild December for us here in Missouri.  We were thankful for the weather that we did have as we laid Tippy to rest in our orchard.  Tippy was our dear sweet kitty.  She will be missed, and there is quite a void in our house without her.  Sox our other cat grieved over Tippy.  I didn't realize how much her passing would affect him, but it did, it affected all of us.

On the day we buried Tippy, the weather was very mild and we decided to take a little walk around our farm.  As we went buy our raised garden beds, I noticed some growth.  Some of our onions and spinach are growing.  I knew we had some old windows that we were saving to use for a greenhouse, so I asked Steve if he could fashion a cold frame for me.

Gardening in Winter: A  Cold Frame Story www.HensleeFarmAdventures.com
Little onions and spinach growing. 
I have wanted to try and grow vegetables during the winter months, and I thought this was the perfect time to start my hand at it.  I'm not sure if this is going to work, but I will let you know.  With the raised beds, all we did was use one of the covers that Steve built, and then put the windows on top to create a greenhouse effect.  I will have to keep a close eye on them to make sure that they are getting enough water, and sunlight, but not burning up either.  A true cold frame would allow you to raise the glass so that the heat it generates from the sun does not burn the plant up.  At this time, we do not have this feature which is why I need to keep a close eye on it.

Gardening in Winter: A Cold Frame Story www.hensleefarmadventures.com
Our windows sitting on top of the cover on our raised garden bed. 
If you would like to watch the video I have it shared below.  It also shows you a beautiful view of our creek. If you would like to see more of our videos, then check-out our YouTube channel. 


Let me know in the comments below, have you ever gardened with a cold frame?

How to Make Raised Garden Beds for a Fall Garden (Absolutely Free!)

Tuesday, August 25, 2015

Some of you may remember me mentioning that my garden didn't do well this year.  To be absolutely honest that is an understatement.  It really did nothing at all.  I was able to pick some shelly beans which I saved for seed, and I got a few cucumbers out of the garden.  That was it.  My husband says that it was because we bought a new pressure canner.  We jinxed ourselves.  I say it was because of all the rain we got, (we are still! trying to fix all the leaks in our roof).   Whatever it was, our garden just sucked!

But not everyone's garden fared poorly. My niece's garden did great this year.  The rain didn't seem to bother her's at all.  I am so jealous happy for her. :-)  So what was the difference between her garden and ours?  Her's was a raised bed garden.  Ours was straight in the ground.  I probably don't have to explain that with hers the water was able to drain, while ours was sitting in water.  In fact our garden looked like a pond in some places!


So while our garden did not do well at all this summer, we are not people who give up easily.  I talked my husband into building some raised beds for us to plant our fall garden.  It really wasn't that hard to persuade him.  I asked and he said yes.  The ones he built are small so that we can try them out and see how we like them.  Also they were built from lumber we already had on hand, which also determined the size.  After all, that is the point of being sustainable, right?  


I decided if we were going to do this, I should read up on raised garden beds.  I already had a plan in mind and I was able to get some newspapers from the local library that they were going to discard. I thought newspapers would be great for putting down first to keep the grass and weeds out of the garden. Then I read where cardboard really is better because it breaks down slower.  I was in luck, because of just moving my mother-in-law, we had lots of cardboard that we hadn't gotten around to recycling yet.  Since I had both, I decided to use cardboard in one and newspaper in the other to see what works the best.  I will have to let you know after this gardening season.


So to begin, the garden bed is just a box.  We already had these put together.  In fact they are parts of a porch railing which we took out the slats.

It began life as a railing...
Then we put two together to make it deeper.  We wanted to make sure that there was enough root space for the vegetables to take hold.

Stacking one on top of the other.
Steve screwed the two together to that they would be more stable.

The perfect size!
Then we set them where we wanted.  We decided we wanted them just outside our garden area, that way it would be easy to transplant in the spring.  Our garden proper, will soon become a chicken run once again (the perfect pest control!).

After that, I layered one with newspaper, and the other with cardboard.


From this point on, it is hit and miss on what to do next.  Some used a system that was cardboard, mulch, soil.  Others put the soil right on top.  We decided that on top of the newspapers/cardboard to first put grass clippings (that is our mulch), and then we put some chicken manure on top of that.  I want to stress that the chicken manure that we used was not fresh.  It was from a pile that we had sitting out composting, or as my dad would say it was "seasoned."  

With the grass clippings
Then on top of that we used soil.  We had all of this on hand which is why we used what we did.  The point was to make these without spending any money!

Ready for seeds!
While we were getting these ready and before we actually planted in them (thank goodness!) our dear sweet Abby (our boarder collie) decided she wanted to help.  She did this by digging in them.  So we decided that we needed covers for them.  I was thinking along the line of just laying some chicken wire along the top, which we had plenty of, but leave it to Steve to get all fancy on me.

He actually used a couple of more railing sections and built me covers for my boxes.  He did use chicken wire and he even made me handles for the boxes from scratch!  He used some stout wire that he had to fashion them. 

So here it is in all of its glory.  Steve actually made me two more for a total of three.  I couldn't be prouder of my little raised beds.  The best part is that they cost $0 to make.  

All done and ready for the veggies to grow!
Wondering what I planted?  Well, I used seed that I already had saved so that was something else, I didn't have to buy.  I planted carrots, turnips, peas, spinach, and green beans.  

I can't wait for my little fall garden to start growing and I can't wait to see how these raised beds do.  Hopefully we won't have to worry so much about weeding or getting too much rain.  I'll keep you all posted on how my garden grows. ;-)

So tell me in the comments below, how many of you use raised beds? 

Our Garden is Finally Planted!

Monday, June 15, 2015

Our garden is finally planted...and growing!  I really didn't think that it was going to happen.  I can't tell you how worried I was.

We are always late with planting.  It seems like there is one thing or another that keeps us from getting our garden in on time.  Usually it is the weather.  This year there were other things as well that kept us from planting. One was that our tiller wasn't working.  But thanks to my handy husband, he got it going and got the garden tilled.

A lovely tilled garden

 Because I wasn't completely healed from my surgery, we did have a little help from my sweet mother-in-law.  She was more than willing to come over and help with the planting.  In fact her and my husband did the majority of the work.

I had lots of help

 What I was especially excited about this year was that I was able to plant some shelly bean seed that had been saved from plants that my grandparents had.  These seeds have been passed down from a couple of generations.  There was not much left and I was really nervous about planting them in case nothing came up.  But the thought of planting those beans was exciting at the same time. 

Shelly beans handed down from my grandparents.
In case you are wondering, shelly beans are similar to pinto or brown beans.  We cook them up in our family just like brown beans.  And they taste wonderful with a slice of cornbread.  Yum!

We also had help from the infamous Sox.  You remember the one that loved to get into my tomato seedlings?

Sox (in a box). :-)

And of course, there is only one way to plant a garden...


Bare feet

So tell me...

How does your garden grow?


It's Garden Time!

Tuesday, May 12, 2015
I love the spring time! It means trees are budding and flowers are blooming, but best of all it means garden time!

It seems like every year we are late with putting out our garden.  Something always happens, whether it be life or the weather that postpones when we had planned on planting.  This year however we had big plans!  I started some seeds indoors and we were going to get our cool weather crops out, then go on to the summer varities.  And then life happened.  My mother-in-law put her house up for sale which meant that we had buildings to move to our place (YouTube video coming soon) as well as a few other big items. And if that wasn't enough, I ended up needing major surgery.  That means 6 weeks no heavy lifting and no hard labor. In fact no work at all, which is almost impossible for me to do!

So once again we are late with gardening season.  Here it is the middle of May and the garden isn't even tilled let alone planted.  But I haven't given up hope.  I have an idea that I think will work.  I just hope my family will help out since I won't be able to do the work myself.

Sox the tomato plant lover.

I thought I would share with you the pictures of my plants that I do have growing.  My peppers did wonderful.  My tomatoes, not so well.  That was due to a certain cat that couldn't keep out of them.

Here is where I started.  A blank slate.  I started these seeds on March 1st.  There was snow on the ground and dreams in my heart of the fresh vegetables to eat and can in the coming summer.  I planted seeds for four different kinds of tomato plants and three different kinds of peppers.  Some of the seeds I had purchased, and some I had saved myself from the ones I grew last year.
Starting seeds,

And here are the plants one month later.  The plants have grown some and so have the dreams.  They look wonderful!  I am so excited and my husband and I start talking about when we need to start working the soil.  This also includes redoing the chicken run because during the late fall and winter, we let the chickens loose in our garden spot so that (hopefully) they would eat the bugs we had trouble with in our garden last summer.

Tiny pepper plants
Tiny tomato plants


It was after these pictures that things started happening.  And now here it is in May.  You can see how much the plants have grown and I am determined to still get my garden out.

Pepper plants

Tomato plants


So here is my idea.  Instead of tilling the whole garden, I am thinking of having someone just make rows.  The chickens have done a good job of trampling down the straw that was in there last year.  That straw can serve as a mulch between rows.  I have done this before, but it was on my small garden plot.  I am sure it would work on a larger garden as well.

So is there anyone else out there that is late with their garden?  How are your plants doing? Please post a comment and let me know!
©HensleeFarmAdventures.com. Powered by Blogger.

Search This Blog

Back to Top