The Chelsea: Sewing Pants From My Past

Wednesday, October 11, 2017

I am so excited to be a part of The Chelsea Blog Tour today!

Have you ever had a piece of clothing that you absolutely loved?  A special dress, or skirt, or pair of pants that you just wore all the time because not only did you love the way they felt, but you loved how you looked in them?

I used to have a pair of pants back in the 90s that I loved, but it wasn't love at first site.  I bought them (yes bought - I wasn't sewing at that time in my life), to wear around the house.  They were made of black knit material, had this seam down the front, and a flared leg.  One day I got brave and wore them to work.  I actually felt guilty about wearing them to work because they were knit!  You didn't wear knit pants to work, at least not back then, and not in my mind.  But I started styling them with cute blouses and even cuter boots and they very soon became a staple piece in my work wardrobe and in my date night wardrobe as well.

In fact, I ended up wearing them so often that they became threadbare.  I actually wore holes in them and I have never done that with any clothing I have had.  I had to eventually throw them out.  But because I loved them so much, I started looking for another pair.


Fast forward 20 years (YIKES! 20 years!), and I finally gave in to my sewing obsession.  I love sewing for my family and me. I love how I can make clothes that not only fit much better than any ready to wear items, but that are also a higher quality.  I have become a follower of a couple of sewing groups on Facebook and that is where I saw a post from Greenstyle Creations that was calling for testers for a new pattern for pants.  You can't believe my surprise when the picture of the pants was almost the exact same pair of pants that I had and loved 20 years ago! I had always been in search of a pair of pants just like the one I had, but never found any like them. I immediately signed up to be a tester and was so excited when I found out I was chosen!


My third pair.  I love this fabric!


Even though I have been sewing (this time around) for about a year I still felt a little nervous being a tester for this pattern.  I was worried at first if I would even be able to sew these pants.  In my mind I could never do these wonderful pants justice. I also thought I would never be able to get that seam down the front to look good.  I was pleasantly surprised to find out how easy this pattern really is to sew.  And the front seam was not an issue at all.  I don't have a coverstitch machine, so I just lengthened my stitch and top-stitched down the front.

I love the detail of the front seam!

So here are my tips when sewing these pants:

Fabric is the Name of the Game!
Different fabrics will give this pant a different look.  The pattern calls for a stable knit.  The reason is so you can see that bell bottom at the end of the pant.  However you can use a DBP for a more relaxed version. It will still have a flare, it just won't stand out.  When I made my three different pairs, I went with a more stable version in fabrics that were recommended.  However between those three there are differences in how the pants look.  My first pair used fabric that was very heavy (and also was very hard to sew), my second pair used a ponte, but not with as much stability as the first, and my third used a ponte but it was flocked making it heavier and more stable than the second pair, but not quite as much as the first.  All three pairs turned out great and all three will be worn.

My second pair I made. I love wearing these to work!


Don't Stress Over the Pockets.
When testing started, there were not pockets on the pants, but they were very quickly added to the pants.  The pockets were something that I loved and desperately wanted, but I was questioning my ability.  I made the pockets on the first pair and they actually turned out pretty good.  However the pockets on my second pair of pants didn't turn out as well.  On the third pair, I decided to leave the pockets off, but mainly because of the type of fabric I was using.  That flocking just doesn't lend itself to being able to sew through multiple layers of fabric. The point is to try it and see how the pockets go.  They look fabulous and they are a great feature to have.  If you don't do so well the first time, then try again.

The Flare is Not As Big As You Think.
While I love the flare, I was worried how it might look on me.  Yes, they mimicked the pair I had in the 90s, but back then bell bottoms were all the rage.  Here we are right smack dab in the middle of the skinny jeans fad. My daughter Carly called my first pair of Chelseas my "Elvis pants" and you know what, when I had those babies on, I had an attitude.  Even nuking my coffee seemed more hip with those pants.  Carly may call them "Elvis pants" but I like to call them my sassy pants! I actually loved the flare.  They were so flattering because instead of looking like an ice cream cone, it evened out my shape.
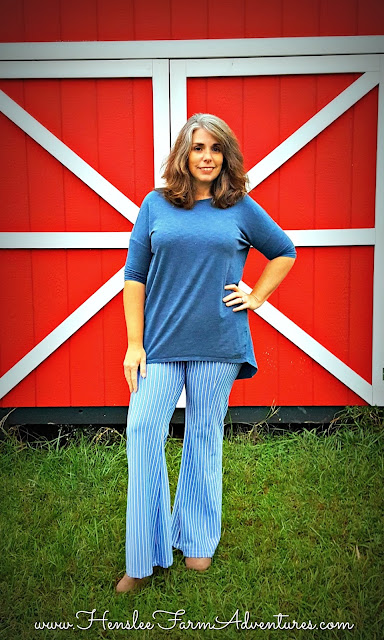
These are my Elvis pants!  I didn't think I would like my first pair, but I now love them!


And Most Important:  If You Haven't Tried Them Yet, You Need To!
These pants are amazing!  They are flattering on all body types! There were all sizes testing this pattern, and I did not see one person that these didn't look great on.  And of course I love how easy they are to assemble and sew.  I see a few more pair in my future...like a stretch denim and a corduroy. 

So here is some exciting news!!  Along with this blog tour there is a giveaway!  The first giveaway is The Chelsea pattern, and the second giveaway is stretch denim from Aurora Design Fabrics.  Be sure and enter below!


a Rafflecopter giveaway

Chelsea Pants Blog Tour

Monday, October 9, 2017
Tuesday, October 10, 2017
Wednesday, October 11, 2017
Thursday, October 12, 2017
Friday, October 13, 2017

Homemade Applesauce!

Monday, October 9, 2017
This summer has been crazy!  Wait, it's fall?  Already?  In fact it's October you say? I can't believe how fast this year is flying by. Actually fall is my favorite season, all pumpkin spice and everything nice.  At least it is my favorite until spring comes along then spring is my favorite season, everything new again and flowers blooming, gardens being planted.  Ah, yes, I'm a fickle one.

But back to fall.  What could be more fall-like than warm comfort foods and spices in the air?  Baking and cooking, now that it is cooler weather is something that I love to do, and one of my favorite things to make during the fall is applesauce.


Applesauce has to be one of the easiest things you can make.  There are only two ingredients you need; apples and a little water.  Of course you can always add in cinnamon to spice things up (we always do) or even apple pie spice.  And if you want to give it a deeper flavor, you can add in apple cider instead of the water.

The most important thing to do however is to start with good quality apples.  This is really what makes the applesauce.  Growing up my parents had several apple trees.  The one that they always used for making stewed apples (a chunkier version of applesauce), apple butter, and apple pie filling was a variety called Grimes Golden.  It cooked up beautifully, was sweet without needing much, if any, sugar added and it didn't have a mealy texture.

Blooms on one of our apple trees

Never heard of this apple?  Well I am not surprised, and if you have, then you rock! You really can't find this apple in stores today.  It is an heirloom variety and was first introduced in the 1830s.  It is considered a "parent" of the Golden Delicious apple among many other apples that are popular today.

Ok, enough of the history lesson!

To make homemade applesauce, first use apples that are good for cooking, and are on the sweet side.  If you use Granny Smith (which it is perfectly acceptable to do), then you will need some sugar added.  I prefer not to add any sugar.  Good varieties to use are: Golden Delicious, Fuji, and McIntosh.  These aren't the only ones you can use, but I wanted to list just a few that are readily available in the stores.  You can use just about any apple, just be cautious however, because apples like Red Delicious can be mealy in their texture and aren't the best for cooking.

Peeled and cored apples ready to be cooked


Once you have your apples, you will need to start peeling and coring all the apples.  It is best to purchase a peeler, especially if you want to continue to make applesauce, or you can do it by hand.  Don't throw out those peels and cores!  You can save them and make some amazing apple jelly or apple syrup!

Apple peels and cores that will become jelly


Put your peeled and cored apples in a big pot, a stock pot is perfect for this!  Add a little water, or apple cider.  Depending on how many apples, you can use 1 cup to 2 cups. For the 1/2 bushel I was cooking, I used 2 cups.  You don't need a lot of liquid as the apples will cook down, you just need something to keep them from burning on the bottom.  Put the heat on low to medium low and let them cook, stirring occasionally. Keep an eye on them and if you need to add more liquid, you can.

Once they have cooked down to the consistency that you like add in any spices that you wish.  We love cinnamon in ours.  You can also have your apples go au natural if you choose.  We also love to leave our applesauce a little chunky.  If you want a smooth consistency, you can use an immersion blender, or use a regular blender, just do it in batches.

Homemade applesauce, looks so good!

  
After it is all cooked down and to the consistency you like, you can preserve them by canning them, which is what we do. You can also let the applesauce cool and then put them in freezer safe containers to freeze. Or the best option you can eat it immediately!  If you decide to can them, you can do this using a water bath.  Just be sure and follow safe canning procedures.

Pint jars just going into a waterbath


There is absolutely nothing better than homemade applesauce.  If you have never made anything from scratch, this is one of the easiest recipes you can start with.  And I guarantee, once you start making your own, you will never want to buy pre-made again.

Let me know in the comments below if you have ever made homemade applesauce, and if you have, let me know how you make yours.
  

The Problem with Valentine's Day

Wednesday, February 15, 2017
I humbly bring you this post, the day after Valentine's day to address something that has been weighing on my mind. And I also want to speak to the women out there that are degrading all the men that have chosen not to buy into the commercialization of Valentine's day.

I first want to say that I am a romantic type of girl. I love getting flowers and chocolates and being taken out for a nice dinner. I love spending time with my husband and going on dates with him. I say that because I don't want you to get me wrong when you read what I have written.  I am not against the idea of Valentine's day.


However, I think that Valentine's day has become overrated and too commercialized. It has now become a competition with who gets the most flowers, or the finest chocolates.  For our kids, it is who can create the most extreme Valentine box for the school party, or who gets flowers, balloons, and/or candy bouquets when they are in the 1st grade!

When I went to my daughter's school yesterday, I was shocked at all the bouquets of flowers, balloons, candy, and stuffed animals that were there waiting for the child to whom they were sent to be picked up. I just thought to myself, what has this day become?

When I was in school, we made our Valentine card holder in art class, and it was usually made out of construction paper, was almost always in the shape of a heart, and just big enough to hold the small paper Valentine's that we would bring for each other. And what about candy? Well, that was usually given to us by our teacher...in fact 9 times out of 10 it would be a box of conversation hearts.


As a child, I never received anything else. I didn't need to receive anything else. Parents' giving their children these ornate bouquets of flowers, candy, and soda are setting them up for a lifetime of expectation that will inevitably one day let them down. (Not to mention starting them on a road to poor health).

But what I really want to address is the fact that I have seen women take men to task because they do not want to get their wives or girlfriends something on Valentine's day. In fact I have seen these men berated in front of others because of this. Really? Did these women ever once ask why these men did not want to get something? Do you think it might be because the money needs to go to groceries rather than flowers? Or perhaps he is saving up to buy something bigger for her birthday or Christmas. In fact there are some that are more than likely still paying off Christmas bills.

Have you ever asked yourself if it is really that important for men to give gifts on Valentine's Day?


And what about women?  Why is all the blame laid upon men?  Don't men deserve to receive a Valentine's gift? If we are going to force men to give a gift, then shouldn't it be reciprocal? In fact this isn't supposed to be a day just for women. This is a day to show your love for one another, so...

Here is my answer: Valentine's day should be about love and mutual respect for one another.

This year is the first in the 15 years that my husband and I have been together (3 dating, 12 married) that he did not give me a bouquet of flowers or a box of chocolates on Valentine's day.  In fact I didn't even get a card from him! How horrible is that, right? Wrong. My husband works hard every day of the year to show me his love.  He does this by helping me with the housework. In fact, he is a much better cleaner than I am. He helps with the kids without my prodding. He listens to me when I need to vent. He holds me when I am feeling blue. And he makes me laugh when I desperately need a good laugh.

My husband shows me love every day of the year, not just on Valentine's day.

I tried to tell him this, to say that this was more important than gifts, but he kept saying, but..but..

No, I said. I would rather have a husband that shows me respect and love everyday of the year, than a husband who gives me flowers on Valentine's day out of obligation.

Women...when you start hounding men about not buying gifts on Valentine's day, stop and ask them how they treat their women the rest of the year. And women, start asking yourselves how you treat your men every day of the year. If you are berating each other into buying flowers and chocolate out of obligation, then the gesture doesn't mean jack!

So how did I celebrate Valentine's day? On the Friday before, I volunteered at my son's school for their Valentine fest, I ate lunch with him. I spent time with him. On Valentine's day, I ate lunch with my daughter at school, and I went to her Valentine's party. I spent time with her. 

That evening, I cooked a special meal, and made homemade brownies in a shape of a heart. I loved on my family and I spent time with them.

And how did my husband celebrate Valentine's day? By showing me love in all that he does. Every. Single. Day.


A Month of No Groceries: Week 2 Update

Wednesday, January 18, 2017
Have you ever heard the term "a day late and a dollar short"? Well that is where I am with this post. Actually I am two days late. So does that mean I am two dollars short? Whatever it means, I am glad to finally give you an update on week 2.


This week didn't go as well as I had hoped. The first half of the week went great. No groceries were purchased and everything I cooked was food from our pantry and freezer.  I was really on a roll, and I was already thinking about all the great things I was going to tell you. I was going to say things like, how good it felt to stick to our plan, how easy it was to "shop" from our own pantry and freezer, how fun it was making meals that the whole family loved, and how I was up for mother of the year...

Then Wednesday hit, and two things happened; an impending ice storm was scheduled to hit our area on Friday, and my sister and I had to take our mother to the emergency room. My mom is fine, but we spent the entire day at the hospital. That meant there was no cooking that day. And in the back of my head, all I could think about was what if the ice storm coming our way knocked out power? Do we have food that we can easily cook on a camp stove? How will we get water?

Old-fashioned donut muffins.  A treat I baked on the week-end.

So on the way home from the hospital, my sister and I stopped at Aldi. I love shopping at Aldi! I love the variety and I love the prices. I swear I was only going in to buy some bottled water. I don't normally buy bottled water, but with the threat of the ice storm, there was a chance of losing power. If we lose power, then we have no water (our water comes from our well that uses electricity to pump it). 

Once I walked in the door of Aldi, I was a monster! A grocery shopping, I need one of everything, monster! I did get bottled water, but I also got crackers, and cereal, and milk, and bread, and lettuce, and bananas...lots of bananas. They were only 29¢ a pound! And I know there was more than that, because I ended up spending $45.00. Oh, and I bought one of their pre-made pizzas because by the time I got home I knew it was going to be late, and I knew I wouldn't feel like cooking. Convenience food here I come! 

Homemade tortillas...right next to my favorite coffee mug.

The very next day, I was back on track and back to my regular self. It is amazing how when life get's you off your regular path, all other things can break down. While planning can help, it is planning for the unpredictable that can really keep you on track. 

So my meals this week weren't too bad. Here is what we ate:

Monday: Mexican meal

I really don't know what to call this. I used the hamburger meat that I had cooked extra of when I was fixing our lasagna during week 1. I then added spanish rice, corn, and a can of rotel. I made some homemade tortillas and added in some sour cream and cheese and this was our meal for the evening. 

Our Mexican concoction.

Tuesday: Nachos

I used the leftover meat mixture from the night before and used it to make nachos. Very yummy!

Wednesday: Pizza

Of course this was the night that I didn't cook.  I bought a premade cheese pizza from Aldi and then added pineapple chunks and ham to make a Hawaiian pizza. This is one of my favs!

Thursday: Chicken patties, green beans, and applesauce

This is definitely one of those clean out the freezer meals. I am trying to cut out as much processed foods as possible, but I had chicken patties in the freezer and decided to go ahead and use them. They are at least now out, and we won't have to buy more. :-) The green beans and applesauce were both from the pantry and both home canned.

Friday: Broiled Pineapple Burgers with Aloha Salad

Sometimes I like to get vintage with my cooking and I decided to get out one of my 50's cookbooks to make this meal. We had some premade burger patties in the freezer that needed to be used, however, the last time we used them they tasted horrible. Not because the meat was bad, just the flavor was bad. I thought this recipe was perfect. I was able to use my left-over pineapple from the pizza on Wednesday to top the burgers. Broiling them made them cook up quick and of course I made the "spicy sauce" that went with them. The spicy sauce was comprised of brown sugar, ketchup, and mustard! I'm telling you they really knew how to spice things up back in the 1950's! My aloha salad was a regular tossed salad with the pineapple chunks that were left (the ones I didn't need for the burgers).  

Pineapple burgers with spicy sauce. Watch out! That sauce will getcha'

Saturday: Leftover night!

Or clean out the fridge night as I like to call it.  It is a great way to finish off what is left of meals and then decide if there are other meals that can be made from the leftovers of leftovers.

Sunday: Brown Beans and Ham; Cornbread

I was able to use beans I had in my pantry and ham I had in my freezer to make this meal. I made the cornbread from a mix I already had. Good, old fashioned comfort food!

Comfort food at its finest!


So that was my week in a nutshell.  (A really big nutshell)

How did you do? Be sure and tell me in the comments below. I love to read them!


Why I Cook with Cast Iron and Why You Should Too

Thursday, January 12, 2017
My husband tends to give me Christmas presents that are practical. That isn't to say that I don't like them. In fact I love them! His gifts are always something that I want, and that I need. He knows my taste and knows what I will be happy with.

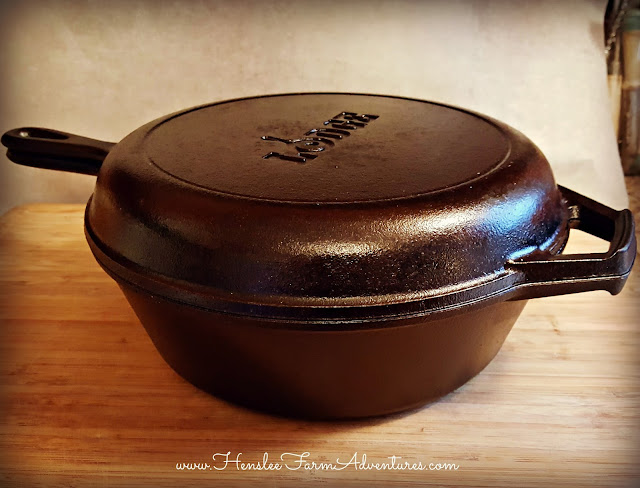
This year one of his presents to me was a cast iron pot with a cover that doubles as a pan. I have been eyeing this for sometime, and was ecstatic when I got it! I have slowly been transitioning to cast iron over the past couple of years. The other pans I have been using are a large stainless steel that can go into the oven, and a very small ceramic pan.


A couple of years ago I made the decision to toss out all my non-stick (read: Teflon) pans. I didn't like the fact that my family was ingesting the chemicals from the pans as I cooked the food, but I did love the idea of using little to no oil and having the food not stick to the pan, as well as how easy they were to clean-up. However health won out over ease of use and I decided to try stainless steel after that. The clean-up was easy enough, but the non-stick part was not there unless I used a ton of oil!  I decided I didn't want to add that many calories to the food we ate, so I tried ceramic. It did have non-stick properties at first, but the more I used it, the more the coating started chipping off and I didn't want that in my food either. I am sure some of you would tell me that I didn't use the ceramic pan right, I probably used too high of heat, or used too abrasive of cleaners, but if there is a coating on a pan, no matter what, it will come off at some point.

During this time, I had also started using a 12" cast iron pan. I like the idea of cooking with cast iron, and I like the benefits. It allowed iron to get into our diet in a healthy, non-toxic way. There are no chemicals on the pans, and they can last literally forever.  But there are some tips to using them to get the most benefit out of them.

I thought I would share with you why I am now solely using cast iron and why you should be too. I will also share with you some tips for using cast iron that gets the most benefit out of it.

Yes, you can fry an egg in a cast iron pan and not have it stick!


It Is Naturally Non-Stick
When I first started using cast iron, I would have absolutely disagreed with this statement. Yes, I was told it was non-stick, but my experience proved otherwise. What I didn't realize is that the pan must be well seasoned. Don't expect a brand new pan to be automatically non-stick. You will need to cook with it and build up the seasoning to experience it being non-stick. If the pan was pre-seasoned, then it won't take long for it to get to the non-stick stage.

Tip 1: Be sure and use some type of oil when you first start cooking with a new pan, or even a newly seasoned pan.  You will need to build up the seasoning of the pan and therefore its non-stick quality.

Tip 2: Keeping the temperature at a lower setting on your stove will also help keep food from getting too hot and burning/sticking to the pan.

The lid to the pot, which flipped upside down (as pictures) is now a frying pan!


It Adds Iron to Your Food
As I mentioned earlier, cast iron will naturally add iron to the foods that you cook in the pan. There are many people that are not getting an iron rich diet (think red meat, dark leafy greens, beans).  Not having enough iron in your diet can lead to anemia. While taking a supplement can help, the best way to get nutrients and minerals is through your food. And to think this pan helps with that!  If you are on the anemic side, don't think that you can immediately start cooking with cast iron and stop your supplements, it doesn't quite work that fast. You will need to cook with cast iron on a regular basis to see the benefits of the iron.

Cooks Somewhat Evenly and Retains Heat
I think this is probably my favorite benefit of cast iron. The pans I have used in the past (stainless steel, ceramic, non-stick) have had hot spots and cold spots. I do not have the luxury of having a gas stove and having control over the heat of the burner. With cast iron, I have experienced very few hot and cold spots, once it heats up, it is an even heat. What I have found with my electric stove is that I never want to raise the temperature of the burner more than medium. Once the pan is hot, it stays hot for quite awhile.

Tip 3: Be sure and preheat your pan! This really is a must to have even heating. I always put my pan on the burner and turn the burner to Medium (remember I have an electric stove). Once it is heated up (drop some water in the pan and if it sizzles and dances, it's ready) you can add your food (oil of your choice if you need it.)

My Christmas present this year, and it is fast becoming one of my favorites!


It is Easy to Clean
Ok, you might disagree with me on this, but I have learned the secret to cleaning cast iron. Clean it while it is still hot. Remove the food and add a little water to the pan. Using a soft cloth (I love using the dish cloths that I have crocheted), clean off the food residue. You will not need soap this way, I promise you. Soap can take the seasoning off of the pan. Be sure and dry the pan with a clean soft cloth (lint free) and then I reseason mine. To do this, I add about a tablespoon of olive oil to the still warm pan and rub the oil all over. I then sit it back on the stove  for the oil to absorb into the pan. If you need to season a pan from scratch, this is not the way to do it.

Tip 4: Do not over oil your pan to season it. If you put too much oil on your pan, you will end up with a sticky gooey mess. Don't worry if this has already happened, you can always scrap it off and reason your pan.


You CAN Use a Metal Spatula (and you should!)
On one of my YouTube videos I show how we cook cowboy stew over an open fire in our dutch oven. One of the things that I used was a metal spatula to first cook the hamburger. I immediately received a comment that I shouldn't be using metal. Guess what? You DO want to use metal with cast iron. When you first purchase cast iron pans, they can be bumpy or have an uneven surface. The use of metal on them hones down the cast iron over time and makes it smooth, which helps with the non-stick process and cleaning process.

Tip 5: You do NOT want to use metal on an enamel clad iron pan. That will definitely scratch the surface.

My cheeseburger soup in my enamel clad dutch oven. That spoon in the pot is a ladle and was not used to cook with.


You Can Cook on Any Cook Surface
These pans can be used anywhere! Electric stove, gas stove, wood stove, camp stove, open fire, you name it! So if the zombie apocalypse ever happens? Well you can bet you can still cook a fantastic meal! ;-) I have used mine on my electric stove, a camp stove, and an open fire. Nothing beats chili cooked in a dutch oven over an open fire. It is one of our favorite things to cook.

This is our dutch oven that we use when camping. We use it over an open fire, in coals, and have also used it on a camp stove.


They Last Forever
This is the best part about these pans...they last forever! What I wouldn't give to have a pan that one of my grandmothers had. I have heard from other cast iron lovers that the older the cast iron, the better. There are pans out there that are over 100 years old and are still in service today. The more use they get, the better they become. Of course that is if you take care of them. And I have found that care of these pans can be easier than some of the other pans I have had in the past.

Tip 6: Take well care of your pan by using it as often as possible, keeping it in a dry place so it doesn't rust, seasoning it as needed, and you will have a pan that you can pass on through the generations.

Let me know in the comments below what your experience is with cast iron, and what your favorite cast iron pan is.
  
©HensleeFarmAdventures.com. Powered by Blogger.

Search This Blog

Back to Top