Showing posts with label hamburger. Show all posts

Cheeseburger Salad

Thursday, February 4, 2016
My husband and I decided to go on a diet.  After the holidays we both had put on a couple of pounds.  Okay, maybe it was more than a couple.  I knew that I had been feeling extremely bloated, exhausted, grouchy, etc.  I thought I would follow in my sister's footsteps and cut out wheat and sugar.  We are on day 4 and I feel so much better!  No more bloat, I have a ton of energy, and I can actually remember things.  I think this is going to work!


You may wonder what we are eating, well it is a lot of veggies and fruit with lean meats and grains that aren't wheat or have a high glycemic value (think white rice).  I thought I would share with you one of our favorite meals, that is perfect!

My husband loves cheeseburgers.  He could eat them every day. Every. Single. Day.  In the spring, summer, and fall he grills every chance he gets.  This salad is perfect in recreating the cheeseburger experience without eating the bun.

The first thing to do is to make a basic salad based on what you would put on a cheeseburger.  Here are the ingredients that I used.
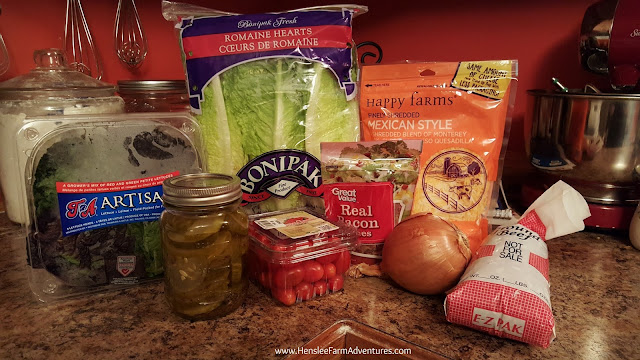
Salad Ingredients
If you want to be authentic about it, I would use iceburg lettuce shredded, and a red onion.  However, this is what I had on hand.  I love romaine and I also love to get the artisan lettuces that Aldi has, so since I had both, I used both.  Then I added cherry tomatoes (they were on sale), homemade dill pickles (lime pickles would also be yummy!), shredded cheese (any kind you like or have), and of course some bacon pieces.  You could also make it into a mushroom swiss burger salad by using swiss cheese and adding mushrooms to the mix. 

This looks yummy just like it is!
 After your salad is made and chilling in the fridge, then get your burgers ready to cook.  Since it is winter and extremely cold at the moment, I got out the stove top grill to grill up my burgers. It's not quite the same, but it's better than nothing!  You can find a great burger recipe here.  Or just season up your burgers how you wish.  Besides using my go to recipe, I also like to use Cavender's Greek seasoning.  A friend of mine got me started on this seasoning and it is great on hamburgers and steaks!

While your burgers are cooking, you can make the dressing.  The dressing is of course, what you would put on your cheeseburger. 

Dressing Ingredients
You will want to mix:
  • 1/2 cup of whipped dressing (or mayonnaise if you prefer)
  • 1/4 cup of ketchup (make sure and get a low sugar one if you like)
  • 3 Tablespoons of mustard
  • Salt and pepper to taste
You can see from the picture above that we used spice brown mustard.  I actually prefer Dijon mustard in this recipe, but I didn't have any on hand.  You can also use just regular table mustard.  If you would like you could also add in a little relish to your dressing as well, but we don't care for that.  If you want to play around with the amounts, go ahead.  Be sure and taste the dressing and adjust to suit your tastes.
 
Dressing, just waiting for that delicious salad.
All that is left is putting it all together.  I don't put the hamburger patties in the salad.  I like to put the salad on my plate, then the hamburger patty, and top it off with shredded cheese, bacon pieces, and the dressing.

So good!!!
This really is a great salad.  It is really good during the summer when you can grill the burgers outside and also grill some onions while you are at it.  

I hope you try this recipe out and let me know what you think!

Throw Back Thursday: Goulash

Thursday, November 19, 2015
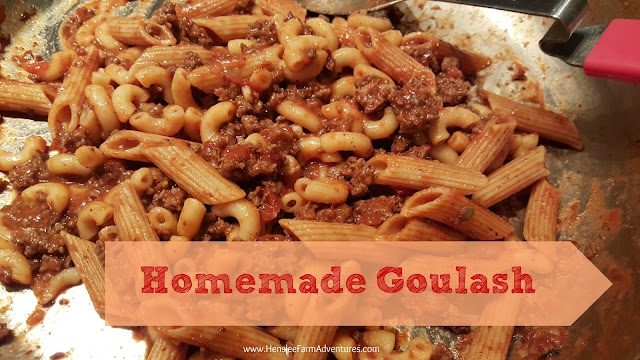
Homemade Goulash

I love today's post, because I get to share with you one of my family's favorite meals.  In fact, I believe this is probably the most requested meal that I get from my family.  It is also a dish that I grew up with, and one that is easy to make, and budget friendly!

My mom always called this goulash.  I know that there are other variations of goulash and I have tried a couple of those recipes, but I always come back to the variation that I grew up with. Well, kind of.  My mom made her goulash with hamburger meat, diced onions, elbow macaroni, and home canned tomato juice.  For us, I use my home canned pasta sauce so that there is a thicker sauce that already has spices added.

goulash ingredients
Goulash ingredients, yep that's all there is!
You can see from the picture above that there really isn't much to it.  The ingredients I use are:

  • 1 pound hamburger meat (this would be good with ground deer meat for you hunters out there)
  • 1 to 1 1/2 cups dry pasta, we prefer elbow macaroni, cooked according to package directions
  • 1 jar pasta sauce of your choice

For this recipe, we like to use elbow macaroni, but when I made it this time, I didn't have enough. You can see in my picture of the finished recipe that there is also penne pasta thrown in as well.  Remember this is my no grocery month, so I had to use what I had on hand.  The bowl in the picture has my homemade pasta sauce in it.  I opened a jar to use some for pizza, and needed to use the leftover sauce for something else.  This was the perfect dish to do that!

To make the goulash:

  1. Cook pasta according to package directions 
  2. While the pasta is boiling, brown 1 lb. of hamburger meat.
  3. After the hamburger meat is cooked through and chunked - my husband loves bigger chunks - add any spices you like.  I add a little minced onion (remember I'm using already seasoned sauce).
  4. Pour the pasta sauce in with the hamburger meat and let it simmer on low heat.
  5. When the pasta is done (I cook it to al dente), drain the pasta and add it to the sauce.

 And that's it!

Goulash
There almost wasn't any left to get a picture of it!
Once I finished cooking this batch, I set the pan on the table and went to get my camera to take a picture.  When I came back, there was hardly any left!  I had to scrap together a small pile just to get a picture. That is how much my family loves this dish!

I like to serve this with a salad and homemade french bread.  Of course some nights, we don't even bother with a veggie or bread, we just grab a big bowl of this pasta dish and enjoy.  This is comfort food at its finest!

Let me know in the comments below what you think of this recipe, and let me know if you have made this recipe before!


Mushroom Swiss Burger

Tuesday, October 20, 2015

Mushroom Swiss Burger

I know it has been a little while since my last post.  Life has happened and unfortunately some things had to be put on the back burner.  However, at Henslee Farm Adventures, we are trying very hard to get back to where we need to be, especially since winter will be here before we know it.

It seems strange to be talking about winter when we have had some absolutely beautiful days.  In fact the temp is supposed to be up to 80ºF today!  It is days like these that we like to take advantage of the nice weather and grill outside.  Steve's favorite meal happens to be burgers and fries.  Well this day he decided he wanted a mushroom swiss burger.  It sounded good to me, so I thought I would share with you how we make our mushroom swiss burgers.

First, I am going to let you in on a little secret of how I make my hamburgers.  I don't even tell Steve how I make them because he swears that plain is best.  So I secretly season the meat before cooking and of course he loves it!

Hamburger Ingredients
Burger ingredients
We use ground beef that we have had butchered.  Seriously folks, if you haven't tried grass-fed beef you need to.  Of course you can use just regular hamburger from the store.  And another kind that is really good is what my grocery store calls Boston Burger.  It is 60% beef and 40% pork.  This makes wonderful burgers and meatloafs!

To make the patties, I put 2 lbs. of hamburger in a bowl and add in 4 splashes of worcestershire, 2 tablespoons of mined onions, and 1 tablespoon of seasoning salt.  I mix this with my hand until just incorporated.  You don't want to over mix.

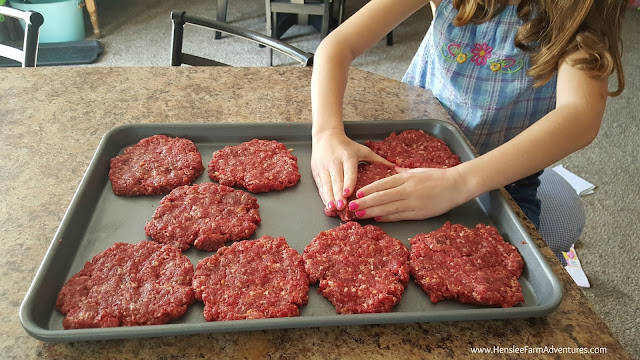
Making Hamburger Patties
Carly loves to help me cook!
You can see we make some pretty big patties.  There will be some shrinking, but if you make an indention in the middle, there will be minimal shrinking (I forgot to get a picture of the indention).  Then you grill to your taste.  We like ours medium well.

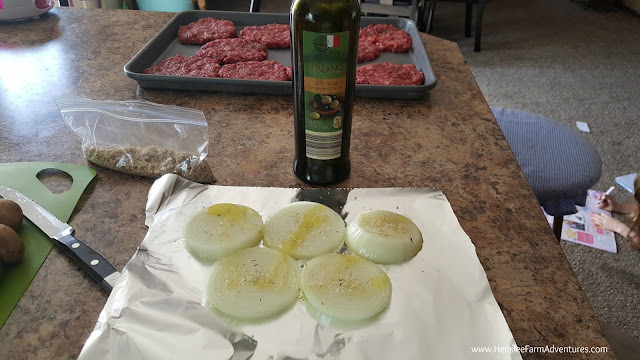
Usually while we are grilling, we take the opportunity to grill onions as well.  We love grilled onions!  I slice them pretty thick, put them on some foil and drizzle them with some extra-virgin olive oil.

Onions ready for grill
Onions ready for the grill
I also found some great seasoning at our local farmer's market.  The lady that makes it smokes her salt with applewood.  Man is it ever good!  She calls it Stove-Side seasoning.  You can use it on just about anything.  Besides the salt there are other things she puts in there.  It is definitely yummy!  You can also use just plain kosher salt, or a seasoning blend of your choice.  After I season the onions, I wrap them up in a foil packet and put it on the grill.  We do flip the packet after they have cooked about 10-15 minutes on one side.

Now for the mushrooms.  I have seen many recipes for the mushroom sauce for burgers, but I concocted one of my own with what I normally have on hand.

Mushroom sauce ingredients
My ingredients for mushroom sauce.
I know what you are thinking, it doesn't look like it would be that good, but trust me on this.  I lucked out and was able to get some mushrooms on sale at ALDI, one of my favorite places to shop!  Also the brown gravy mix I get at ALDI as well and love it because it does NOT have MSG in it.  I love this gravy mix for when I want a quick gravy, it is always so good and cooks up easy.

First I washed my mushrooms by wiping them off with a damp paper towel.  You do not want to submerge them in water because they will absorb the water and you will end up with mushy mushrooms (ha ha!) in the end.

After washing them, just slice them, not to thin because they will cook down.

Mushrooms in pan
Fresh mushrooms in the pan.
I add a little extra-virgin olive oil to my pan and put the sliced mushrooms in.  Then I took advantage of that smoked salt and seasonings and added a little bit of that.  I cooked this on medium heat.

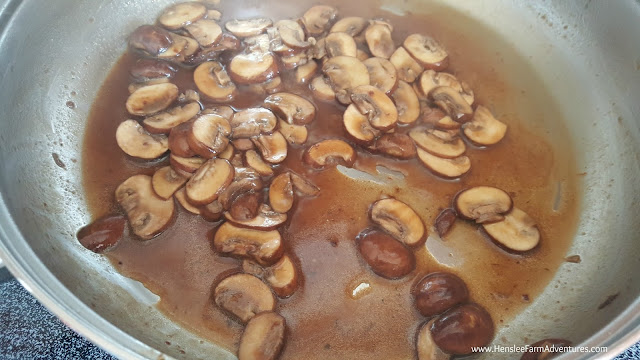
Mushrooms that have been sauteed
Cooked mushrooms
After they have cooked down to where they are soft (again I don't want mushy ones), then I am ready to season them.  I add in two splashes of worcestershire sauce, then I take about a 1/2 teaspoon of the brown gravy mix and sprinkle it over the mushrooms.  I cook it for just a minute more and then I have my mushroom sauce!  So easy!

Mushroom sauce for hamburgers
My mushroom sauce!
All that's left is to build my burger.  I of course got the swiss cheese at ALDI as well, I love their selection of cheeses!  Steve put the slice of cheese on the burger while it was still on the grill so that it would be nice and melty.

Mushroom Swiss Burger
My burger, nom nom nom
Here is my burger.  I of course had to add some grilled onions to it as well.  And let me tell you, it was so good!

Steve wanted me to share with you his burger so here it is...

Mushroom Swiss Burger with Tator Tots
Steve's burger, looks pretty good!
We decided to go with a side of tator tots instead of fries this time.

The burgers were awesome!  The mushroom sauce was perfect.  I hope you try it and let me know what you think in the comments below. 


Throw Back Thursday: Stuffed Peppers

Thursday, September 3, 2015

My #TBT recipe post is back!  I hope you all are as excited as I am.  The recipe I am sharing today used to be made by my grandma and my mom  when I was little.  My mom always loved it, but to be honest, I really never cared for stuffed bell peppers.  I just didn't like the cooked peppers.  Also the filling had rice in it and as a kid I didn't care for rice either.

So you might be asking yourself why am I sharing a recipe that I didn't like growing up?  Well because my tastes have changed and a couple of years ago, I came up with my own recipe for stuffed peppers that I loved.  In fact even the kids loved it! 

What I did different is halved the peppers and laid the halves cut side up and stuffed them that way.  I liked that because there wasn't as much pepper to eat.  I also omitted the rice and instead used some black beans and corn along with hamburger meat that I flavored with my taco seasoning blend and then added a little salsa.  I topped that with cheese.  It was wonderful!

Even though I love that recipe, it is not the one I am going to share with you today.  These stuffed peppers were actually made out of leftovers and more closely resemble my grandma's recipe that she used.  HINT: Once the peppers are assembled they can be frozen for later. 

So now on to the recipe.  Actually there really is no recipe for it.  I could have sworn that I had a written recipe for my grandma's peppers, but when I went to look for it I couldn't find it.  I do know that she would stuff them with browned hamburger, cooked rice, and homemade tomato juice.  Then she would cook them until the peppers were done.  So I based my recipe on that.

My ingredients...so glad I could make over my leftovers!

Here are my ingredients.  I had some leftover meatloaf that wasn't enough to feed all of us, but it was perfect for this dish.  Plus I thought the way the meatloaf was flavored would give the peppers a great taste.  I also had tomato juice left over.  This of course is my family's homemade version.  It is better than any tomato juice you can buy! If you don't have tomato juice on hand, you can always use tomato sauce, or even marinara sauce would be yummy.  I used a 1/2 cup of dry rice and three sad looking big peppers that I knew needed to be used very soon.

I started by preparing my peppers.  I cut them in half long-ways and removed the seeds and membrane.  I put them in a greased pan. 

Here is where I shaved off a piece on the backside so it would be stable.
Some of the peppers didn't want to "sit" very well, so I sliced off just a little of the underneath side so that they would be stable and wouldn't slide around or tip over. 

As I was preparing the peppers, I had already started cooking the rice.  After the peppers were ready and before the rice was done, I chopped the leftover meatloaf into a bowl.  Once the rice was done, I added it to the meat and then poured in some tomato juice, and mixed well.  You can see the consistency below.  I didn't want it too soupy, but moist enough so that when it baked, it wouldn't dry out.

Stuffed and ready to bake!

I then put this mixture into each of the peppers.  I just spooned it in and made sure not to fill it too full.  Once they were all full, I put the peppers into a 375°F preheated oven for 20 minutes.

After about 20 minutes, I removed the peppers and put a generous helping of grated cheese on top of each one.  Then I put them back in the oven and let them cook for another 10 minutes.

Depending on the size of the peppers and also how done you like them you may need to cook them a little longer.  I do not like the peppers mushy.  Thirty minutes was perfect for me.

These were even better than I thought!

The family loved these!  They were super easy to make AND I was able to use up leftovers which is always a plus in my book.  These lasted us two meals (supper and lunch the next day) which is also a big plus. 

So usually I have a recipe link that you can click on and print out, but for this one I don't have a recipe.  If you wanted to make it from scratch for a family of 4, here is what I think you could use:
  • 3 large or 4 medium size bell peppers
  • 1/2 pound hamburger, browned
  • 1/2 cup dry rice, cooked according to package directions
  • 1/2 cup tomato juice
  • 3/4-1 cup shredded cheese (however much you like)
Besides using leftover meatloaf like I did, leftover taco meat would be great as would leftover sloppy joe meat.  You could also add in a few veggies like I did in my original version (the mexican one)  to suite your tastes or to use up any leftover ones you may have. No matter what you do, these are sure to be yummy!

So let me know in the comments, have you had stuffed peppers and if so how did you make them?

Throw Back Thursday: Meatloaf!

Thursday, July 2, 2015


Who doesn't like a good meatloaf?  Okay, I can hear groans out there.  I really think that meatloaf gets a bad rap.  Meatloaf was a staple in our house when I was growing up.  It wasn't necessarily my favorite meal, but as an adult, I do like it.  What I find funny is that my 9-year-old actually asks for it.  When he does, I like to accommodate that request.  Plus, meatloaf can make some yummy sandwiches the next day for lunch!

Freezer full of hamburger...

My husband's uncle had to butcher a cow and we, along with my mother-in-law were the lucky recipients of some hamburger.  For our family that was an awesome gift!  We go through hamburger like you wouldn't believe, but this past year we have had to slow down because of the prices.  This is one reason why we are raising our own beef.  That and honestly the meat is so much better tasting, less fatty, and you know what your own cows have been eating and where they've been!

Needless to say we have been cooking a lot of ground beef recipes lately.  My meatloaf recipe is loosely based on my mother's recipe.  I find that my mother's meatloaf is a little too wet for my taste.  My mother-in-law's recipe is too dry.  After trial and error, I have come up with a recipe that our family really enjoys.  Feel free to take this recipe and adapt it to your tastes.  Really there is no limits to what you can do with meatloaf.

Note about recipe: there are some ingredients with no specific amounts given.  I usually hate recipes that do that so I apologize for giving you one, but some of the ingredients depend on your personal preference.

Holli's Meatloaf

1 lb. ground beef (chuck/round - whatever you prefer)
1 large egg
1 8oz. can of tomato sauce
1 small onion (or amount you prefer)
handful of italian breadcrumbs (I use this because it is already seasoned, if you use plain, then you may need to add some spices)
dash Worcestershire sauce (more or less to taste)
salt and pepper to taste
ketchup

1. Grate onion into a medium sized bowl. I like grating because you get the onion juice for flavor and then the onion itself is small so you are not biting into a big chunk.
2. Add the rest of the ingredients and mix with your hands.

Ingredients all ready to be mixed
3. Put the mixture in muffin tins - that's right a muffin tin, it cuts down on cooking time and makes perfect portion sizes!
4. Top with ketchup if desired.

Ready to put into oven
5. Cook at 350 degrees Fahrenheit for 20 minutes or until down.
Enjoy!

Get the printable recipe HERE

I would love to hear what you think about this recipe.  Please let me know below!
©HensleeFarmAdventures.com. Powered by Blogger.

Search This Blog

Back to Top